Ano. I po ukončení studentského i zaměstnaneckého vztahu můžete mít zájem být s institucí dál v kontaktu. Nadále funguje vaše učo a heslo pro přístup, e-mailová schránka a možnost
používat různé komunikační agendy (Vývěska, Diskuse, ...). Možnosti některých agend mohou být omezené.
Smyslem zachovaného přístupu do IS VŠTE je například
umožnit Vám kontakt s bývalými spolužáky či spolupracovníky,
umožnit Vám snadno podat přihlášku k dalšímu studiu ,
umožnit Vám přístup k výukovým materiálům (Vaše studijní výsledky, studijní materiály ap.).
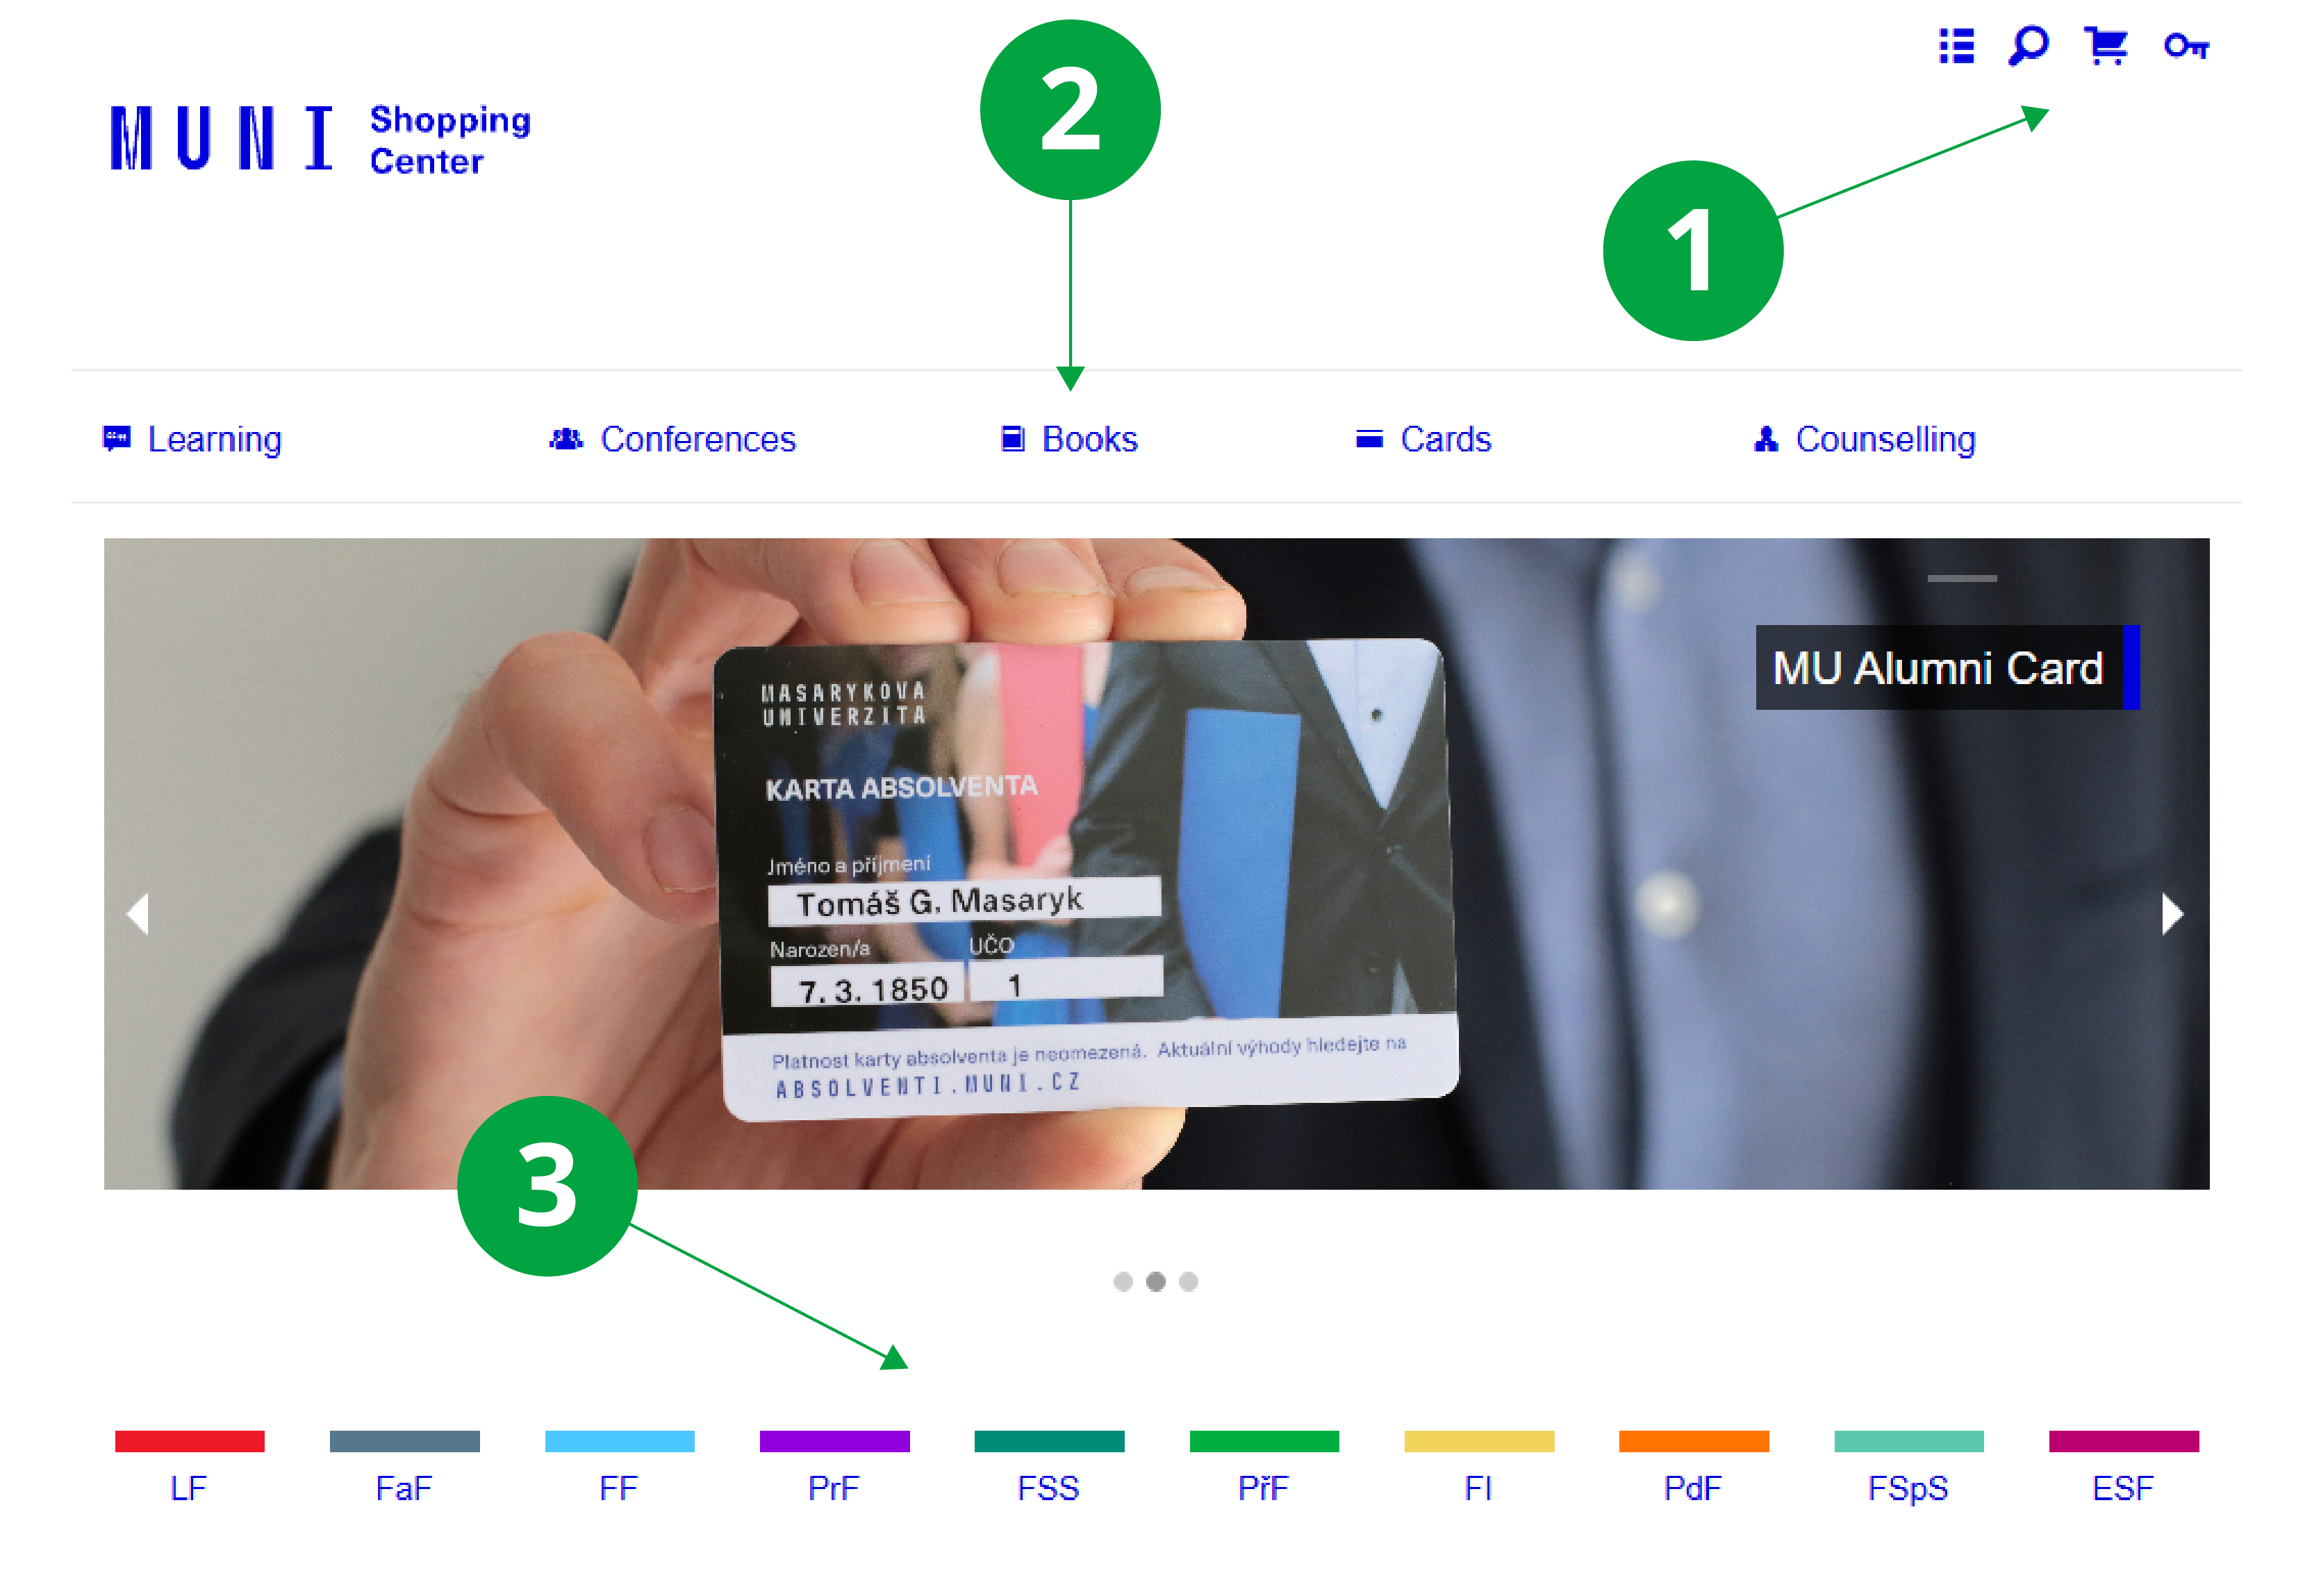
Absolventi mají v IS VŠTE dostupný rozcestník Absolvent, na kterém jsou soustředěny komunikační agendy a informační zdroje, o kterých lze předpokládat, že mohou být pro absolventa užitečné.
Informační systém Absolventi
Absolventi obecně mohou mít přístup k určitým aplikacím či funkcím IS VŠTE, ke kterým nemají přístup jiní neaktivní uživatelé (bývalí pracovníci či neúspěšní studenti).
Do Absolventské sítě byli zařazeni všichni absolventi Úspěšní absolventi školy mohou za
účelem udržení či navázání kontaktu s bývalými spolužáky využívat služeb IS VŠTE pod výše zmíněným rozcestníkem.
Je žádoucí, aby absolventi aktualizovali svou Osobní stránku – doplnili na sebe kontakt a další informace, mohou si např. aktualizovat fotografii. Podrobnosti o možnostech lze najít
v nápovědě: Lidé.
Absolventy lze z hlediska způsobu setkávání se s lidmi ve škole zhruba rozdělit do dvou typů: absolventi starší nebo absolventi malých oborů cítí spřízněnost se svým studijním
kruhem – skupinkou spolužáků, která společně absolvovala většinu výuky. Tyto promoční kruhy lidí jsou v IS VŠTE předvyplněny a pro komunikaci v rámci nich se používá agenda Kruhy lidí (nápověda Kruhy lidí).
Absolventi velkých oborů a ti, kdo zažili kreditové, studentem řízené studium, zpravidla nemají úzkou vazbu na svůj určitý kruh, ale během studia navázali různé vztahy s různými spolužáky a
dalšími osobami na škole. Tito absolventi si mohou vytvořit seznam tzv. Mých známých, informovat je o svém životě prostřednictvím blogu Vzkazy pro Mé známé a odebírat e-mailem informace o
změnách, které tyto sledované osoby učinily v IS VŠTE.
Uživatelé, kteří nejsou aktivní studenti či zaměstnanci, si mohou v aplikaci na změnu hesla nastavit tzv. kontrolní otázku pro případ zapomenutého hesla. Zdaří-li se jim zadat na ni
v takové situaci správnou odpověď, IS VŠTE jim zašle nové heslo na e-mail, kam mají z IS VŠTE přesměrovanou poštu. Doporučujeme si otázku nastavit.
Informační systém Absolventi (Správa) Změna hesla a kontrolní otázky
V aplikaci Moji známí svým známým můžete zveřejňovat nejen některé informace o sobě, ale také vás může zajímat, co v IS VŠTE dělají. Aplikace Aktivita vám proto poskytuje přehled
některých jejich operací v IS VŠTE, např. přidání další osoby mezi známé vašeho známého nebo změna údajů na Osobní stránce vašeho známého. Přehled aktivity najdou osoby působící na škole pod
rozcestníkem Setkávání:
Informační systém Setkávání Aktivita
a absolventi školy pod rozcestníkem Absolventi:
Informační systém Absolventi Aktivita
Absolventi navíc mohou sledovat aktivitu i v jednotlivých svých kruzích, mohou si ji nechat zasílat e-mailem, klidně v každém kruhu s jinou frekvencí. Ze souhrnu aktivity se tak mohou
dozvědět o vstupu nových členů do Kruhu, nových příspěvcích v Diskusi, změnách na Osobních stránkách členů Kruhu, o nových příspěvcích na Nástěnce nebo např. nových fotkách na stránce Kruhu Náš
web apod.
Pokud určité aktivity nevidíte, znamená to, že vy nebo vybraná osoba (příp. oba) máte u těchto aktivit zakázané zobrazování. V tomto případě platí reciprocita, pokud zakážete zobrazování nějakého typu Vaší aktivity, neuvidíte tento typ aktivity ani u ostatních lidí.
Hodí se, abyste nemuseli každý den kontrolovat aktivitu vašich známých. Lze nastavit pravidelné zasílání informací o novinkách. Nastavení frekvence zasílání aktivity provedou osoby
působící na škole v aplikaci:
Informační systém Setkávání Aktivita
a absolventi v aplikaci:
Informační systém Absolventi Aktivita
kde kliknou na odkaz „změnit“ v řádku Zasílání souhrnu informací e-mailem. Tamtéž lze zasílání aktivit e-mailem i vypnout.
Podobně lze nastavit zasílání aktivity i jednotlivě v každém kruhu zvlášť.
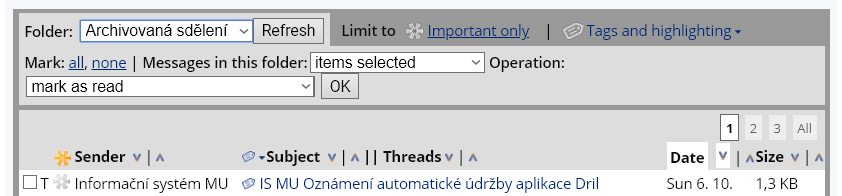
Archivovaná sdělení jsou trvale uložené kopie vybraných důležitých zpráv, které jsou z IS VŠTE posílány jeho uživatelům. Archivované sdělení bude
v systému uživateli trvale dostupné pro případ, že např. zpráva na uživatelem nastavenou adresu přesměrování nepřišla, či když si zprávu uživatel
v poštovní schránce smazal.
K archivovaným sdělením má přístup i odesílatel, aby si mohl ověřit a měl jistotu, že sdělení skutečně adresátovi dorazilo. K archivovaným
sdělením studijní povahy mají opět z důvodu ověření přístup i studijní referenti.
Archivují se některá sdělení automaticky zasílaná Informačním systémem VŠTE a hromadné zprávy rozeslané prostřednictvím aplikací
Záznamník učitele, Studijní a Přijímací řízení, u kterých byl při rozesílání zaškrtnut příznak „toto sdělení archivovat“.
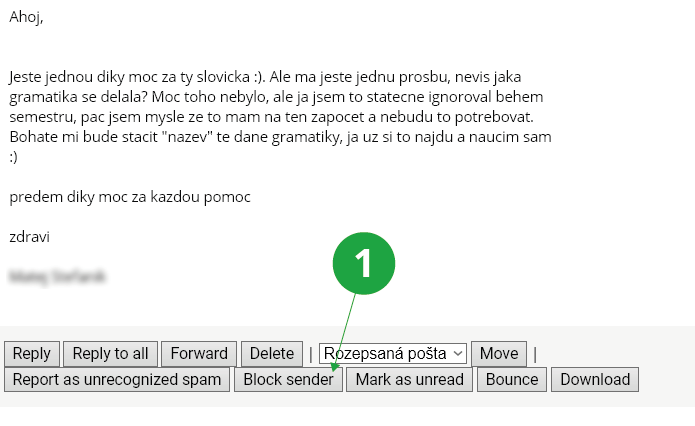
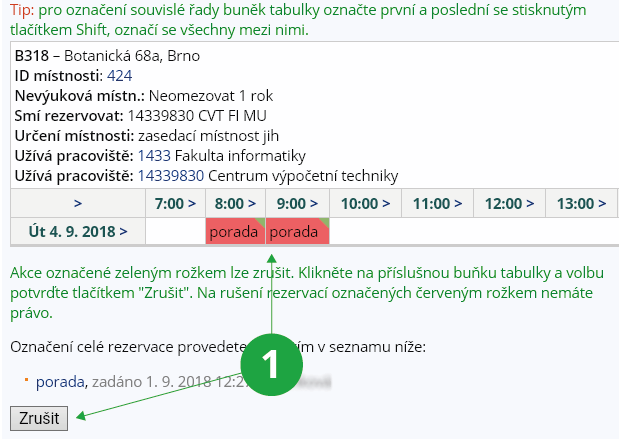
1 Pro archivaci dopisu zaškrtněte.
Tato sdělení se studentům ukládají jak do přijaté pošty, tak do zvláštní složky Archivovaná sdělení, odkud je nelze smazat.
Ve zprávách lze také vyhledávat, a to prostřednictvím aplikace Archiv sdělení (viz otázky níže). Díky tomu mohou učitelé i referenti kontrolovat,
jaké dopisy a komu odeslali a snadněji tak řešit stížnosti studentů na nedoručení určitých zpráv.
Note
Z aplikace Přijímací řízení se archivují zprávy pouze pro ty příjemce, kteří již mají učo/schránku v IS VŠTE, tj. mají přihlášku založenou autentizovaně.
Informační systém Učitel [výběr předmětu] (Studenti) Archiv sdělení
kde máte přístupné všechny archivované zprávy odeslané studentům vašich předmětů. Vyhledávání je omezeno na předmět a období, které máte vybráno
v Záznamníku učitele. Toto omezení můžete zrušit volbou „Zrušit omezení na vybraný předmět“ vedle tlačítka „Vyhledat“.
V aplikaci můžete vyhledávat např. podle data odeslání, adresáta, předmětu sdělení apod.
1 Možnosti omezení vyhledávání, například zadání konkrétního adresáta.
Na přesné znění zprávy pro vybraného studenta se můžete podívat kliknutím na odkaz „Zobrazit text zprávy“ v sekci Příjemci.
1 Zobrazení textu zprávy.
Školitelé mají k archivovaným sdělením přístup přímo z agendy Školitel.
Informační systém Studijní (Hromadné dopisy) Archiv sdělení
kde máte přístupné všechny archivované zprávy zaslané všem studentům fakulty včetně již neaktivních studentů. Máte k dispozici jak zprávy
zasílané automaticky systémem, tak zprávy, které odeslali a archivovali úředníci v agendách Studijní a Přijímací řízení, tak i zprávy, které
odeslali s archivací vyučující při použití Záznamníku učitele.
Do aplikace můžete vstoupit se skupinou studentů vybranou hromadným výběrem.
V aplikaci můžete vyhledávat např. podle data odeslání, odesílatele či adresáta, předmětu sdělení apod. Upřesnit vyhledávání můžete také pomocí
kódu požadovaného předmětu – hledáte-li sdělení týkající se předmětu, např. odeslané učitelem ze Záznamníku učitele.
Výběr dle pracoviště má význam pouze pro hledání zpráv zaslaných z agend Studijní a Přijímací řízení.
1 Možnosti omezení vyhledávání, například podle pracoviště.
Na přesné znění zprávy pro vybraného studenta se můžete podívat kliknutím na odkaz „Zobrazit text zprávy“ v sekci Příjemci.
Vyhledávat můžete také pomocí štítků, které se ke každé odeslané zprávě přiřazují automaticky. Přehled štítků, podle kterých
lze vyhledávat, najdete pod vyhledávacím formulářem po rozkliknutí odkazu „Omezit vybraná sdělení pomocí štítků“. Štítky mohou mít i další
podúrovně, např. štítek „předmět“ může mít podštítek „termín“ apod.
1 Možnosti vyhledávání pomocí štítků.
Pro vyhledávání pomocí štítků v předmětech je nutné mít vybranou požadovanou fakultu a období v záhlaví stránky.
Blog je pravidelně či nepravidelně publikovaný "deníček" na Internetu, kde se autor či skupina autorů zabývá určitým tématem, nebo informuje o událostech ze života. Blogů existuje v
Internetu více než 100 miliónů, proč si jej tedy zakládat v IS? Protože IS zajistí, aby si ho mohli přečíst pouze lidé, kterým dáte právo blog číst. Můžete ho zveřejnit komukoli v Internetu
nebo jej omezit např. přímo na určité osoby.
Blog v ISu je tvořen příspěvky autora a komentáři jeho čtenářů, případně autora.
Ve formuláři je potřeba zadat alespoň název a zkratku blogu pro url a také upřesnit, kdo může blog číst. Vhodné je doplnit popis blogu - čemu se bude věnovat, komu je určen atd., dále
můžete přidat moderátory blogu (budou moci měnit nastavení) a nastavit, kdo může kromě čtení blogu příspěvky i komentovat.
Ostatní blogy, které máte právo číst, naleznete pod rozcestníkem
Setkávání Blogy .. Všechny
Blogy jsou rozdělené na osobní a skupinové. Dále se vypisují blogy s vysokým hodnocením příspěvků, blogy ve skupině Moje blogy, blogy zařazené mezi vaše Sledované a Nové blogy.
Můžete vyhledávat příspěvky ze všech vám přístupných blogů, a to buď podle slova, které má příspěvek obsahovat, nebo podle autora příspěvku
Setkávání Blogy .. Všechny
nebo
Absolvent Celoškolní setkávání .. Blogy
na konci stránky, v sekci Vyhledat příspěvky.
Další možností je vyhledávání příspěvků pro náročnější uživatele. Vstupte do blogu a volbou 'Vyhledávání' vpravo nahoře zobrazte formulář, kde vepíšete hledaný výraz, zvolíte, zda
vyhledávat v daném blogu či ve všech a potvrdíte kliknutím na "Vyhledat příspěvky".
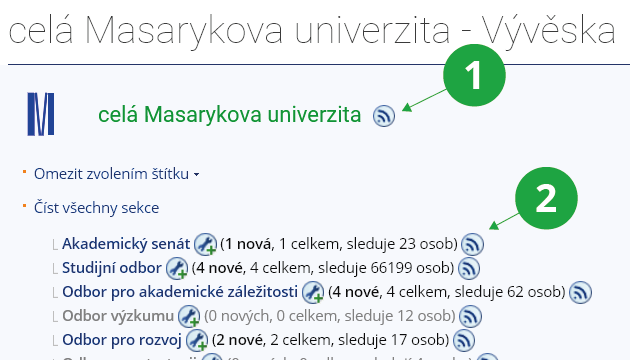
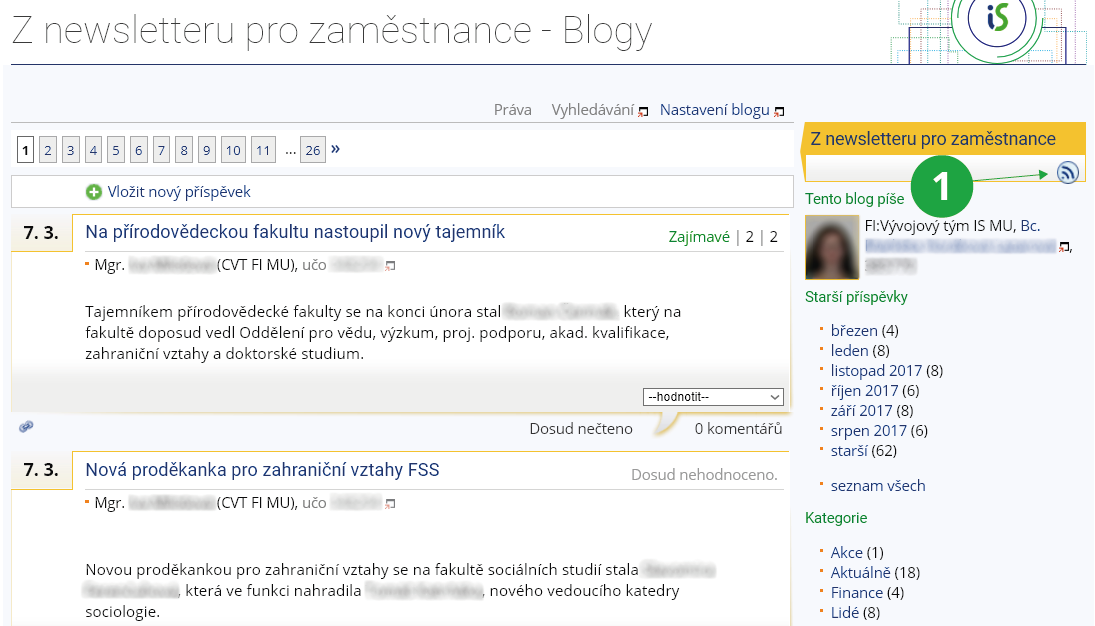
Prostřednictvím RSS můžete odebírat nové příspěvky z Blogů. Odebírat můžete jak příspěvky (včetně komentářů) z celého blogu, tak jen komentáře z konkrétního příspěvku.
[1] odběr příspěvků z celého blogu
[2] odběr komentářů z příspěvku
Více informací o RSS najdete v této Nápovědě.
Komentáře v blogu jsou reakce na příspěvek v blogu. Komentáře mohou přidávat osoby, jimž moderátor nebo autor blogu přidal v nastavení blogu právo komentovat. Právo lze přidělit na
celé skupiny, např. i kohokoli v internetu, či jen na určité jednotlivce.
V nastavení blogu lze zadat i datum, dokdy je možné vkládat příspěvky. Systém po uplynutí tohoto data automaticky sám právo komentovat odebere.
Vstupte do svého blogu. Volbou 'Práva' vpravo nahoře zobrazte formulář, zadejte učo nebo dohledejte osobu, které chcete zakázat komentování, a
potvrďte tlačítkem "Zakázat přístup".
Chcete-li číst jen kvalitní příspěvky z blogů, pak je hledejte
Setkávání Blogy .. Všechny
nebo
Absolvent Celoškolní setkávání .. Blogy
v sekci "Vysoce hodnocené příspěvky".
Hodnotit příspěvek lze volbou z roletky ve spodní části příspěvku. Výběr nabízí hodnocení Vtipné, Zajímavé, Informačně přínosné, Otravné, Mimo téma a Nemám názor.
Je-li vyplněna anotace příspěvku, zobrazuje se na stránce blogu pouze tato anotace. Není-li vyplněna anotace, zobrazí se celý příspěvek, i když je text příspěvku dlouhý.
Pokud už však byl dlouhý příspěvek dříve přečtený, zobrazí se nevýrazně jen jeho úvodní část. Celý text zobrazíte volbou 'celý příspěvek' v levém dolním rohu příspěvku, nebo kliknutím na jeho
název.
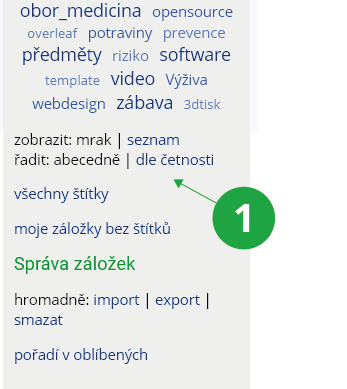
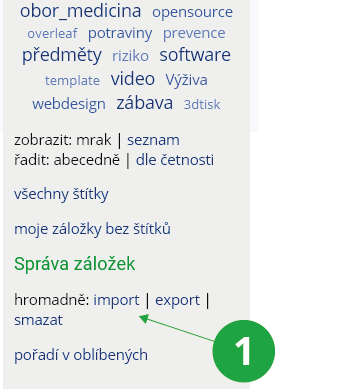
Sem si může vlastník blogu přidávat odkazy na blogy nebo jiné stránky, o které se chce podělit se čtenáři svého blogu. Seznam odkazů vytvoříte jednoduše pomocí aplikace Záložky.
Vytvořte si záložky v ISu a přidejte jim štítek vašeho blogu. Každý blog má svůj jedinečný štítek ve tvaru např. blog8882287, který naleznete v pravém sloupci vašeho blogu v textu
zelené mininápovědy.
Tip: návod k vytváření záložek naleznete v nápovědě
Discussion forums are an agenda that allows users to communicate with a larger group of people. IS VŠTE operates several types of discussion forums:
Course-related discussion forums
For topics related to the teaching of a specific course. The teacher decides whether it is mandatory to keep track of the forum.
General discussion forums (faculty-wide and university-wide)
For general school-related topics. It is not obligatory to read them.
Note
The discussion forums are for discussion. Do not post e.g. challenges, invitations or advertisements in them; that is what the Noticeboard is for.
Topic-based discussion forums
Topic-based discussion forums are set up by users who have a serious long-term discussion intention. It is not obligatory to read them.
Off-topic discussion forums
Relaxation discussion forums may include topics unrelated to the operation of the school, as long as the content or manner of discussion does not bring VŠTE into disrepute.
A course-related discussion forum is automatically created for each course taught in a particular semester. Only teachers of the course and students enrolled in the course can contribute to the forum. Students can use the forum without the teacher's involvement. The settings of the course-related discussion forum cannot be changed.
You can access the course-related discussion forum via:
The Information System Discussion Forum Course-related
If the post is related to the course, post it in the course-related discussion forum. It is not desirable to overwhelm other discussion forums. Such posts will be deleted elsewhere by the system administrators.
The teacher may set up topic-based course-related discussion forums within the course.
The Information System Teacher [course selection] (Students) Discussion Forum
In the section "Start a thematic discussion forum under the selected course(s)", click on the link with the name of the course and enter the form, where you fill in the data necessary to create a discussion forum and its settings. The teacher usually explains the purpose and rules for using the discussion forum in the header. The teacher can restrict the ways of contributing to the discussion forum in various ways. Topic-based course-related discussion forums are used for e-learning, i.e. it may be mandatory to post certain posts in the discussion forum in a timely manner or to rate others' posts, etc. – all according to the teacher's instructions.
If the teacher does not force this forum to be tracked by students (see question Teacher: What is the purpose of the "Force forum to be tracked by students" option?), students can find it in the application:
The Information System Student Teaching (E-learning) Discussion forums – courses
Discussion forums are listed under a given course, similar to a general course-related discussion forum.
General discussion forums are used to communicate topics that may be of interest to most users.
Off-topic discussion is used for relaxation purposes. Start a thread in off-topic discussion forum if you want to chat, basically it doesn't matter who you chat with. Start a thread in the general discussion forums if you want to solve a specific problem, are interested in a serious debate on an issue related to the operation of school, want to have a discussion on a topic, etc.
A user creates a topic-based discussion forum if he/she has a serious long-term intention to communicate on a topic, wants to moderate the discussion forum and set the rules. In the header of the forum, the user defines the purpose of the forum and the rules of communication.
For topic-based discussion forums, access rights can be used to define who can read the forum, who can post, and who the moderators are. A topic forum is therefore also suitable for cases where you need a closed discussion (e.g. people working together on a project, employees of a certain workplace, etc.).
1 You can find your topic-based discussion forums and a list of your followed discussion forums in the "Topic-based" menu.
The topic-based discussion forum can also be made available to anyone from the Internet (for reading and contributing). You can create your own discussion forum using
The Information System Discussion forums Topic-based Start a new topic-based group (below)
1 Click on the link to access the form for creating a topic-based discussion forum.
Fill in and select the forum parameters (name, rating, reading and posting restrictions, moderators, rights). Click "Save" to create the forum.
It is the duty of the discussion forum moderator to prevent any potential damage to the reputation of the schooly by the content or manner of communication in the discussion forum.
Within each post, you can select the most appropriate rating for the post on the top right to help other readers better navigate the posts. The total score, the number of ratings and the prevailing rating are instantly recalculated (in the top bar of the rated post).
The Information System Teacher [course selection] (Students) Discussion forum
In the "Discussion forum of courses (and their seminar groups) taught this term" section, click on the name of the course-related discussion forum. Next to the list of threads, under the tooltip icon, you can find a menu and the option "Force students to follow the group", which will add the discussion forum to students' followed discussion forums. This will make it easier for them to access this course-related discussion forum.
1 In the menu under the tooltip icon, you will find an option to force a specific course-related discussion forum on students.
Tip: Only topic-based course-related discussion forums can be forced
The function can be used exclusively for course-related topic-based discussion forums. General course-related discussion forums cannot be forced on students.
Select the discussion forum or thread from which you want to be notified of new posts, and use the at sign icon to turn on sending posts by email. Discussions will also be added to the list of followed (i.e. favourite) discussions.
1 You can use the icon to turn on or off the email forwarding of new posts.
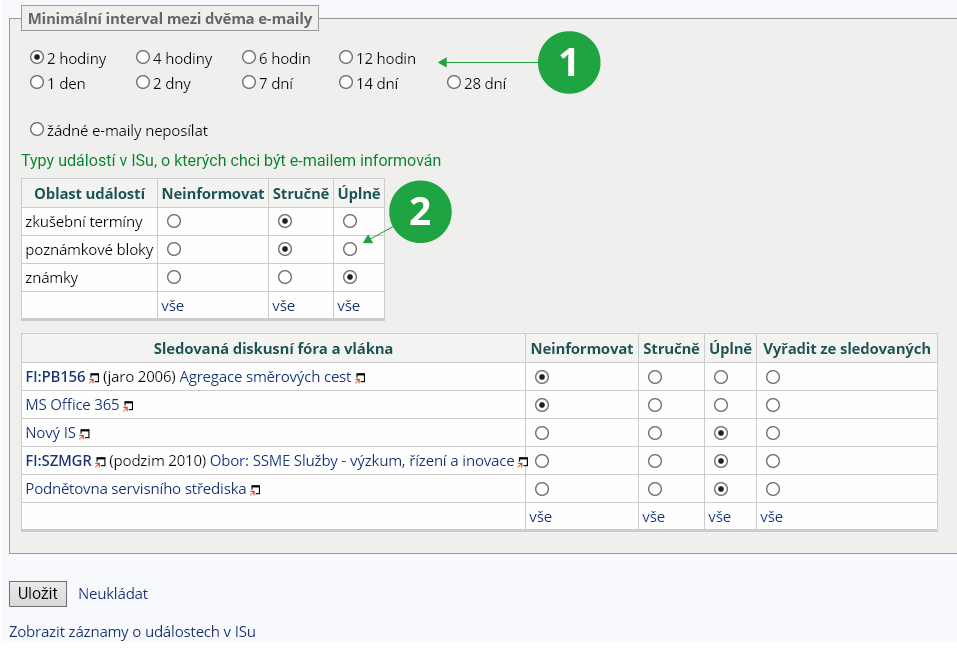
More detailed settings for sending an email (whether it will be brief, complete or at what interval) can be selected in the Events application:
The Information System System System settings Events Configure email notification for IS events
Yes, you can mark a post in the discussion forum with an asterisk, which can be found next to the "Reply" button.
1 Starring a particular post will put it in your favourites list, so you can return to it later.
An overview of the posts marked with an asterisk can be found on each page of IS VŠTE in the upper right corner under the asterisk icon. When a post expires in the discussion forum, the asterisk will be deleted and the post will no longer be available in the overview of marked posts.
The forums aim to facilitate meaningful communication at university. The netiquette described here must be followed. If you seriously and repeatedly violate the rules, you may be denied access to the discussion forums or may be subject to disciplinary action for violating the rules and guidelines.
Discussion forums are divided into threadhs. The person who starts a thread is the owner. of the thread. The owner clearly defines the topic of discussion in the thread title. In Discussion Forums you are obliged to stick to the topic (so called being on-topic). It is forbidden to make posts with little informational value (called chatting).
The thread owner may delete posts, that violate the rules described here. The thread owner is the authority who decides what level of discussion they want to have in the thread. Do not contact the system administrator to protest the deletion of a post; if you feel restricted, start a competing thread. What discussion is "proper" is highly subjective.
The thread owner function is exercised outside the course-related discussion forums. On a course-related discussion forum, only the course teacher may delete an entire thread or sub-thread.
VDiscussion thread branches automatically disappear after one month without new posts (does not apply to course-related discussion forums). A post cannot be deleted by the author if it has already been responded to (but can be edited). Posts may be deleted by the thread founder. Authors are automatically notified by email when posts are deleted.
Use the course-related discussion forums for posts on specific courses of study. It is not the responsibility of students, faculty, or school officials to read or respond to posts here.
Rules for using the Discussion Forums
form and content of the post
Do not violate the laws of the Czech Republic, including the Copyright Act (Act No. 121/2000 Coll., on Copyright, on Rights Related to Copyright and on Amendments to Certain Acts, as amended; hereinafter referred to as the "Copyright Act"). Contribute primarily in Czech (Slovak). Write in English only if there is a reason (e.g. you are inserting a copy of the English text). If you post in another language for a compelling reason, include a brief translation into Czech (exception – conversational foreign language threads in course-related discussion forums).
Do not post challenges, invitations or advertisements in the discussion forum, that is what the Noticeboard is for.
Do not use CAPITAL LETTERS, it gives the impression that you are shouting. Don't be vulgar.
concise title/subject of the post
It is very important to give a concise title, so that it describes what the post is about and others can better navigate. Do not use headings like "Help", "Question", "Problem", "Advise".
copying posts
Do not copy posts from another thread, system or private mail unless you are sure the author agrees. It is appropriate to explain the context of the original post.
repeating a post in multiple threads – crossposting
Don't post in multiple threads at the same time, save others time.
posts with little informational value
Formulating a simple agreement, disagreement, amusement, etc. with a post containing a mere abbreviation (e.g. comma, hash, LOL, smiley face) is prohibited. Express this via a positive or negative rating of the post.
chat posts and threads, chatting
For chat posts and threads, there are off-topic discussion forums. Please respect the readers who don't have time to read the chat threads.
discussion topic – on topic/off topic, fair use
Stay on topic. Don't bother others. If you are reprimanded, comply. Do not address any disputes with the thread owner directly in the thread.
Don't post an unrelated comment, or various P.S. If someone responds to an unrelated comment, they will start an off topic subthread.
thread moderation
Try to keep the level of discussion as high as possible. Do not limit the plurality of opinions. Penalize (by reprimanding and deleting posts) diversions from the topic. Penalize violations of the rules. Answer questions from contributors when you can. Even a chat thread can be monothematic – use examples to inform contributors of the level of off-topic and information ballast that is acceptable to you. The thread is your calling card, take care of it so people like to visit it.
The moderator of the discussion forum has the duty to prevent any possible damage to the reputation of the school by the content or manner of communication in the forum.
rights of system administrators
The administrators of the system reserve the right to make any interventions and changes aimed at better fulfilling the mission of the Information System - ensuring quality communication on university. The administrators will delete posts (including any responses to them) that do not comply with the rules. Administrators may prohibit those who repeatedly violate the rules from posting to the Discussion Forums and Off-topic Discussion Forums.
If you have a thread with more than one post displayed on the page, the area to the left of the post is used to remind you of the parent posts to help you navigate the discussion more clearly.
1 In the area to the left of the post, there are active mouseover points.
2 The parent post is used here to serve as a reminder of the topic being discussed.
The post can be edited using the tooltip icon. Select "Edit the post" in the menu displayed and confirm the edit by clicking "Save". You can cancel a post as long as there are no responses to it. To cancel a post, select "Delete post". The owner of a thread in a non-course discussion forum can cancel (entire sub-threads) at any time, in a course-related discussion forum only the teacher can do this.
It's only appropriate to edit the meaning of a post in a more fundamental way shortly after it has been posted, otherwise you confuse readers who have already read it (it is marked as read for them). Later on, you should rather make a new post.
If you want to cancel an entire discussion forum, you can only do so for the Topic-based Discussion Forum. To cancel a discussion forum, click on the tooltip icon at the top of the row next to the discussion forum name and select "Discussion settings", then at the bottom of the form there is an option to "delete this forum". To avoid confusing readers, it is not advisable to delete a forum if they have already contributed to it. Only the discussion forum owner has the right to cancel the discussion forum.
Click on the tooltip icon next to the post and select "Mark as unread" in the menu that will pop up. What is this operation for? For example, if you want to respond to a post later and you don't want to search for it among the unread ones.
You can insert mathematical formulas using the HTML editor with the "Insert mathematical formulas" function. They are entered in TeX typesetting system.
1 The "Insert mathematical formulas" function allows you to insert mathematical formulas using TeX typesetting system.
The Information System Discussion Forums Topic-based Start a new topic-based group
just check the option "list on the discussion forums main page" in the settings. The discussion forum will appear among new discussion forums in the Topic-based section if it is set to anyone logged in to IS or anyone from the internet has read access.
1 Check the option in the settings to display the discussion forum on the front page of the topic-based discussions.
Start a thread, make the first post. After saving it, you have the option "Pin thread to top" after clicking the tooltip icon – all threads marked as such will be displayed first in the discussion forum. This option is only available to the moderator (i.e. the teacher in course-related discussion forums). The option can also be enabled later, again for the first post of a thread.
To prevent posting and editing, threads in topic-based and course-related discussion forums can be locked. Locking/unlocking can be done by the thread founder or discussion forum moderator (or teacher in the case of a course-related discussion forum) at the top level of the thread by clicking on the "Lock the thread" option in the tooltip menu. Only threads that have at least one response can be locked. Locked threads can still be read by users.
The discussion forum can be used for students to submit assignments, such as short comments on a topic. The teacher has the opportunity to score these posts and count them towards the student's overall grade.
Setting up a topic-based discussion forum for submitting assignments:
Enable scoring.
A field will then appear next to the posts for entering the number of points. This will be saved in a notebook with the same name as the discussion forum name. In addition to the course teachers, discussion forum moderators can also score posts.
If you don't want students to be influenced by their classmates' contributions at the beginning of the discussion, choose the option "posts can only be read by those who have made at least one contribution to the discussion".
If it's just a collection of short statements and not for further discussion, choose "everyone can only make one post".
If students are asked to write a text of a certain length, select the option "display the number of characters and words for posts".
1 Text field for entering the scoring of the post. Both points and verbal evaluation can be entered, both will be transferred to the notebook. Only the moderator of the discussion can see this field.
Tip
In the header of the discussion forum, tell students the rules of communication (activity is required, but not at the expense of quality; peer evaluation of contributions is intended to create a quality and useful discussion).
Create a new topic-based discussion forum in the course, and put the topic of discussion and evaluation conditions in the header.
Setting up a topic-based discussion forum for scored student discussion:
Enable scoring. A field will then appear next to the posts for entering the number of points. This will be saved in a notebook with the same name as the discussion forum name. In addition to the course teachers, discussion forum moderators can also score posts.
Leave the disable mutual rating by participants option unchecked. You can further use student ratings of posts, for example to add bonus points to posts with the highest ratings.
Tip
A scholarly and fruitful discussion on a given topic does not usually develop in a course by itself. It may be necessary to set good rules for discussion, to score contributions, to give feedback to students and also, for example, to set a limited period of time when discussion can take place (e.g. a week before a seminar where the topic will be followed up).
Students have a course discussion forum in each course. If a discussion is sparked here (e.g. on homework) or encouraged and sparked by the teacher or lecturer in the course, it is possible to set up the possibility to score students' posts in this discussion. The points and any verbal comments are saved in the students' notebook.
In the course discussion forum
The Information System Discussion Forum Course-related [selected course]
at the top of the list of all threads under the tooltip icon, select the discussion settings option:
1 At the top of the list of all threads under the tooltip icon, you will find the settings for the entire course discussion.
The scoring option settings will appear and you can enable the scoring. A text field will then be displayed below each post for all course teachers to evaluate. This will be saved in a notebook with the same name as the discussion forum name. Students will not see this notebook and the evaluation. If you want to make this feedback available to them, select "students can view the notebook".
1 When scoring is enabled, fields for entering evaluations or scores appear in the discussion and are saved in the notebook.
In the course discussion forum of a course you are enrolled in, you can switch the semesters in which the course was taught and access discussions from earlier periods.
1 Switching semesters in the course discussion forum.
Posts expire (disappear). In the Discussion Forums, posts that have not been responded to for one month disappear. In the Off-topic Discussion, posts that have not been responded to for two weeks are disappearing. The discussion forums archive can be searched using the search box on the front page of the discussion forums.
Komentáře jsou krátké, veřejné vzkazy uživatelů IS VŠTE k jiné osobě, jejichž počet se zobrazí na její Osobní stránce. Slouží k vyjádření vztahu k
dané osobě, nebo ke sdělování informací o této osobě ostatním uživatelům (spolužákům, známým), pokud osoba není v Absolventské síti a nepoužívá IS VŠTE, aby
si ostatní mohli vytvořit představu o této osobě.
Komentáře neslouží ke kontaktování osoby, k tomu použijte např. e-mail nebo jiné kontakty uvedené na její Osobní stránce. Komentáře, které budou
porušovat pravidla (např. vulgarismy, vzkazy, které chápe pouze adresát či vzkazy bez informační hodnoty pro ostatní uživatele), budou smazány správci
systému.
Ano, můžete. Osoba, která komentovala a osoba, která byla komentována, může komentář kdykoli smazat. Jakmile uložíte komentář k osobě,
zobrazí se vám na konci stránky spolu s možnostmi:
smazat komentář
Budete znovu dotázáni, zda chcete komentář smazat. Volbu potvrďte.
editovat komentář
Zobrazí pole pro editaci komentáře. Přepsaný komentář opět uložte.
Smyslem agendy je umožnit akademické veřejnosti, zejména zaměstnancům, spravovat svoje kontaktní údaje, tj. telefonní číslo na pracoviště, umístění pracovny, eventuelně e-mail. Informace lze měnit formou podání elektronické žádosti (formuláře s vyplněnými upřesňujícími údaji), kterou zanese/upraví/odmítne pověřená osoba s přístupovým právem k_kontakty.
Dále se touto agendou spravují seznamy místností v budovách; pro potřeby rozvrhu a rezervace učeben.
Výstupem agendy jsou:
informace na autentizovaných osobních stránkách Lidé na VŠTE,
informace na neautentizovných (světu dostupných) stránkách Lidé na VŠTE, pokud uživatel zveřejnění povolí,
seznamy telefonních čísel a místností dle jednotlivých pracovišť jak pro zobrazení na webu, tak v tištěné podobě.
Obsahem agendy jsou zpřesňující informace o pracovištích VŠTE.
Je určena zaměstnancům, studentům doktorského studia, příp. dalším studentům,
kteří dlouhodobě pobývají v některé univerzitní místnosti respektive jsou
dostupní na některé telefonní lince. Nepatříte-li do této skupiny nebo chcete-li
zveřejnit např. váš soukromý telefon, použijte Osobní stránku
Informační systém Lidé Moje Osobní stránka Editovat tuto mou Osobní stránku (karta Profil) změnit
Informační systém Kontakty Tvorba telefonního seznamu, seznamu místností a e-mailových adres
zde si vyberte požadovaná pracoviště, upřesněte typ výstupu (tisk z prohlížeče, výstup na tiskárnu apod.) a klikněte na možnost „Vytvořit telefonní seznam dle zadaných pokynů“.
1 Lze vybrat i jiné pracoviště.
2 Podčást budovy je např. patro.
3 Úplný seznam obsahuje i e-maily.
4 Zde můžete vidět síťovou tiskárnu pracoviště nebo vaši osobní, pokud ji váš správce přidá.
Pokud hledáte konkrétní osobu můžete vyhledat potřebné údaje na její Osobní stránce
Informační systém Kontakty Prohlídka kontaktních informací a podávání žádostí o změny
Libovolný uživatel IS může požádat o změnu v kontaktu na kohokoliv dalšího. Očekávané chování je, že zjistíte-li, že v IS je uvedeno chybné
telefonní číslo a zjistíte na ústředně správné, podáte žádost o změnu, jako informaci pro správce agendy, že jde o chybu. Správce následně
změnu provede. Iniciálně je předvyplněno, že hodláte místnost a telefon (je-li nějaký uveden) vystavit na neautentizovaném webu světu.
Správu kontaktních informací provádějí osoby s přístupovým právem k_kontakty. Seznam najdete na
Informační systém Kontakty Kdo může spravovat moje údaje
Tyto osoby mají možnost upravovat základní registr budov/areálů (evidence dle poštovních adres) a k jednotlivým areálům definovat součásti
(„upřesnění“), např. rozdělit kampus na jednotlivé budovy či budovu na křídla. Taktéž mohou přímo vkládat/opravovat záznamy osob a
doplňujících ne-osobních subjektů.
Kromě informací vztahujících se k osobě jako takové lze zadat také kontakty na člověka zastávajícího na pracovišti nějakou roli, nebo obecně
na místo v budově se vyskytující, nebo kontakt na širší skupinu osob ap. Například
děkan,
tajemník,
Spolek mediků,
ekonomické oddělení.
K těmto ne-osobním záznamům lze kromě telefonu a místnosti uvést i e-mail (typicky neosobní nebo hromadnou přezdívku, např. rektor@muni.cz nebo
ekon@fakulta.muni.cz). U záznamů osob je preferovanou adresou schránka na serveru mail.vstecb.cz.
K jedné osobě lze přiřadit i vícero kontaktních informací. Toto lze využít zejména u lidí s více pracovními poměry, respektive pracovnami. Není
však cílem nutně evidovat veškeré existující telefony ap. - nechť uživatel sám rozhodne, které kontaktní údaje o sobě chce uvádět, uvede spojení
do preferované místnosti atd.
Správce agendy může osobní i ne-osobní záznam označit „nezveřejňuje se“. Potom je informace dostupná pouze uživatelům s právem k_kontakty pro
čtení. Typické použití: hodláte-li pro úplnost evidovat např. veškeré telefonní klapky i k místnostem/objektům, které běžného uživatele nezajímají.
Doplňující kontaktní informací je elektronická poštovní adresa. U záznamů týkajících se jednotlivých osob se při prezentaci (telefonní seznam,
stránky Lidé na VŠTE) použije adresa nastavená v poštovním systému IS VŠTE. Má-li uživatel poštu přeposílanou
na jiný server než mail.vstecb.cz, vypisuje se tato cizí adresa pro přeposílání pošty.
Pokud pošta ze schránky na mail.vstecb.cz není přeposílána, vypíše se adresa ve tvaru přezdívka@mail.vstecb.cz, pokud přezdívka
není definována, pak adresa učo@mail.vstecb.cz.
Změnu elektronické poštovní adresy (např. přeposílání jinam) může uživatel provést sám, v aplikacích
Informační systém Pošta Nastavení
Hromadně obesílat osoby mohou zaměstnanci pomocí
Informační systém Pošta Hromadný e-mail
Postup pro hromadné obeslání osob dopisem s přílohou naleznete v Nápovědě
Kruh lidí je místo v IS VŠTE, kde se může setkávat určitá skupina lidí, povídat si ve svém diskusním fóru, informovat ostatní o různých akcích na
nástěnce kruhu a nebo sdílet např. fotografie ve společném úložišti Náš web.
Jsou dva základní typy kruhů. Automaticky zakládané v systému (např.
imatrikulační ) a uživatelsky zakládané vlastní kruhy.
Kruhy, které se vás týkají, najdete pod rozcestníkem Setkávání nebo
Absolventská síť.
Imatrikulační kruhy slouží studentům přijatým ve stejném roce na stejný obor, aby se mohli mezi sebou kontaktovat. Studenti bakalářského i
magisterského stupně jsou do imatrikulačních kruhů řazeni automaticky po zápisu ke studiu.
Tyto kruhy nemají žádného správce, ale žádost o členství v kruhu může schválit jakýkoli člen kruhu.
Pro malé obory se imatrikulační kruhy automaticky nezakládají, ale studenti mají možnost přidat se do jiného kruhu, např. podobného oboru, nebo si
mohou založit vlastní kruh individuálně.
Informační systém Absolvent (Kruhy) Všechny Založit nový kruh
Automaticky se stanete správcem kruhu, můžete přidávat další správce a rozhodujete, kdo vstoupí do vašeho kruhu jako člen.
Nastavení práv pro vstup do kruhu v případě volby „studenti předmětu s kódem“, „studenti předmětu v období“ a „studenti semináře“ se
vztahuje i na ty studenty, kteří již nemají studium, ve kterém měli předmět zapsaný, aktivní.
Je-li do nějakého kruhu osoba „pozvána“, musí členství v kruhu nejprve přijmout kliknutím na „Ano, chci se stát členem“ v aplikaci
Informační systém Absolvent (Kruhy) název kruhu
Členství v kruhu může člen zrušit volbou „Vystoupit z kruhu“, správce kruhu může zrušit členství jakémukoli členovi volbou „vyřadit“ v seznamu
Členové kruhu.
Ze seznamu lze rychle odeslat členovi kruhu e-mail, napsat k této osobě Komentář, zobrazit její Osobní stránku, zobrazit Aktivitu této osoby či
zjistit, kdy byla naposledy v IS VŠTE. Nenajdete-li některého spolužáka v seznamu, pozvěte jej. Pokud dosud nebyl v IS VŠTE, pošlete mu e-mail s pozvánkou
přímo z této stránky.
Diskuse
Chcete-li relaxovat, povídat si s ostatními o zajímavých tématech, potřebujete-li poradit, nebo si chcete jen nezávazně popovídat, založte vlákno
v diskusním fóru kruhu
Informační systém Absolvent (Kruhy) název kruhu Diskuse Založit nové vlákno
nebo přispějte již do existujícího vlákna.
Náš web
Máte-li například fotografie či videa ze společné akce, případně jiné soubory, které chcete zveřejnit pro ostatní členy kruhu, vložte je do webu vašeho kruhu
Informační systém Absolvent (Kruhy) název kruhu Náš web
a dle typu vkládaného souboru zvolte „Vložit fotky do nové galerie“, „Vložit videa do videogalerie“ nebo „Vložit soubor“.
Nástěnka
Chcete-li ostatní členy někam pozvat či jim něco nabídnout a chcete, aby si vaši výzvu/pozvánku určitě přečetli, zavěste příspěvek na Nástěnku.
Informační systém Absolvent (Kruhy) název kruhu Nástěnka Vložit příspěvek na nástěnku
Příspěvek se zobrazí na úvodní stránce kruhu, na nástěnce a informace o něm i v aktivitě kruhu.
Aktivita
Informační systém Absolvent (Kruhy) název kruhu Aktivita
Zde se dozvíte, co bylo v kruhu provedeno za operace - nejnovější se zobrazují na úvodní stránce kruhu vpravo a úplně všechny najdete pod záložkou
Aktivita. Získáte odtud informace o vstupu nových členů, přidání fotografií do webu kruhu, o novém příspěvku na nástěnce apod.
Yes, there is. Please use the application the path to which is as follows:
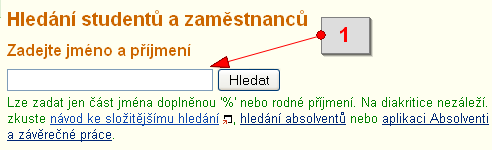
The Information System People
The application allows you to search for the person and it, provided he/she is found, displays
his/her personal page. The person can be searched for by his/her first name, last name, maiden name, personal identification number, and user name (log-in name). The
users with special access rights are also allowed to search some other databases – an option only available to a few for privacy reasons.
On May 25, 2018, the method of handling personal data changed and it was necessary
to adapt the search and display of users. The search rules below now apply.
Unlogged users can search for the following people:
Logged in users can search for the following people:
current employees, professors emeritus, persons with an agreement on activities or work performance, externs (persons who are introduced in the application for registration of externals directly in IS) and guests (persons introduced from the Guest Evidence application at MU, which is located in Inet) including persons who have terminated their relationship with MU during the last six months,
current students, including students who have completed their studies during the last six months,
users who have provided the consent "The ability to be searched for by authenticated IS users" in the application Consent to the provision of IS services (https://is.vstecb.cz/auth/privacy/former),
persons who are registered as teachers of a subject in the current semester.
If the logged-in user has set a disagreement with the option "The ability to be searched for by authenticated IS users" in the application Consent to the provision of IS services (https://is.vstecb.cz/auth/privacy/former), he can search and display only persons who are visible to unlogged users. In the event that he changes the disagreement to consent, the protection period lasts 14 days, when he is searchable himself, but he does not search for other users who are visible only to those logged in.
The Information System displays the programmes of studies which are not under way as contracted by default. To disable
this option, please use the following path:
The Information System People Settings Chování aplikace (Browsing Personal Pages) Collapse programmes which are not under way
Check the option I want all the programmes of studies to be displayed expanded and click on Save.
1 Check this to have the programmes of studies displayed expanded.
It is only certain programmes that support the choice.
The information on the programmes of studies that students are currently enrolled in is displayed by default
and cannot be hidden.
The information on the programmes students failed to complete and that on lifelong learning programmes is hidden by default
and can only be browsed by the student himself/herself and some staff members.
The information on the programmes of studies that students completed can be made public or hidden.
For those programmes of studies the information on which can be made public or hidden, there is a table header
specifying the current display status and a link to the section allowing you to change it.
Every Personal Page consists of several tabs such as Workplace and Studies, Teaching, Supervisor, Curriculum Vitae,
Publications, and Profile. To configure the page the way that makes it display one of these tabs by default, please use the following path:
The Information System People Settings Chování aplikace (Browsing Personal Pages) Tab displayed by default
You can browse you Personal Page in several modes to find out how it is displayed to various visitors to it (e.g. a user visiting the page
from outside the System, people belonging to your group of My Friends, staff, etc.). Here is the path to the links with previews:
The Information System People Settings Chování aplikace Personal Page display mode
The page offers you several user types to choose from.
Your Personal Page is inaccessible to those trying to visit it from outside the System. However, if you wish to make it accessible
to these people as well, please click on the option 'I want my page to be accessible to people outside the System, including
the information listed in my Profile tab' available on the page the path to which is as follows:
The Information System People Settings Chování aplikace Personal Page display mode
If you are an employee, your page is available to the users outside the System by default (the information related to your studies
can be hidden, though). Provided you want your page to remain accessible to the people outside the System even after you stop working
for the school, please click on the option 'I want my page, including the information listed in my Profile tab, to remain publicly
accessible even after I stop working for the school.' the path to which is as follows:
The Information System People Settings Chování aplikace Personal Page display mode
You can find the information on your current settings at the bottom of your Personal Page. These settings also affect the way your Personal Page
is displayed at www.muni.cz.
You can disable the photograph mode using the following path:
The Information System People Settings Chování aplikace Select my photograph mode
However, provided you find something amiss with your photograph, you should have a new one taken since disabling the photograph mode will prevent you
from seeing the other IS users' photographs.
What you should realize, though, is that even if you disable the mode, your photograph will still be displayed to the Office for Studies staff and teachers teaching the courses you have enrolled in for identification purposes.
Please make sure you have the photograph mode enabled. To do so, use the following path:
The Information System People Settings Chování aplikace select photograph mode
Another cause of the problem may be the fact that your photograph is not stored in the System yet. If this is the case, have yourself photographed as soon as possible, please.
Yes, you can have a watermark of your personal identification number printed on your photograph. Provided you wish to enable the watermark mode, do so in the section the path to which is as follows:
The Information System People Settings Chování aplikace select photograph mode
Nevertheless, the likelihood of your photograph being misused is comparatively low since
the System administrators constantly monitor the numbers of photographs displayed to individual
users. Provided one of them has a large number of photographs displayed, his/her access to them is denied.
The IS users can, after logging into the System, browse other users' photographs. These should be utilized merely for identification purposes inside the System. Any other use of these, their distribution outside the System, and their batch downloading are strictly prohibited.
The Information System hosts tools that keep track of the numbers of photographs displayed to individual users.
Provided it detects a massive download or display of photographs by someone - an indicator of their possible misuse, it will disable the culprit's access to them.
Violating the aforementioned rules may lead to blocking the violator's access to the IS photographs and make him/her subject to disciplinary proceedings.
Under each of your programmes of studies you can find a link to a form enabling you to activate this option and specify
which users your study results should be displayed to. Once you change the settings, remember to save them.
Please contact the Office for Studies at your faculty. The contact information is available at
https://is.vstecb.cz/auth/studium/studijni.pl and
it is also listed at the bottom of every IS page.
This section facilitates teachers' and supervisors' work by allowing them to enter their Teacher's Notebook directly from
a selected student's Personal Page. Provided you are a teacher, this page lists all of your courses the student is currently
enrolled in or was enrolled in in the past. Each of these has a link enabling you to enter its Teacher's Notebook or a section containing
detailed information on the student. Provided you are a supervisor, you are also provided with an option to enter
the Supervisor section.
1 An operation on a course at the list of courses the student is currently enrolled in.
You can post information on your office hours on your Personal Page under the Teaching tab. To do so, click on change, enter some
text into the text field (e.g. Monday, 13:00 - 15:00) and save it.
Your (or someone else's) Personal page also enables you to access other IS applications such as Students, Teacher, Study-Related, etc.
Who can access what directly from his/her Personal Page:
A student can enter the Student application for each of his/her programmes of studies.
1 Link to the Student application.
A teacher can access individual Teacher's Notebook applications clicking on the links listed in the Teaching
section. Using the links listed on his/her students' Personal Pages, he/she can enter Teacher's Notebook and
pages containing detailed information on the students.
1 Link available in the Teaching tab to Teacher's Notebook applications.
Tip
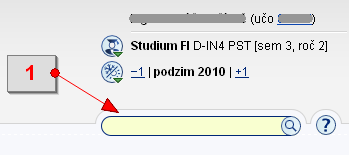
Provided you often use Teacher's Notebook applications, you might want to be able to access it
using the following shortcut: Each IS page displays your personal identification number (učo) in its upper right-hand corner.
This number, when clicked on, takes you to your Personal Page, where you can have the tab titled Teaching displayed
by default. As this tab lists all your courses, using the path described above, you can reach a certain course-related
application from any IS page in only two clicks.
To specify the tab you want the System to display by default, please go to the People section and click on
'Change the People application settings'.
1 takes you to your Personal Page.
Office for Studies staff can enter the Study-Related section from every student's Personal Page.
Your IS mailbox is used as a destination for important messages related to your studies.
Its use and keeping track of the mail delivered to it is therefore mandatory. You can download your IS e-mail
to your computer or have it forwarded to another location (another e-mail account).
Please ensure that you delete the messages you have read on a regular basis preventing the mailbox
from getting full and thus incapable of receiving other mail. The information
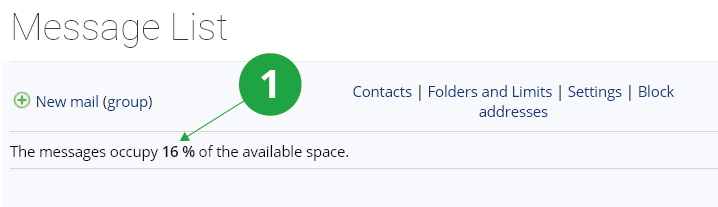
about the free space and the space occupied by your messages can be found in the mail application.
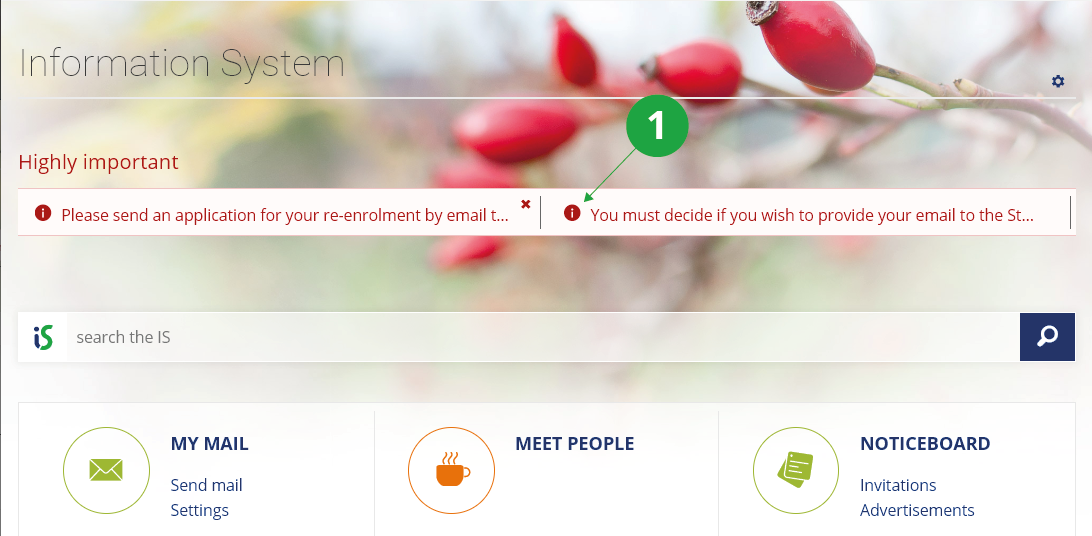
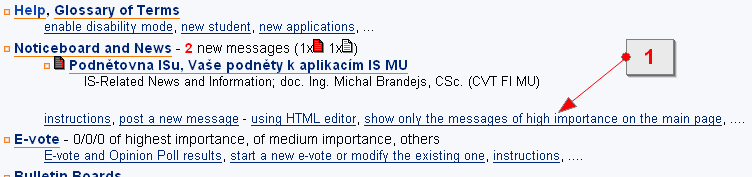
Provided some new mail is delivered to your IS mailbox, a message notifying you of the fact appears
on the main IS page.
1 Information about the space occupied.
The IS user's e-mail address format is učo@mail.vstecb.cz, where učo represents his/her personal identification number.
The address in this format remains functional even after he/she starts using his/her new user name.
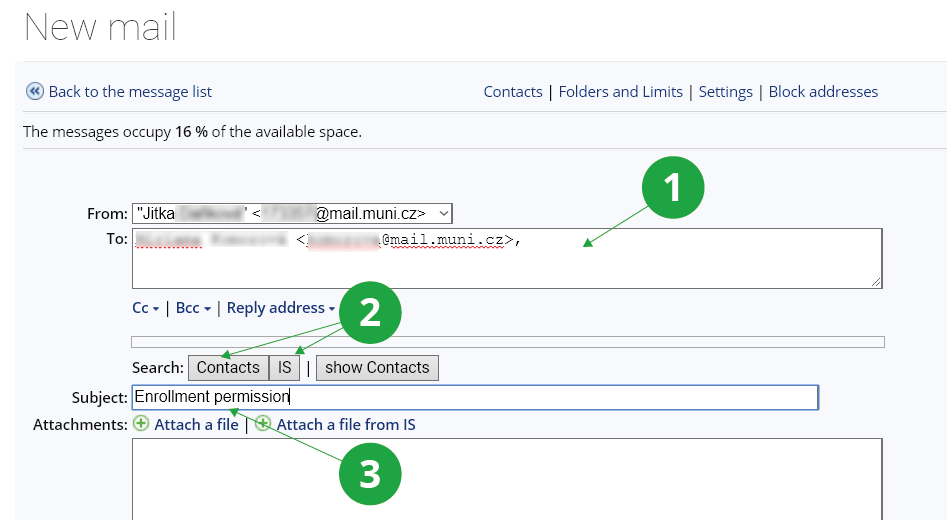
Enter
your recipients' addresses into the To, Cc (carbon copy) and Bcc (blind carbon copy) fields
and the subject of the message into the subject one. Please remember to make the subject text meaningful enough for the recipient(s)
to be able to easily locate your message among others when they need to. After typing in the text of your message, you can choose to save
it in the Sent Mail folder. Clicking on the Send button will cause your message to be sent.
1 Enter a recipient.
1 Enter your recipient's name and click on 'Find the recipient in my Contact List' (use this option provided you are
writing to someone stored in your Contact List) or 'Find the recipient in the IS database' (provided you are writing to an IS user).
If more people are found, select the right one..
1 Remember to fill in the “Subject” field with some meaningful text.
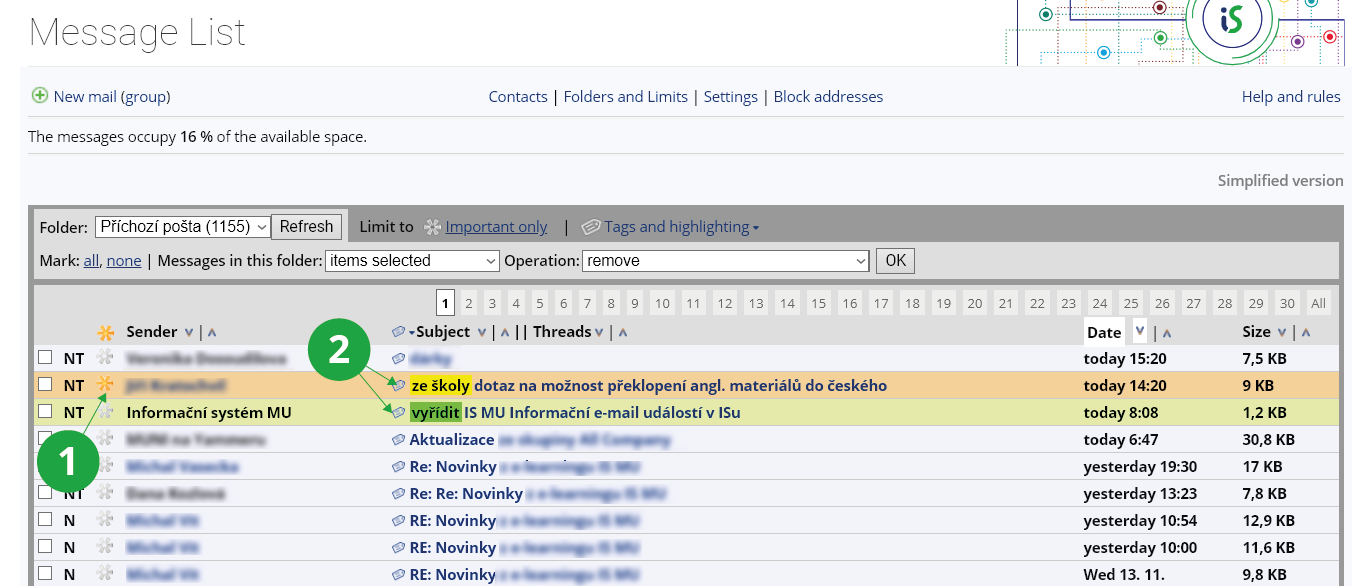
After you enter the Mail application, your screen will look similar to the one displayed in the picture below.
The main page gives you a list of delivered messages. The letter U can be found next to those which have not been
read yet (the letter stands for “unread”).
If you want to read a message, click on its subject. As regards attachments, these are opened and displayed automatically
provided it is convenient to do so. The others can either be opened by being clicked on or downloaded to your computer.
The application also allows you to edit the old and create new mail folders. For this purpose, please use the following path:
Personal Administration My Mail Folders and Limits
If you select more than one message (by using the checkboxes placed next to these), the operation you perform will be carried out for all the messages selected. Thus you can read,
delete, download, and move all these with a single click.
The individual messages can be marked with a star (as those of high importance), a certain tag or color. Using the option titled Tags administration, you can create your own tags
or rename the old ones. The order in which messages are displayed can be changed by clicking on the
title of the column containing the information by which you want the messages to be sorted.
1 Important message (starred).
2 Adds or edits tags and color.
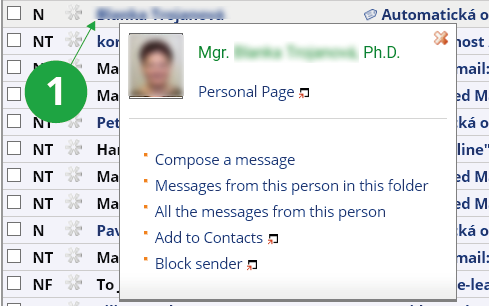
Clicking on the sender's name in the message list displays a menu with fast options.
1 Clicking on the sender's name displays a menu with fast options.
Your e-mail message is sent to all the recipients whose addresses you have entered into the “Cc” and “Bcc”
fields. However, those you have entered into the “Bcc” one will not be displayed to the other recipients after the message is delivered.
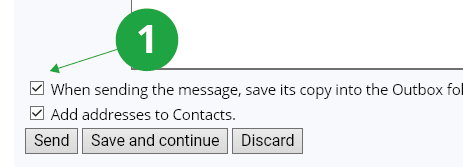
If you check “Save copy of message in Sent Mail folder” before sending your message, it will be saved for later use.
1 An option allowing you to save sent mail.
Tip: Hint
There may be a delay between sending the letter and saving the copy to the Outbox. This is because the copy of the letter will not be saved until the IS MU mail server has been able to deliver it to another mail server.
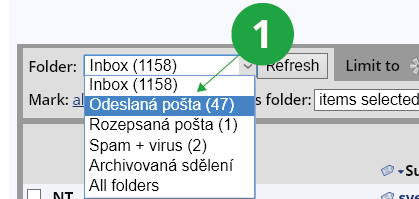
To go to your Sent Mail folder, use the “My Mail” reference situated on the main IS page and,
after selecting “Sent Mail” from the drop-down menu, click on the “Change folder” button (after selecting “Sent Mail” from the drop-down menu).
1 To display the list of sent items, click on Sent Mail.
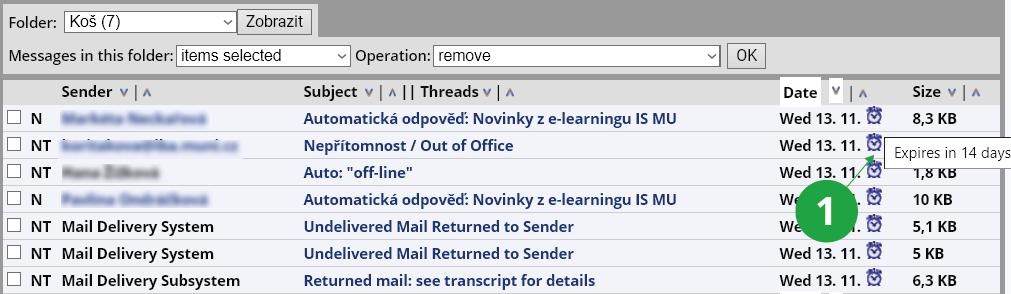
The messages in the Trash folder are automatically deleted 14 days after they were moved into it.
Those messages that are to be removed in less than 14 days are marked with clocks (situated next to reception
dates). To find out in how many days the messages expires (is to be removed), move your cursor over the clock icon.
Yes, there is. To do so, please use the following path:
The Information System My mail New mail
Click on Attach a file and specify which file you want to attach to the message. Once you have confirmed your selection,
the file will be uploaded automatically. The upload is over when a checked checkbox appears next to the name of the file.
The application also allows you to attach to your messages the files recently uploaded into your Depository as well as other files stored
in IS (only those with the right to read, though).
You can always remove the attachment from the message by clearing its checkbox. The checkbox is always checked by default.
All the files attached to e-mail messages get automatically saved in their sender's Depository (where they expire in 30 days) and can therefore be used
repeatedly. Their 30-day expiration period restarts every time they get sent again. The files attached to messages from IS also get saved in their sender's
Depository and they are treated by the System the same way as the other files stored in it.
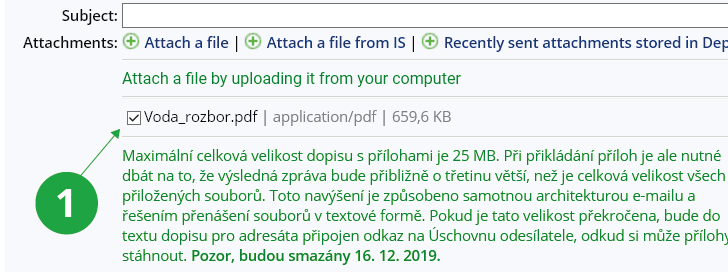
1 Leave the checkbox checked provided you want the file to be attached to your mail.
Attention
The maximum total size of a letter with attachments is 25 MB. However, when attaching attachments, make sure that the resulting message is about a third larger than the total size of all attached files.
This increase is due to the e-mail architecture itself and the text file transfer solution. If this size is exceeded, a link to the sender's Depository will be added to the text of the letter to the addressee from where he can download the attachments.
There is a 30-day expiration date in the Depository - when sending a letter, the date will appear when the attachments from the sender's Depository will be deleted (until the deletion is complete, the attachments are available for 30 days in the Depository in the Dustbin folder).
There are several reasons why messages might not be delivered:
Crowded Mailbox
Each mailbox has a set quota, ie the maximum size of stored data and the maximum size of one message. If the quota is exceeded,
only messages of an administrative nature will be accepted from the IS VŠTE (eg a letter from the teacher about the
examination result), but mail from the world or from other IS VŠTE users will not be delivered.
Increased mail server load
In times of heavy load on the mail server (eg mass mailing), it may happen that several thousand letters are waiting in the queue for processing. They are processed sequentially, with letters of smaller size (without attachments) being preferred. If the sender has selected to save sent messages in the Sent Items folder, the message is not saved until it is received, not when it is sent. The sender is informed of the problem by sending a letter.
Forwarding address provider error
You can check the delivery of group messages from teachers or officials in the Archived Messages folder in your IS VŠTE mailbox (What is the Archived Messages folder?). If you find the missing messages in this folder, we recommend that you cancel forwarding or change the forwarding email address.
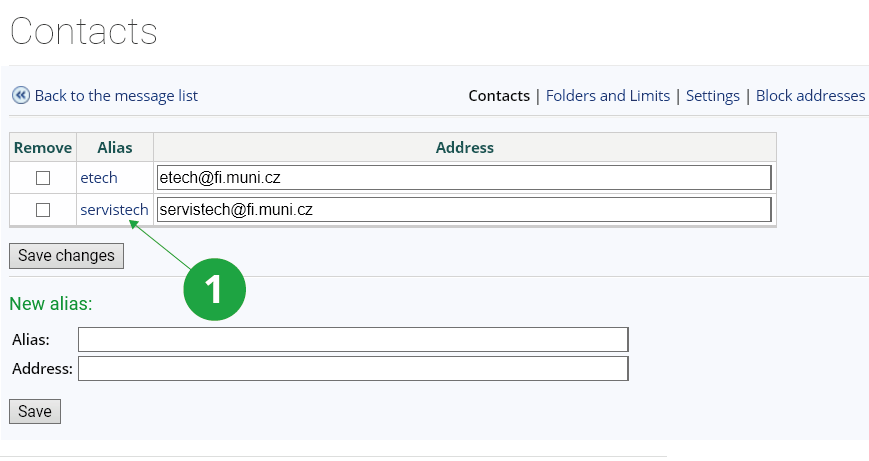
One of the advantages of using the Contacts list is that you can define your
own aliases for the e-mail addresses you often use. You can do so using the following path:
The Information System My Mail Contacts
1 To open a window for composing a new message pre-filled with an e-mail address, click on the appropriate alias.
When composing a new message, enter the recipient's alias into the “To:” field, click on Contacts or show Contacts situated next
to Search and select the recipient.
You can also compose a message directly from the Contacts list by using the following path:
The Information System My Mail Contacts
To open a window for composing a new message pre-filled with the recipient's address, click on his/her alias.
An alias is a string of characters that can be put in the place of the string starting your original e-mail address.
The IS address containing an alias has the form of user_name@mail.vstecb.cz. Aliases may only consist of letters (of any case)
and digits (must not start with these, though). Furthermore, they must be free of diacritics. The minimum length of an alias is three characters.
If an alias is found to be violating some basic principles of decency, it might be made non-functional by IS administrators. Users are
not allowed to use aliases intended to make others believe they are someone else either.
Logically, it is only the alias no other IS user is using that can be selected. Please create the one that other
people will be able to associate you with easily.
To create a new alias (or change the old one), enter it (or the old one) into the text field and click on 'Save user name'.
By giving up your alias, you make it free for other users, who can start using it. However, you should bear in mind
the possible problems stemming from any alias change. That is, provided you have made your e-mail address public in the form
of user_name@mail.vstecb.cz and now you decide to change your alias, people will start sending you messages either to a non-existent
address or to someone else's (a similar situation has been described in the previous paragraph). It is therefore
advisable to create an alias that you do not plan to use only for a short time.
To activate your e-mail forwarding, use the
following path:
The Information System My Mail Settings
Please enter the address to which your e-mail should be forwarded into the text field titled Forward messages to.
Save the new settings. In order to check the delivery of important messages, copies of selected messages of an administrative nature are kept in the Archived Messages
folder (for more information on (What is the Archived Messages folder?). Other messages are redirected and their copies are not stored in IS VŠTE.
Some mail servers, such as gmail.com, use the so-called Sender Policy Framework (SPF) to defend against spam. The principle of SPF is that the recipient of the letter (in your case, for example, gmail.com) checks whether the address of the sender of the letter matches the address of the computer from which the letter was actually sent. If it does not match, the recipient may reject the email as undeliverable.
Tip: Example
Here's an example: The user xxx@mail.vstecb.cz set up in IS VŠTE to redirect mail to
xxx@gmail.com. When e-mails are sent to user xxx@mail.vstecb.cz from eg mail-services.com, it may
reject gmail.com's e-mails, because an email that appears to have been sent from mail-services.com actually came from mail.vstecb.cz.
Because the user has forwarded mail from IS VŠTE.
If you have redirected letters from IS VŠTE and the letters return to you as undeliverable,
the solution is either to cancel the redirection of mail from IS VŠTE or to change
the addressee of the e-mail on the server mail-services.com to the destination xxx@gmail.com
(and not to the forwarding mail xxx@mail.vstecb.cz).
Tip: Technical specification
The sender's server administrator can set up from which computers his e-mails can be sent.
Therefore, the sender's server administrator can solve the IS VŠTE forwarding problem by entering the IS VŠTE address
into the list of computers from which it sends e-mails. This is unrealistic if the mail server does not have a close relationship with IS VŠTE.
You can download your e-mail using IMAP nebo POP3 (an e-mail transfer protocol).
Using the IMAP or POP3 protocol, the user can read his/her messages via mail clients such as Microsoft Outlook, Mozilla Thunderbird, etc.
Some users find e-mail administration via these easier than by using a browser.
Unlike POP3, IMAP enables users to access their messages from multiple computers. Besides, using IMAP, the users can access several folders within the same account,
which allows them to browse Inbox, Sent Items, Drafts, Deleted Items as well as other folders they use within IS. Downloading only the headers of messages and offering
an option of downloading only the selected attachments, IMAP proves more effective when it comes to low connection speeds.
To be able to use IMAP or POP3, you need to create a special (secondary) password using the path below:
The Information System System change my password
Since this password is considered less safe than the one used for logging into the Information System, it must be different from the latter.
You can specify autoreplay for emails that will be delivered in your absence:
The Information System My mail Settings
Check the box next to "Enable out-of-office auto-reply" and fill in the required fields subject, message and start of absence.
In the case of additional incoming emails from the same sender, the next reply will not be sent until four days later.
Also, an auto-reply will not be sent if an incoming email has been classified as SPAM, system message, or archived email.
Automatic replies cannot be used if you have set up e-mail forwarding outside IS VŠTE.
To be able to activate IMAP, you have to use an e-mail client supporting it (e.g. Microsoft Outlook, Mozilla Thunderbird, etc.). The protocol
is supported by some mobile phones and PDAs as well.
The following settings have to be changed for IMAP to work right (the configuration may vary from client to client):
incoming mail settings (server)
Server:
mail.vstecb.cz
Port:
993
Secure connection:
SSL/TLS
User name (account name):
IS personal identification number (učo) or IS user name
Password:
secondary IS password
outgoing e-mail settings
Server:
mail.vstecb.cz
Port:
465
Secure connection:
SSL/TLS
User name:
should be entered in the following form: učo@IS.VSTECB.CZ or user_name@IS.VSTECB.CZ
(Must be case-sensitive.)
Password:
secondary IS password
After a successful connection, you may want to choose which folders to synchronize between your email client and IS VŠTE E.g. in Czech Thunderbird 8, this feature is called the Subscription Manager and is either displayed by right-clicking the account in the left menu or found in the File menu.
You can also use your IP's SMTP server for outgoing mail.
To be able to activate POP3, you have to use an e-mail client supporting it (e.g. Microsoft Outlook, Mozilla Thunderbird, etc.).
The protocol is supported by some mobile phones and PDAs as well.
The following settings have to be changed for POP3 to work right (the configuration may vary from client to client):
incoming mail settings (server)
Server:
mail.vstecb.cz
Port:
995
Secure connection:
SSL/TLS
User name (account name):
personal identification number (učo) or IS user name
Password:
secondary IS password
outgoing mail settings
Server:
mail.vstecb.cz
Port:
465
Secure connection:
SSL/TLS
User name:
should be entered in the following form: učo@IS.VSTECB.CZ or user_name@IS.VSTECB.CZ
(Must be case-sensitive.)
Password:
secondary IS password
You can also use your IP's SMTP server for outgoing mail.
Some clients offer the option of leaving copies of messages on the server. We do not recommend that you use this option since you might
soon exceed the mail account storage limit. Provided you want to save copies of your messages into a file, you can do so using the IS mail
application. Another disadvantage of the POP3 protocol is that it only allows users to download messages from the Inbox folder.
to enter the e-mail address of the SMS gateway to which a notification message should be sent when your new mail arrives.
The right address format may depend on your phone company and thus you should familiarize yourself with it. You can also
provide the address of the e-mail account to which you would like the notification messages to be delivered.
The notification message contains the text of newly arrived email, which may be abbreviated. Provided you have enabled your mail forwarding, no e-mail is
delivered to the IS mailbox and therefore no notification messages are sent.
Since the proper functioning of SMS notification depends on the quality of a third-party service (that of a telephone company), it cannot be
fully guaranteed.
Attention
Eurotel Praha does not currently support this service reliably.
RadioMobil may be charging their customers for the use of the service.
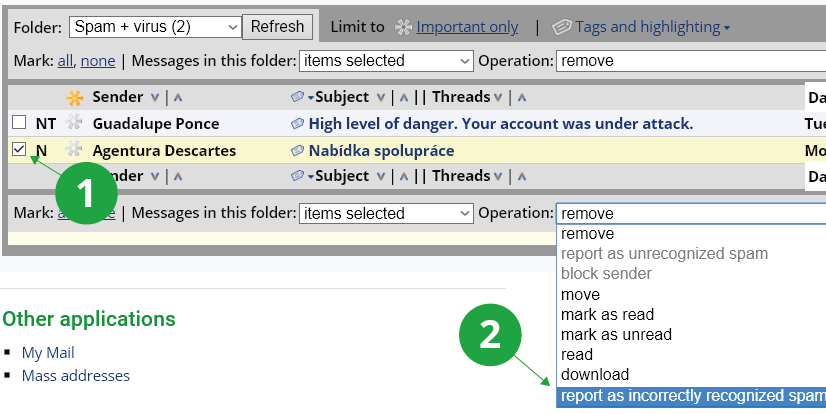
Spam is annoying e-mail. The antispam system tries to detect it and stores it in a special folder Spam + virus, from which it is automatically removed permanently. This folder can also be deleted "manually" using the options below the spam list.
Because misidentification may occur (the system considers a message of interest to you as spam), the latest additions to the spam folder are also listed in the title page of the mail application. Messages with a virus-infected attachment are also deleted.
If you have set mail forwarding to a different address, no antispam check is performed.
In the list of messages in the "Spam + virus" folder, there is an option "report as incorrectly recognized SPAM", which will move
selected (marked, unmarked, all) messages (badly detected spam) back to the folder with incoming mail. for further internal processing
to improve the quality of the antispam filter.
1 Mark a letter that you do not consider to be spam.
2 Select “report as incorrectly recognized SPAM” from the menu and confirm.
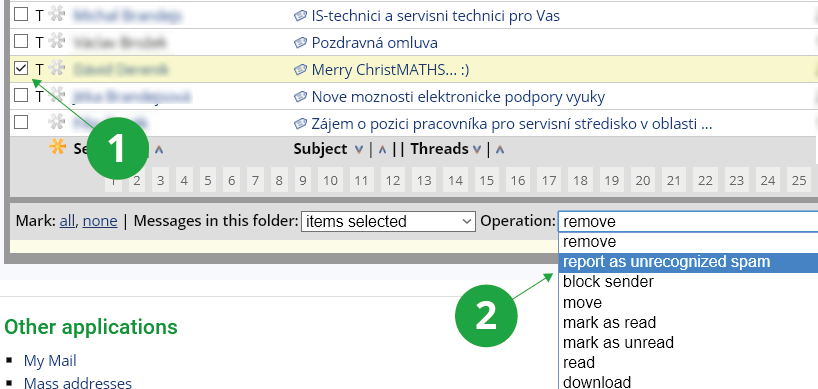
On the other hand, if you have a message in the list of any other folder that you consider spam, move it to the "Spam + virus" folder by selecting "Report as unrecognized SPAM". The corresponding messages (marked, unmarked, all) are moved between the other spam messages and at the same time included for further evaluation. This will help improve spam filter recognition.
1 Mark a letter that you consider spam.
2 Select “report as unrecognized SPAM” and confirm.
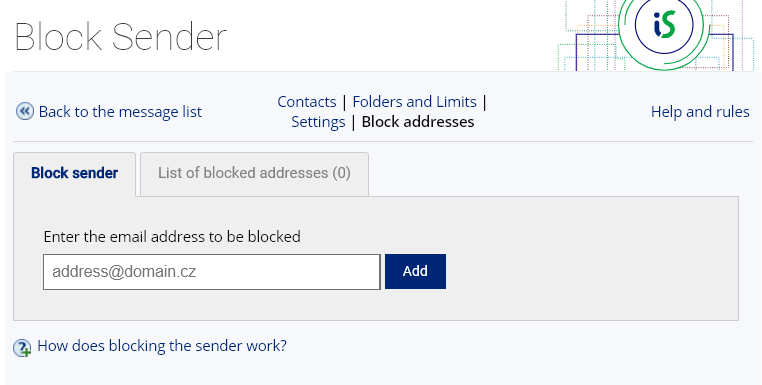
The option to block a specific sender address is found in the Mail app under the "Block addresses" link. You can also manage a list of blocked addresses in this application. Just enter an address from the app that you no longer want to receive emails from and click "Add."
1 Block addresses settings.
You can also block the sender directly in an open email.
1 Block addresses directly in a open email.
After saving the blocked address, incoming letters from this address will be sorted into the Spam + Virus folder, where they will be automatically deleted after one month. Users who have their mail forwarded to another address cannot use this feature because the forwarded mail is not checked for spam or blocking.
The blocking works only to a specific, precisely entered address, which is located in the From header of the received letter. The person can therefore continue to send you letters from another (similar) email address.
This feature is not primarily designed to handle incoming spam. Mark spam using the "Report as unrecognized SPAM" option.
No, if the quota is full, it will try to delete the oldest messages in the "Spam + virus" folder before returning a new message to the sender as undelivered.
The sending of group emails with attachments in IS VŠTE is not fully supported, because receiving letters with attachments can
cause problems for recipients who do not have a fast connection or insufficient mailbox capacity, or have a connection in which
they pay for each kilobytes of attachment transferred. Therefore, instead of attaching attachments to letters,
we recommend placing the files in IS VŠTE (eg in Study Materials, My Web Agenda, Depository) and attaching a link
in the letter so that the user can click on it to download the file or files.
If you still decide to send a group email with the attachment (s), first select the mailing list:
The Information System My Mail Group email
The list of selected persons can be found at the bottom of the page. If you want to further edit the list,
select the links at the top of the page to add or remove people from the list, or create a new list. Then click on
Export the list of selected people into a file (only the people's identification numbers (učos) - used e.g. for manually inserting into the 'To' field in the email application).
Then go to the normal mail application:
The Information System My Mail Send mail
Next, open the file with the numbers of the persons to be sent on your computer, copy the column of numbers (eg Ctrl + C) and paste (Ctrl + V) in the To: field (if you want all recipients to see the letter) or Bcc: "(if you want the recipients not to see each other). Enter the text of the letter, attach the attachments and send the letter as usual.
You can also import an exported list into People Groups → Import a People List into a Group, if you need to use a student group as a named People Group.
The need to copy the učo from a file is introduced intentionally to make it difficult for the sender to send such a message, because receiving a mass e-mail with attachments to the recipients as described in the first paragraph.
Copies of some sent messages are stored in this folder. These are some of the messages automatically sent by the Information System and messages sent by the study department or teachers (if the teacher has indicated that the message is to be archived). Messages stored in Archived Messages do not count toward the mailbox size quota.
The folder cannot be manipulated (delete messages from it). The folder is used to prove or verify later that a particular message has been delivered to you and its exact content.
After looking up the recipient, you are taken to his/her personal page containing information
about whether he/she has his/her mail forwarded to another e-mail account or not. If the latter
is the case, the date on which he/she last read his/her mail is provided.
If you send an email to an IS VŠTE user who returns you with an undeliverable error message, the most common cause (can be read from the error message) is:
wrong address to which mail is redirected
In this case, it is necessary to cancel the incorrect redirect.These workers are authorized to do so. Select an authorized person according to your faculty or nearest workplace, forward an email with an error message and a request to cancel the redirection. Authorized persons can deliver the email to the correct recipient's mailbox locally.
depleted mailbox capacity
In this case, the mail server attempted to delete the recipient's "Spam + virus" folder, but the capacity of the recipient's mailbox was still insufficient to deliver your letter.
Yes, IS VŠTE deletes unread messages in incoming mail after one year of delivery,
unless the user has logged in to IS VŠTE or read the messages in any other way
(eg using IMAP) during this period.
ISMail server is used mainly for sending group emails, which are typically not official.
This alternative e-mail server was designed to efficiently process a large number of emails sent to domains outside mail.vstecb.cz.
Below is a description of a set of tools you can use for posting study materials
on the Information System and setting their access rights. You may not be
able to access all of the features mentioned below since some of these
are only available to a limited number of users (students, teachers, etc.).
The reference Work with study materials allows:
teachers to post various types of study
materials on the Information System for these to be used by
students of their courses, other IS users as well as users from
outside the System
teachers to open Homework Vaults - folders into which
students can upload their assignments; teachers can easily
retrieve these later on.
Archive of Theses/Dissertations allows:
students to post their Bachelor's theses, Master's
theses, or dissertations (doctoral theses) on IS
the IS user to browse and read the posted theses
Document Server allows IS users:
to post various regulations and minutes of meetings
and make these accessible to the University community
to make certain materials accessible to a limited
number of users (e.g. Dean's Council, Senate, etc.)
File Depository can be used for:
depositing a file in the System and retrieving it later
on
the posting and temporal storage of files for other
IS users (and/or those outside the Information System) to
download
retrieving the files which, if attached to an e-mail
message, are rejected by the IS mailbox due to their large
size
To read through the instructions on how to use the File
Depository, please use the following path:
Personal Administration DEPOSITORY
Instructions on how ...
Study materials (files, Internet addresses of
sites hosting some related information, etc.) can be stored in
folders, which can also contain sub-folders (containing other
files). Clicking on the name of a file, folder or reference
expands it and displays its contents and further information related to
it. The objects not hitherto read are highlighted (different background
color).
When you do not intend to read an object and, at the same time, you do
not want it to be displayed as the one not hitherto read, you can mark it
as read. The information pertaining to how many times an object
has been read and how many times it has been marked as read (rejected)
can be found in the access statistics section.
The System generates plain text versions of the uploaded materials
automatically so that these can be searched easily. The contents of these
newly generated files, however, might not completely correspond to their
originals since images, tables and some formulae cannot be converted into
plain text.
The plain text version is usually shorter than the original and may help
the user decide whether he/she will or will not download the
unabbreviated original.
When uploading the files of the formats that are not common, you should
check the result of their subsequent conversion (it usually takes the
newly generated files a few minutes to appear in the folder).
Apart from the plain text versions, the System also generates the
.pdf ones (it usually takes the newly generated files a few minutes to
appear in the folder). Therefore, after you upload a file containing some
text (e.g. a .doc or .rtf one), the System always displays three
different icons next to its name that you can use for opening the
individual automatically generated versions. Clicking on the name of
file opens the original.
The Document Server consists of multiple noticeboards on which authorized
users can post texts for other users to read. These may be, for instance,
regulations, instructions, minutes of meetings, etc.
Types of noticeboards/groups
The Document Server thematic groups can be used in the following
situations:
A group of users need to share some official documents such as
official proposals, minutes of meetings which are not public, etc.
They want these documents to be accessible only to a limited number
(a certain group) of users within the Information System that has
been delimited with the aid of Personnel Groups application.
Here are examples of groups (noticeboards) that can be created:
Doctoral Board
Scientific Board
Academic Senate
Dean's Council
...
A certain department want to inform the general public of some
new regulations, provide them with some news, etc. The department
want the groups (noticeboards) to be accessible to every Internet
user regardless of whether he/she is inside or outside the
Information System. Here are examples of groups (noticeboards) that
can be created:
The study materials posted on IS can be found at the address of
https://is.vstecb.cz/el/ or that of https://is.vstecb.cz/auth/el/ (the latter
applies to the materials inaccessible from outside the System). The exact
address of folder can be found in the folder-related information section.
Here is an example of an internal WWW reference:
The address contains "/el/" meaning e-learning,
information identifying the faculty, term, and course. Addresses in this
format can be used anywhere on the Internet (e.g. on your Web site) as
well. In such a case, the reference to the study materials of the PB151
course would have the following form: https://is.vstecb.cz/el/1433/podzim2003/PB151/Sub-folder Addresses
Every newly created folder is given an automatically generated
identification number, which is unique. As a result, the address of a
file stored in a sub-folder has, for instance, this format:
..../podzim2003/PB151/354/12987/slides01.pdf
However, the folder identification number can be replaced with an
abbreviation entered at the creation of the folder or when its
properties are modified. The abbreviations are used to facilitate
navigation inside folders. Here is a version of the aforementioned
address containing an abbreviation instead of the number:
..../podzim2003/PB151/grammar/slides/slides.pdf
Every file stored on the System is checked for viruses within
several minutes of being uploaded or generated. The file remains marked
with the bug icon
until the virus
check is complete. Provided the antivirus application detects a virus in
the file, it deletes its contents and inserts into it the message
'Virus found, file removed.'.
NB: The presence of
means the file
has not been checked for viruses yet, not that it is infected. The
contents of the infected files are removed immediately after a virus has
been detected.
In some situations, users might want the uploaded materials to be
automatically removed from the System after some time. The expiration
date, which you can specify using
, is used for this purpose. The files (or folders) in which
this option has been activated are automatically removed once they
expire. In some sections, the expiration date is imposed on files (or
folders) without any action on the part of the user. The expiration date,
if specified, can be found next to the name of file (or folder).
The information about the objects that have been removed is stored in the
file titled expired (placed in the Folder Management
folder). The expired file expires a year after it was last written
into.
If a folder containing a file (or folder) which has not expired yet
expires, it is not removed.
No expiration date can be specified for the sections of Study
Materials and Theses/Dissertations. On the other hand, the
Depository section requires that the users specify the date(s).
Údajů v IS VŠTE je mnoho, některé jsou veřejné, k jiným mají mít přístup jen určití lidé (např. studenti předmětu, pracovníci pracoviště, ...) – to nastavují pověřené osoby.
U některých osobnějších údajů si však uživatelé sami chtějí nastavit skupinu osob, kterým je zpřístupní. Této skupině osob se říká „Moji známí“.
Jednoduše si přidáte buď vy jeho, nebo on vás mezi své známé. Vy můžete na jeho Osobní stránce (nebo on na vaší) kliknout na odkaz „Přidat k Mým známým“. Volbu potvrdíte kliknutím
na odkaz „ano, opravdu požádat“. Dané osobě se poté odešle automatický e-mail, ve kterém nalezne odkaz do své agendy Moji známí. V sekci „Lidé, kteří požádali o to být Moji známí“ se mu
nabídnou tlačítka „souhlasit“ a „zamítnout“. Aby byly dvě osoby sobě známé, musí s tím obě souhlasit. Známost je tedy nutné potvrdit kliknutím na odkaz „souhlasit“.
O „známost“ můžete požádat i členy některého z vašich Kruhů, a to jak jednotlivě, tak i hromadně. V aplikaci
Informační systém Absolventská síť (Lidé) Moji známí
překliknete na odkaz „Seznam dle Kruhů lidí“ a pod Ostatní lidé v tomto kruhu kliknete na odkaz „Zobrazit je“. Poté si můžete vybrat jednotlivé osoby a požádat je jednotlivě o známost
kliknutím na odkaz „požádat“ za jejich jménem. Lze požádat i všechny členy kruhu hromadně pomocí odkazu „Požádat hromadně v tomto kruhu“.
Můžete nastavit, co se o vás vaši známí mohou dozvědět navíc oproti ostatním uživatelům:
Kontakt pro Mé známé
Na své Osobní stránce si můžete nastavit, jak vás mohou soukromě kontaktovat vaši známí, nikdo jiný soukromý kontakt neuvidí. Editaci kontaktu provedete v aplikaci:
Informační systém (Lidé) Moje Osobní stránka
na kartě Profil změňte v sekci „Kdy a ja mne kontaktovat“ Kontakt pro mé známé.
Blog Vzkazy pro mé známé
V blogu můžete své známé informovat o tom, co je ve vašem životě nového, např. po odchodu ze školy. Dále zde lze nastavit, kdo může blog číst a kdo může příspěvky komentovat. Blog založíte:
Informační systém Setkávání (Blogy) Vzkazy pro Mé známé
Úspěšní absolventi školy mohou blog založit pod rozcestníkem Absolvent
Informační systém Absolventská síť (Moje) založit blog Vzkazy pro Mé známé
Rozvrh studenta
Zobrazování vašeho rozvrhu lze nastavit pro všechny uživatele přihlášené v IS VŠTE, jen pro Vaše známé nebo vůbec nezveřejňovat. Pokud zvolíte zveřejnění zobrazování rozvrhu „mým známým“,
uvidí váš rozvrh pouze osoby z vaší skupiny Moji známí. Stejně tak si můžete prohlédnout i vy jejich rozvrh, pokud si jeho zobrazování nastavili stejně. Zobrazování rozvrhu nastavíte:
Informační systém Lidé Moje Osobní stránka Editovat tuto mou Osobní stránku
na kartě Studium pomocí odkazu „změnit“ u Rozvrhu studenta.
Čas posledního přihlášení v IS VŠTE
V rubrice naposledy v IS VŠTE na Osobní stránce u běžných uživatelů vidíte pouze přibližnou dobu jejich posledního přihlášení, např. „v posledním měsíci“. Vaši známí v seznamu osob na
stránce Moji známí však u vás uvidí přesný čas vašeho posledního přihlášení do systému. Stejně tak i vy uvidíte přesný čas posledního přihlášení vašeho známého. Čas posledního přihlášení Vašich známých zjistíte v:
Informační systém Setkávání (Lidé) Moji známí
Úspěšní absolventi naleznou tyto informace pod rozcestníkem Absolvent
Informační systém Absolventská síť (Lidé) Moji známí
Seznam známých osoby
Vaši známí se mohou podívat, kdo další patří do vaší skupiny Moji známí, a případně tyto osoby též požádat o známost. Stejně i vy uvidíte známé vašeho známého a můžete si je přidat
mezi své známé.
Tip
Požádejte o známost známé vašeho známého přes jeho Osobní stránku a odkaz „Známí této osoby“ na kartě Profil. Zobrazíte si seznam jeho známých. O známost požádejte kliknutím na „(požádat)“ u vybrané osoby. Žádost potvrdíte kliknutím na „ano, opravdu požádat“, čímž se této osobě odešle
automatický e-mail s vaší žádostí, aby ji mohla potvrdit/zamítnout.
Komentáře
Lze se podívat, jak jste vy nebo ostatní uživatelé okomentovali jiné osoby. Přidejte komentář k vašemu známému přes jeho Osobní stránku a odkaz „Komentáře“ na kartě Profil. Tím vstoupíte do formuláře na vepsání komentáře k vašemu známému. Zveřejnění komentáře provedete tlačítkem "Uložit".
Oblíbené položky
Můžete vaše známé upozornit na zajímavé položky v systému či se podívat, jaké položky zaujaly vaše známé. Označte si zajímavý předmět, zprávu na Vývěsce nebo diskusní příspěvek hvězdičkou. Podrobnější informace najdete v Nápovědě.
Přehled označených položek pak najdete přes tyto odkazy:
Informační systém Diskusní fóra Příspěvky označené hvězdičkou
Informační systém Katalog předmětů Předměty s hvězdičkou
Informační systém Vývěska sekce Zprávy s hvězdičkou
Imatrikulační kruhy
Týkají se aktuálních studentů školy. Jsou do nich řazeni studenti stejných bakalářských a magisterských oborů podle roku imatrikulace. Pokud např. váš spolužák nastoupil do školy na
váš obor v jinou dobu, nebo máte známé na jiném oboru, pak si je můžete přidat mezi své známé, nebo vstoupit do imatrikulačního kruhu jejich ročníku či oni do vašeho. Prohlédněte si promoční kruhy vašeho známého přes jeho Osobní stránku a odkaz „Kruhy“ v kartě Profil. Kliknutím na název kruhu se zobrazí seznam osob v kruhu.
Aktivita
Vaši známí se mohou dozvědět, některé operace, které jste prováděli v poslední době v systému. Např. to, že jste si přidali další osobu mezi Své známé nebo jste provedli úpravy na své
Osobní stránce.
Aktivitu vašeho známého zjistíte na jeho Osobní stránce přes odkaz „Aktivita“ na kartě Profil. Nechte se pravidelně informovat o aktivitě známých e-mailem:
Informační systém Setkávání Aktivita
nebo
Informační systém Absolventi Aktivita
kliknutím na odkaz „změnit“ u jednotlivých položek přejdete do nastavení. Zvolíte, kde všude má být sledována aktivita i frekvenci zasílání informací. Zde lze zasílání informačního
e-mailu o aktivitě též vypnout.
The VŠTE Shopping Centre is an online shop primarily used to sell educational activities.
The shopping centre offers the following types of education:
regular courses (study of individual selected courses from the faculties' offer)
vocational training courses (interest courses, vocational courses, retraining courses, of varying duration,
e-learning courses for the public, etc.)
lifelong education in accredited programmes with the same rules as regular students
(completion of study obligations – participation in seminars,
examinations, work on assignments, etc.)
preparatory courses for prospective students
and others, e.g. courses at the University of the Third Age, language school courses
It also allows you to purchase other types of commodities, services or items:
There are several ways to choose from the Shopping Centre's offer:
through individual types of offers – education, conferences, books, etc.
through the offer of individual faculties – if you want to choose from the products of a particular faculty
1 signpost, search, add product to cart button, login
2 topic menu
3 offer of individual faculties
via the menu of selected products at the bottom of the front page (Language Centre, Career Centre, etc.)
via full-text search (if you know the name of the offer)
4selected offers of the Shopping Centre
5popular books from Munipress
5full-text search
All offers can be found on the front page of the Shopping Centre.
For each type of learning you will also find a brief description.
If you are looking for a specific product, you can use the search
available on all pages of the Shopping Centre under the magnifying
glass icon in the top right corner of the screen.
Click on the selected product to view detailed information about
it and click on the "Add to shopping cart" button at the bottom of the page.
1button to add product to cart
The button is not displayed if the package is not yet being sold
or has been discontinued and therefore the product cannot be added to the cart.
In some cases, the offer can be added to the cart on the product page. When you click on the
shopping cart icon, the offer is added to the cart. When you click on the
"Add to shopping cart" link, you will be taken directly to the shopping cart with the item.
The pre-order option means that the course is now fully booked by those
who have ordered the package before you. However, the course is still on sale,
so more people can apply. In the event that someone does not pay on time or
the course capacity has been increased, then the pre-order will turn into an order
and you will be able to pay for the course. In this case, the payment details will
be sent to you automatically by the system.
On the top right corner of each page you will find a shopping cart icon with a
red number for the number of packages you have in it.
1shopping cart icon with the number of items inserted
When you click on this icon and click on the Details button, a page with the detailed
contents of the shopping cart will appear. On this page, you can directly edit the contents of the shopping cart
(edit the number of packages to be ordered or even delete them from
the cart completely) or proceed to the order.
1 removal of the selected package
2 button to change the quantity of inserted packages
The easiest way is to log in to the Shopping Centre via the UIN (učo) and the IS password.
If you enter the Shopping Centre directly from the authenticated IS, you do not need to log
in separately, if not, you can log in by clicking on the key icon at the top right and
selecting "Login to VŠTE IS". If you have already shopped at the Shopping Centre without
logging into the IS, you can use the details from your previous order by clicking on the key icon.
You can register in the first step of the order by clicking on Order in the Login section
(unless it is a fast order, no registration is needed here). For a fast order, you
only need to fill in your first and last name, your email and a control code. If you
need to fill in any additional information, just click on the "More options" button.
If you already have the selected products in your cart and want to order them, click on the Order link
in the upper right corner of the page (after clicking on the shopping cart icon).
Then fill in the required information and press "Order".
On the next page, choose your payment method and press "Next". Next, recap your order,
check the details provided and click on "Complete order for binding payment".
The system will then display the payment details, and these will also be sent to your email.
For each product there are conditions for purchase, which are displayed under
the buy button on the page of the specific package. This may be, for example,
a limitation on the payment method of the product, a limitation on the number
of units ordered from the package, etc. Any restrictions will be reflected
during the order process.
After filling in the basic data, in the second step you choose the payment method
by checking the appropriate option (bank transfer, credit card, postal
order or in person at the cash desk of the faculty that sells the product).
Not all payment methods are always available. It depends on the nature of the
product and the settings of the faculty offering it.
If you have not yet sent payment for your order, you can cancel it in the application
Information system (Shopping Centre) My orders
Click on the order ID and then on "Do you want to discard the order?".
Check the box and click on "Discard order" to confirm that payment has
not yet been sent for the order and cancel it. Payment may no longer
be sent for a cancelled order.
Each user keeps personal information in the application:
The Information System (People) Personal Section Check and change your personal data
Please update your listing when you change it and request a processing. If your listing is in perfect order, please confirm it at the bottom of the page.
If you submit a change request via the personal data verification form, it will be processed by a person with the k_people
access right (typically a staff member from the study or HR department). They will either approve or reject your request, or ask you to
provide additional documentation. Before submitting the change request, you can add a comment to explain the reason for the change to the responsible person.
Personal data is not public, only people with access rights k_people have access. If you would like to disclose
information about yourself, please use the Personal Page:
The Information System People Change the People application settings
Pursuant to the “zákon č. 111/1998 Sb. o vysokých školách § 87 písm. j)” the Ministry maintains, in particular for the purpose of determining facts in accreditation proceedings, in electronic form, a register of associate professors and professors employed at public and private universities containing, in particular, the following data on the employees: information on the employee's higher education field, his academic titles, scientific degrees and scientific and pedagogical titles, including the programs or fields in which the degrees and degrees were obtained.
To access the data collection app, go to:
The Information System (People) Personal Section Academic qualification
Create a new form via:
The Information System (People) Personal Section Academic qualification (Moje záznamy) založit nový
Fill in this form:
Date of qualification (in format "20 6 2005" without quotation marks)
level of education achieved,
level of education achieved,
only after you have selected a degree, can you select from the menu the degree and field that is tied to the degree. If you do not find an item in the menu, select “other” and enter the information in the text box.
Your listing will be confirmed by a HR specialist. You can cancel the record before you confirm it, after it has been confirmed by the HR manager, only the HR manager can change or cancel the listing.
Note
The app is only available to users with an active VŠTE relationship..
The records are confirmed by authorized persons through the application:
The Information System (People) Personal section Academic qualification (Operace pro pověřené osoby) Potvrzení, úprava a rušení záznamů
Pověřené osoby mohou také manipulovat se záznamy jiných osob:
The Information System (People) Personal Section Academic qualification (Operace pro pověřené osoby) Založit záznam osobě
The Information System (People) Personal Section Academic qualification (Operace pro pověřené osoby) Seznam dosud nepotvrzených záznamů
The Information System (People) Personal Section Academic qualification (Operace pro pověřené osoby) Zobrazit seznam záznamů z fakulty
If you find any inaccuracies in the data, please contact your Human Resources department for details.
In case of problems with the application, contact the IS coordinator at your school.
Tip
The possibility of registering guarantors of study programs and fields in a certain period (from-to) is related to the Academic Qualification agenda. For owners of the access rights katal_a is available application:
The Information System Studies (Degree Programmes, Fields and Specializations) Programme and field guarantor registry
The purpose of this service is only to make students' work with Information System convenient. In this respect, its malfunction should by no means be used as an excuse for not attending to the duties stipulated by Study and Examination Regulations. This also applies to the situations where the service provides inaccurate or incomplete information.
The situation notice is displayed on the IS VŠTE title page, or an e-mail is sent (depending on the type of situation and the level of risk).
1 IS reminders on the title page.
Overview of current and historical alerts can also be found in:
The Information System Student During studies IS reminders
Students with interrupted study are notified of the planned end of interruption of study. (Students who do not apply for re-enrollment before the scheduled date of interruption of study are automatically terminated.)
Reminds students of bachelor, master, follow-up master's and doctoral studies.
It is warned one month before the scheduled termination of the interruption. A warning email is sent two weeks before the scheduled return. One week before the scheduled return, a warning email is sent every fourth day.
The Surveys agenda is used to create questionnaires and surveys not only for users in the VŠTE IS, but also outside it. It offers a number of advanced settings, including automatic sending of emails to respondents for organizer holding the explicit access right.
Whether all or only certain persons or studies included in the list of respondents may respond
Whether the questions are answered by individual people or fields of study
Whether it is accessible only authenticated users
Whether the survey is anonymous
Whether respondents are allowed to see the results
It is also possible to set up the survey administrators and placement of the survey to a department, a welcome page, for sections with repeats to a learning object linking the survey to the faculty and term, texts of automatic emails, etc.
After saving the survey, you can edit sections and questions or perform other operations on the survey. Links to other applications can be found by clicking on the on the More options button of the survey you want (triangle icon).
If you want the survey to be anonymous, check the "Yes" option when you create the survey. Information about the anonymity of the survey will be displayed to respondents automatically when the survey is opened. If you use this option, no additional information will be available to you to uniquely identify the person. You can change the option until the first respondent opens the survey, after which editing is no longer possible.
In the My Surveys section, select the "Questionnaire" option for the
survey you want.
Each survey always contains at least one section. Within a section, there is a uniform setup for linking questions to study objects (see below) and can be checked for completeness. It is not necessary to fill in the section name.
At the top of the page there is a fixed banner which allows you to switch on various functions, e.g. deletion, reordering of questions, editing of identifiers (mainly used for machine processing of exported answers), etc. To create a bilingual version of the survey, select "česko-anglický" in the Formulář operations panel.
For each section, you can set the study objects to which it responds:
Žádný studijní objekt (No study object)
The questions in the section will not be repeated for any of the enrolled courses, seminars, etc. This is the most typical setting.
Zapsané předměty (Enrolled course)
It is responded to the courses that the study has enrolled in the
semester and faculty, according to the survey setting.
Semináře zapsaných předmětů (Seminar goups of enrolled courses)
It is responded to the seminars that the study has enrolled in the
semester and faculty, according to the survey setting.
Předmět-přednášející (Course-lecturer)
It will be responded to each course-lecturer pair for courses enrolled in the semester at faculty, according to the survey setting.
Seminář-cvičící (Seminar group-seminar tutor)
It is responded for each seminar group – seminar tutor pair to the
seminars in which the study is enrolled in the semester and faculty,
according to the survey setting.
Předmět-přednášející a seminář-cvičící (Course-lecturer and seminar group-seminar tutor)
Course survey mode. It is responded to each course - lecturer and
seminar group - seminar tutor pair that the study has enrolled in the
semester and faculty, according to the survey setting.
If you want to check the completion of questions in a section, you need to check the option "Kontrolovat vyplněnost sekce" (Check section completion). Otherwise the respondent will complete the section even if he/she does not answer any questions.
For each question, you can choose from several types (see more in the question What are the types of questions?) and decide whether the question is mandatory or not.
If the system detects any problems in the survey settings, you will find the message "Průzkum obsahuje chyby" (Survey contains errors). You can also expand the list of errors detected, including links to applications where you can solve the problem.
To check how respondents will see the survey, select the link for the language version for the selected survey on the front page of the agenda (via Links to the survey button).
If the survey is only for a list of studies, it will be displayed in sample mode. This is a view through a randomly selected student from the list, the questions will be displayed for all of his/her courses, just as if he/she was completing the survey themselves.
As a survey creator or administrator, you can access the results of your surveys via the "Results" link in the operations panel of the selected survey. Here you can view all responses to questions in different modes. Other users can access the results of the surveys they have answered, if publishing the answers has been enabled.
The results for study objects are always displayed to the persons in relation to the course. Lecturers, seminar tutors for objects with their name, as well as guarantors and persons with the anketa_predm access right for the department where the course is assigned (or according to the guarantor or supplier department).
You can also export the survey results to different formats using the "Export answers" application available in the survey operations menu.
For each survey, it is possible to email users who have responded authenticated. If a list of respondents is set up for a survey, it is also possible to email those who have not responded. The emailing can be done using the Send email to those "who have completed" / "who have not yet completed" links in the operations menu.
In order to use this feature, there must be a minimum of 5 people to be contacted to preserve anonymity.
For users with the e_pruzkum, s_studium or k_people access rights there is also an automatic mailing of respondents option.
You can set up either a welcome email to be sent out when the survey is launched or an urgent email to go around to non-respondents at a specified time. In the survey announcement form, all you need to do is fill in the "Uvítací e-mail" section (welcome email), where you enter the time of the distribution, the subject and the text of the email.
Similarly, you can set up automatic mailing of respondents during the survey. For this purpose, the "Urgence respondentů" section (respondent urgence) is available. Here you can set the subject and text of the urgent email as well as the date when the emails will be sent out. Up to three variants can be created.
The versions of the emails can be set in both cases in the English version.
Active filtering allows you to change the menu of displayed questions according to the respondent's answers.
It is possible to either hide or reveal questions based on previous answers. You can also set the filter to apply to the whole section at once.
We do not recommend combining hiding and uncovering in one survey. The resulting combination of rules may, in the extreme, prevent the respondent from passing the survey.
You can check changes to a survey in the History of operations application. Here you will find information about all saved changes as well as information about automatically sent emails.
The displayed items can be filtered by operation type.
For the survey you want to copy, select the "Create a new survey with
pre-filled information" option in the operation selection line. Next, follow the same procedure as for the creation of a new survey.
Each survey can be set up with administrators, who can manipulate the survey in the same way as the survey's creator. However, administrators are not allowed to delete a survey.
The survey can also be manipulated by the person with e_pruzkum access right at the department the survey is associated with. If the survey is not associated with a department, only the creator can edit it.
Do aplikace pro rezervování místností můžete vstoupit přes
Informační systém Kalendář Další rozvrhy a rezervace Rezervace místností
nebo
Informační systém Učitel (Zkoušení) Rezervace místností
zde najdete seznam místností, které máte právo rezervovat.
Jedná se o místnosti, u kterých jste uveden v Kontaktních údajích nebo
jsou označeny některým z atributů „Smí rezerovat“, „Smí rezerv. učo“,
„Smí sprav. učo“ či „Smí rezerv. sk.“ a vy spadáte do jejich hodnot. Hodnotou atributu
„Smí rezervovat“ je ID pracoviště. Takovou místnost si můžete zarezervovat,
pokud pracujete (jako zaměstnanec, učitel, doktorant nebo máte právo
s_rezerv_mist) na stejném pracovišti nebo jeho podpracovišti.
Pro rezervaci vyberte požadovanou místnost a den a klikněte na „Rezervovat“.
Následně si vyberte v tabulce požadovaný čas a vložte k rezervovaným hodinám komentář.
Rezervaci potvrďte tlačítkem „Rezervovat“.
1 Výběr hodiny.
2 Popis typu akce.
3 Možnost zaškrtnout, pokud chcete rezervaci vybraných hodin povolit i dalším lidem.
Přehled vámi rezervovaných místností naleznete na úvodní stránce aplikace pod odkazem „Moje rezervace“.
Datum, do kterého lze místnosti rezervovat, naleznete dole na stránce v Doplňujících informacích.
Toto omezení neplatí pro osoby s nadřazeným právem s_rezerv_mist pro vybranou fakultu, které mají
možnost rezervovat místnosti i mimo uvedené datum. V tomto případě je potřeba změnit interval zobrazených dnů a požadované datum dohledat.
Omezení neplatí také v případě, že je místnost označena atributem „Nevýuková místnost“.
Takovou místnost lze rezervovat kdykoliv od aktuálního dne po dobu uvedenou v hodnotě
atributu (měsíce nebo roky).
Aplikace také kontroluje, zda nedochází ke kolizím s nezveřejněným rozvrhem.
Rezervace nelze zadávat, pokud se datum „dokdy lze rezervovat“ nachází v období, kdy ještě není zveřejněn rozvrh.
Osoby s nadřazeným právem mohou rezervace provádět i v tomto období, ideálně však po dohodě s fakultním rozvrhářem.
1 Datum, do kterého lze místnosti rezervovat.
V případě, že potřebujete rezervovat místnost mimo stanovenou dobu, kontaktujte
osobu s nadřazeným právem. Seznam těchto osob naleznete pod odkazem „Kdo smí na vybrané fakultě měnit „dokdy lze rezervovat místnosti“?“.
Zvolte místnost a den rezervace a v nabídce operací zvolte možnost „Upravit“. Měnit můžete popis akce, místnost nebo možnost sdílení.
Při výběru jiné místnosti se po rozkliknutí nabídnou všechny místnosti, které máte právo rezervovat, a které jsou aktuálně volné, případně
mají povolené sdílení rezervací.
1 Změna popisu akce.
2 Výběr jiné místnosti.
Pro zrušení rezervace vyberte místnost a den rezervace a v operacích vyberte možnost „Zrušit“.
Akce označené zeleným rožkem můžete zrušit. Klikněte na příslušnou buňku tabulky a volbu potvrďte tlačítkem „Zrušit“.
Na rušení rezervací označených červeným rožkem nemáte právo.
Upravovat nebo rušit můžete vámi zadané rezervace nebo rezervace místností, u kterých jste uveden v atributu „Smí spravovat učo“, nebo u kterých
máte právo s_rezerv_mist na pracoviště uvedené v atributu „Smí rezervovat“ (pokud máte právo na celou fakultu, ale na dané pracoviště ne, rezervace rušit nemůžete).
1 Vybraný termín označte a volbu potvrďte tlačítkem „Zrušit“.
Atributy se používají pro popis vlastností místnosti jako vybavení, určení místnosti atd. Jaké atributy má která místnost,
je uvedeno u jejího záznamu v Registru budov a místností.
Pro označení místnosti lze použít tyto atributy:
Délka rezervace
Definuje délku nejmenšího rezervovatelného bloku místnosti.
Jako hodnota se uvádí počet minut a smí být 5, 10, 15 nebo 30 minut.
K místnosti nelze přiřadit více hodnot tohoto atributu.
Kapacita
Počet míst k sezení v místnosti, typicky v učebně. Smí obsahovat výhradně číslo.
Kapacita – pozn.
Textová poznámka ke kapacitě, např. „písemka 56“, tj. 56 míst pro písemku, pokud chceme studenty usazovat přes jedno volné místo.
Kapacita s 2m rozestupy
Počet míst k sezení v místnosti tak, aby byla dodržena vzdálenost 2 metry mezi sedícími.
Nehlásit kolize
Rozvrháři se neoznamují kolize rozvrhových akcí v této místnosti.
Hodí se pro virtuální místnosti, ve kterých je rozvrhována online výuka.
Neplatná místnost
Zrušená místnost, která se nebude objevovat v seznamech místností a nelze do ní rozvrhovat nebo rezervovat.
Nevýuková místn.
Místnost primárně neurčená na výuku. Osoby s oprávněním ji smí rezervovat bez ohledu na zveřejnění rozvrhu.
Jako hodnota se uvádí např.:
„Neomezovat 3 měs“, pro omezení podle počtu měsíců
nebo
„Neomezovat 1 rok“ podle počtu let.
K místnosti nelze přiřadit více hodnot tohoto atributu.
Oznámí se
Pokud rezervace místnosti spadá do určené (tzv. nestandardní) doby, zašle se o rezervaci nebo její změně e-mail na zadanou
adresu (a potvrzení rezervujícímu).
Uvádí se např.:
20–6 vikend svatek nekdo@nekde.skola.cz
kde:
20–6 je sledovaný rozsah hodin; v tomto případě se e-mail posílá, pokud rezervace spadá do doby od 20.00 do 06.59 hod. dalšího dne,
vikend – posílá se e-mail, pokud rezervace spadá do víkendu,
svatek – posílá se e-mail, pokud rezervace spadá do svátku,
nekdo@nekde.skola.cz je e-mailová adresy osoby nebo hromadná adresa (povinný parametr).
Pokud je uvedena jen e-mailová adresa bez dalšího upřesnění, posílá se e-mail při každé rezervaci.
Pokud chcete poslat e-mail na více adres nebo pro různé časy, můžete atribut zadat vícekrát s různými hodnotami.
Rezerv. v celou
Lze nastavit rezervaci místnosti v celé hodiny nehledě na začátky vyučovacích hodin.
Jako hodnota se uvádí např.: 10–15. Zadává se rozsah hodin, ve kterém se místnost dá rezervovat.
Trvání posledního rezervovatelného bloku končí v hodině určené údajem „do“.
K místnosti nelze přiřadit více hodnot tohoto atributu.
Smí rezerv. sk.
Stejné použití jako v případě atributu Smí rezervovat, ale uvádí se jednotlivé skupiny osob – ID skupiny nebo skupinu ve tvaru pracoviště:zkratka.
Smí rezerv. učo
Stejné použití jako v případě atributu Smí rezervovat, ale uvádí se jednotlivá uča osob.
Smí rezervovat
Číslo pracoviště, jehož osoby smí čas v místnosti označené tímto atributem rezervovat v aplikaci pro Rezervaci místností.
Lze atribut postupně přidělit vícekrát, více pracovištím. Toto omezení se netýká rozvrhářů, kteří smějí pro výuku rozvrhovat
libovolnou místnost. Dále si mohou místnost např. pro zkušební termín rezervovat ti, kteří jsou k místnosti přiřazeni v agendě Kontakty.
Smí sprav. učo
Stejné použití jako v případě atributu Smí rezerv. učo, ale oprávněný uživatel smí navíc upravovat a rušit cizí rezervace příslušné místnosti.
Určení místnosti
Textový popis, např. učebna, laboratoř, sklad. Sem nevkládejte jména osob, či telefonní čísla; tyto údaje patří do agendy Kontaktů.
URL
Webová adresa v Internetu, např. s plánkem místnosti.
Užívá pracoviště
Číslo pracoviště, které místnost využívá.
Vybavení
Vybavení místnosti, zpravidla učebny. Doporučené zkratky: ZP zpětný projektor, DP datový projektor, VIZ vizualizér, POČ počítač,
KŘÍD křídová tabule, FIX fixová tabule. Možnosti oddělujte čárkami.
Prostřednictvím RSS můžete odebírat nové příspěvky z vybraných aplikací IS VŠTE (Diskusní fóra, Vývěska, Blogy ...), aniž byste se museli přihlašovat do systému.
Jak to funguje? V aplikaci, která nabízí RSS zdroj, si zvolíte sekci, kterou chcete sledovat, a kliknutím na ikonku pro RSS si zvolíte přidání odběru.
Pro čtení odběrů je vhodné používat RSS čtečku např. Feedly.com, odběry si ale můžete procházet i ve svém internetovém prohlížeči.
Bližší informace o RSS lze najít ve Wikipedii.
Vývěska
Na Vývěsce si vyberete sekci, kterou chcete sledovat, např. Pozvánky. Kliknutím na ikonku pro odběr vedle názvu sekce můžete zvolit odebírání nových zpráv ze všech podsekci.
Pokud kliknete na ikonku pro odběr přímo u podsekce, můžete zvolit odebírání zpráv jen z této podsekce.
1 Odběr zpráv z hlavní sekce.
2 Odběr zpráv z podsekce.
Blogy
Prostřednictvím RSS můžete také odebírat nové příspěvky z Blogů. Odebírat můžete jak příspěvky (včetně komentářů) z celého blogu, tak jen komentáře z konkrétního příspěvku.
Po kliknutí na ikonku pro přidání odběru se vám zobrazí nové okno pro upřesnění odběru. Odebírat tak můžete např. jen zprávy z vybrané sekce, zprávy ze všech podsekcí, nové komentáře apod. Možnosti odběru závisí na sekci, ze které jste odběr zvolili. Počet přispěvků v jednom odběru je omezen na 100 nejnovějších.
Přes RSS může webmaster získávat data z tematické vývěsky pro prezentaci na svém webu. Bližší informace o této funkci najdete v
Nápovědě pro Tematickou vývěsku.
Kliknutím na název vstoupíte do složky nebo otevřete soubor.
Po označení zvoleného souboru/složky se napravo od obsahu složky zobrazí panel nástrojů pro práci se souborem/složkou.
Soubory je možné označit zatržením checkboxu vlevo před typy dostupných souborů.
Více za sebou seřazených ikon vlevo od názvu znamená, že soubor je dostupný ve více formátech. Po najetím kurzorem myši na tuto ikonu se zobrazí všechny dostupné formáty souboru (po kliknutí na příslušnou ikonu dojde ke stažení daného souboru).
Jak nahrát soubor z PC do IS?
Pomocí Správce souborů – Přidat → Soubor nahrát (v případě, že máte nastaveno zobrazení Méně možností), nebo Soubor – nahrát (v případě nastavení Více možností).
1 Klikněte na ikonu, pokud chcete vložit soubor, nebo vybírejte z menu „+ Přidat“.
2 Označte složky/soubor (nebo více souborů/složek) zatržením checkboxu nebo kliknutím do volného prostoru příslušného řádku.
3 Dostupné formáty příslušného souboru.
Pomocí funkce Drag&Drop – další možností jak nahrát soubor do ISu z počítače je pomocí funkce Drag&Drop. Tato funkce umožňuje „přetažení” souboru z počítače přímo do grafického prostředí ISu zobrazeného v internetovém prohlížeči. Tuto funkci lze použít tak, že “uchopíte” pomocí myši soubor (či složku) na svém počítači a poté jej přesunete přetažením do právě otevřené složky v ISu. Po tomto kroku se otevře okno, které zobrazí vkládané soubory a umožní jejich případnou změnu Názvu, Jména souboru nebo přidání požadovaného popisu souboru. Pomocí funkce Drag&Drop lze navíc přidávat více souborů pomocí jednoho přetažení.
Operace jsou dostupné buď ze svislé nabídky panelu nástrojů (napravo od obsahu složky), nebo po kliku pravým tlačítkem myši na příslušný soubor/složku, kdy se zobrazí totožné menu.
Jak pracovat s více řádky najednou, např. jich více odstranit? Zaškrtněte řádky zaškrtávátkem v levém sloupci a v menu Operace .. Zaškrtnuté vyberte úkon, který s nimi chcete provést.
1 Panel nástrojů po označení vybraného souboru/složky, případně více souborů a složek.
2 Zobrazené menu nástrojů, které se zobrazí po kliknutí pravým tlačítkem myši na příslušný soubor/složku.
Pro získání Adresy souboru v ISu, pod kterou je objekt dostupný, nejprve soubor označte a poté klikněte na odkaz Sdílet vpravo. Zobrazí se dva odkazy Adresa v ISu a Adresa ze světa. Ty můžete zkopírovat a uložit nebo odeslat příjemci. Odkaz na složku, ve které se právě nacházíte, navíc vidíte i v poli nad obsahem právě otevřené složky.
1 Odkaz pro sdílení souboru.
2 Adresa v ISu slouží pro přihlášené osoby v ISu. Adresa ze světa je pak dostupná všem, kteří budou mít tento odkaz.
Další možností, jak lze sdílet adresu na vybraný soubor, je pomocí funkce Kopírovat adresu. Tu je možné opět použít dvěma způsoby. První možností je označit zvolený soubor a poté v pravém panelu nástrojů kliknout na Kopírovat adresu. Druhým způsobem je kliknutí pravým tlačítkem myši na příslušný soubor, a zde na Kopírovat adresu. Tato funkce automaticky zkopíruje adresu na příslušný soubor do paměti počítače a poté ji můžete vložit, kam potřebujete, a to buď kliknutím pravým tlačítkem myši a poté vložením nebo pomocí klávesové zkratky Ctrl+v. Tato adresa je Adresou v ISu, tedy bude přístupná pouze autentizovaným uživatelům, kteří mají na práci se souborem příslušná práva.
Nastavení přístupových práv u specifického souboru/složky je viditelné v obsahu složky, ve sloupci práva. Nastavení práv je graficky znázorněno třemi vzestupnými body různých barev. Tmavě žlutý bod znamená, že soubor je přístupný pouze pro čtení. Zelený znamená zpřístupnění pro vkládání a červený bod posléze označuje právo na správu daného souboru/složky.
K nastavení práv je možné se dostat dvěma způsoby. Buď označíte příslušný soubor (či více souborů) a kliknete na odkaz Nastavit práva v panelu nástroj. Nebo kliknete na ikonu zobrazující nastavení práv ve sloupci Práva. Poté se otevře nové okno s možnostmi nastavení přístupových práv. Zde můžete přidávat a odebírat jednotlivé skupiny, nebo jednotlivce, u kterých chcete nastavit přístupová práva. U jednotlivých definovaných skupin můžete dále nastavit pomocí checkboxů tři základní atributy – číst, vkládat a spravovat. Pod ikonou hodin se pak skrývá možnost nastavení od kdy do kdy může příslušná definovaná skupina s daným souborem/složkou pracovat (typicky nastavení horní časové hranice pro odevzdání domácích úkolů od studentů apod.).
1 Hromadné nastavení přístupových práv.
2 Skupiny osob, pro která jsou práva nastavena. Kliknutím na křížek, před názvem skupiny osob danou skupinu odeberete. Opět ji můžete přidat kliknutím na Přidat další právo.
3 Nastavení jednotlivých atributů u dané skupiny osob (číst, vkládat, spravovat a nastavení doby práce se souborem).
Navigační lišta umožňuje prostřednictvím svých ikon tyto akce:
setřídit dle daného sloupce (Název, Vložil, Vloženo),
zkontrolovat přístupová práva.
Pod béžovou lištou je aktuálně otevřená složka, nad ní jsou nadřazené složky. Vodící lišty složek/souborů jsou šedé. Nad názvem stromové struktury, ve které se právě nacházíte (typicky předmětu), se nachází struktura nadřazených složek. Pro přechod mezi nimi na ně lze jednoduše kliknout. Modrý pruh na začátku řádku s příslušným souborem značí, že se jedná o nepřečtené složky/soubory.
1 Možnosti seřazení souborů ve složce podle Názvu, jméno, kdo soubor Vložil, a data, kdy byl soubor Vložen. Seřazení vždy nejprve seřadí složky a poté až jednotlivé soubory.
2 Stromová struktura, která ukazuje, na jaké pozici se ve struktuře nadřazených složek.
3 Modrý pruh označující, že daný soubor dosud vámi nebyl přečten/otevřen.
Změnu automatického řazení souborů můžete docílit dvěma základními cestami. V první řadě můžete pro seřazení využít označení příslušných sloupců v panelu Navigační lišty (Název, Vložil, Vloženo). V první řadě se vždy seřadí složky a poté až soubory.
V případě, že není takovéto automatické řazení dostatečné, je možné využít i možnost vlastního nastavení řazení jednotlivých souborů a složek. Toho můžete docílit pomocí aplikace Změnit pořadí (opět v pravím panelu nástrojů, nebo po kliknutím pravým tlačítkem myši na příslušný soubor). Po kliknutí na Změnit pořadí se zobrazí nabídka, která vyžaduje zadání čísla pořadí daného souboru/složky. Po zadání pořadí klikněte na tlačítko Uložit, což povede k požadovanému zařazení daného souboru/složky. Pomocí aplikace Změnit pořadí se dokážete vyhnout i automatickému řazení, kdy jsou v první řadě seřazeny složky a poté až soubory. Pomocí této aplikace tak můžete docílit jakékoliv požadované struktury souborů a složek v daném adresáři.
Je k dispozici operace Přesunout do popelnice. Ta nezruší soubory
úplně, ale přesune je do složky Popelnice ve vaší Úschovně. Tam budou
zrušeny (vyexpirují) v běžném termínu expirace Úschovny, tj. za 30
dní. Pokud nechcete, aby byly přesunuty do složky Popelnice, můžete
zatrhnout možnost „odstranit místo přesouvání do popelnice“.
Agendu Vývěska lze využít jako frontend pro sběr zpráv/oznámení, které si webmaster externího webového systému přebírá pomocí RSS a prezentuje
na svém webu.
Příklady použití:
Studijní oddělení píše do Vývěsky Aktuality, které má fakulta zájem zobrazovat i na svém fakultním webu.
Pověření členové katedry vkládají do IS VŠTE kalendář katederního odborného kolokvia se zvanými hosty, to se přenáší na katederní web.
Výhody:
Vkládající osoby jsou zvyklé pracovat v IS VŠTE, nemusí se provozovat redakční systém, kde by zprávy vkládaly.
Vložené zprávy se mohou zobrazovat i čtenářům v IS VŠTE (přečte si je patrně více osob).
Ke zprávě lze přiložit přílohy (soubory) uskladněné v systému.
U zprávy lze vynutit vyplnění doplňkových rubrik dle úvahy správce/webmastera, který vývěsku provozuje.
Informační systém Vývěska Založit tematickou vývěsku
V nastavení Vývěsky uveďte Název, Záhlaví a Zkratku. Upřesněte, kdo smí zprávy spravovat (mazat, editovat, ...), číst, či vkládat. Přístup lze nastavit
různým skupinám např. zaměstnancům pracoviště, komukoliv v IS VŠTE, komukoliv v internetu.
Je-li to pro váš účel vhodné, rozdělte vývěsku do sekcí. U sekce lze vyplnit záhlaví (zpravidla obsahuje další informace/odkazy o
instituci/projektu, kterého se daná Vývěska týká).
Rozmyslete si, zda zprávám budete nastavovat expiraci (datum, kdy zpráva zmizí). Výhodou expirace je, že staré zprávy neobtěžují nové čtenáře. Vložení
zprávy a nastavení její expirace provedete v
Informační systém Vývěska [Vybraná vývěska v sekci Tematické vývěsky] Vložit novou
zprávu
Každou sekci na Vývěsce lze odebírat přes RSS zdroj. Uživatel tak může školní Vývěsky číst ve své oblíbené čtečce. Stejným formátem může
webmaster získávat data z tematické vývěsky pro prezentaci na svém webu. Zpráva ve formátu RSS vč. doplňkových položek by vypadala například takto:
<item xmlns:cvis="https://is.vstecb.cz/auth/bb/FF/muni_aktuality/8556391/">
      <title>Libuše Valíčková: Sociální procesy a osobnost 2007</title>

      <link>https://is.vstecb.cz/auth/bb/FF/muni_aktuality/8556391/</link>
      <description>Ve dnech 13. až 15. září 2007 organizuje Psychologický ústav Filozofické fakulty Masarykovy univerzity desátý, jubilejní ročník konference na téma Sociální procesy a
osobnost.</description>
      <guid>8556391</guid>
      <pubDate>Mon, 29 Jun 2009 11:27:28 +0200</pubDate>
      <cvis:completive_values_muis>
      <cvis:poradatel_bez_uco> </cvis:poradatel_bez_uco>
      <cvis:poradatel_prac>142113</cvis:poradatel_prac>

      <cvis:MISTO_KONANI_CS>Telč, Univerzitní centrum Telč</cvis:MISTO_KONANI_CS>

      <cvis:OBSAH_EN>In the days of September (from 13th till 15th September 2007) will be held the tenth jubilee annual volume of the conference Social processes and
personality.</cvis:OBSAH_EN>
      <cvis:poradajici_osoba_1>11191</cvis:poradajici_osoba_1>
      <cvis:termin_do>20070915</cvis:termin_do>
      <cvis:poradatel_bez_uco_kontakt>hump@phil.muni.cz; tel: 737 620 399</cvis:poradatel_bez_uco_kontakt>

      <cvis:NAZEV_EN>Social processes and personality 2007</cvis:NAZEV_EN>
      <cvis:termin_od>20070913</cvis:termin_od>
      </cvis:completive_values_muis>
      </item>
Přebírat sekce z Vývěsky na webové stránky je možné prostřednictvím neautentizovaného RSS zdroje, který může být např.:
https://is.vstecb.cz/rss/bb/PriF/zfakulty/
Kontrola přístupu k neautentizovanému RSS zdroji probíhá na základě IP adresy, ze které dochází k připojení. Pro povolení je nutné zaslat IP adresu, ze kterého se bude k RSS zdroji přistupovat,
na adresu vsteis@fi.muni.cz. Na přístupy z oznámených IP adres se nevztahuje dočasné vypnutí RSS zdroje při zvýšené zátěži.
Úkolem fakultního/katederního/ap. webmastera je připravit si na své straně mechanismus,
který bude periodicky stahovat požadované sekce ze zadaných RSS zdrojů a vkládat je na webové stránky.
Aplikace sleduje některé události v IS VŠTE a sestavuje jejich seznam v chronologické posloupnosti tak, jak se staly.
Seznam událostí obsahuje např. změny ve zkušebních termínech, v poznámkových blocích, ve sledovaných diskusních fórech,
na vývěskách apod. Upozornění na vybrané změny je možné si nechat zasílat e-mailem, a to v několika různých intervalech.
Nově aplikace poskytuje aktivní dotazování systému ohledně nových událostí a zobrazování vyskakovacího okna s upozorněním.
sledované hlavní vývěsky, pozvánky, inzerce, tematické vývěsky,
sledované blogy,
studijní materiály (složky a soubory označené jako oblíbené),
dokumentový server (složky a soubory označené jako oblíbené).
Pokud máte zájem o zobrazování změn v některé z výše uvedených agend, zaškrtněte políčko vedle názvu agendy a potvrďte tlačítkem „ok“.
Výpis událostí si pak můžete zobrazit buď v úsporném zobrazení bez detailů nebo se všemi detaily o události.
Stejnou volbu máte i u jednotlivých události pomocí volby „více/méně“.
Z každé zaznamenané události se můžete prokliknout přímo do aplikace, ve které došlo ke změně.
Pomocí „zapnout/vypnout agregaci historie událostí do nejnovější“ si zobrazíte všechny změny, nebo jen nejnovější z nich s odkazem na starší.
Některé události z agend jsou po určité době automaticky smazány:
vývěska – sekce pozvánky a inzerce po 30 dnech,
známky – po roce,
poznámkové bloky – po roce (v případě, že předmět nebo studium, ke kterému se blok vztahuje, je úspěšně ukončen, smaže se pozn. blok po 60 dnech),
obecná fóra – po 30 dnech, události z Plkáren po 10 dnech.
Zasílání událostí e-mailem si můžete nastavit přes
Informační systém Systém Nastavení systému Události Nastavení zasílání informací o událostech v ISu e-mailem
Zde si vyberte, o kterých událostech chcete být informování a jak podrobně.
Stručné sdělení obsahuje pouze základní údaje pro identifikaci změny, úplné se pokouší přinést co nejvíce informací, klesá tím však přehlednost.
Abyste nedostávali příliš mnoho e-mailů, můžete si nastavit časový interval mezi dvěma e-maily, a to v rozmezí od 2 hodin až po 28 dnů.
Pokud jste si už události prohlédli přímo v aplikaci, můžete vyprázdnit frontu událostí připravených k odeslání pomocí volby „Vyprázdnit frontu a reset intervalu“.
Touto volbou dojde také ke zrušení platnosti zbytku intervalu mezi dvěma e-maily, o nejbližší další události tak budete informováni do několika minut.
Aktivovat upozornění na nové události prostřednictvím vyskakovacího okna v systému si můžete zapnout v tabulce „Chci obdržet upozornění prohlížečem...“ v:
Informační systém Systém Nastavení systému Události Zobrazení událostí v ISu
Touto funkcí si můžete aktivovat upozornění na nejvýše 5 následujících událostí (přesněji nejvýše 5 zobrazení upozorňujícího okna).
Poté je nutné znovu kliknout na odkaz a o aktivní upozorňování se přihlásit.
Za normálního provozu se zjišťují případné nové události každou minutu, při zátěži 1 každých pět minut, od zátěže 2 je celá aplikace Události nedostupná.
Aktivní upozornění přijde pouze z těch typů událostí (zkušební termíny, známky apod.), které máte zobrazeny.
Pro správnou funkčnost je nutné nechat panel se stránkou aplikace Události otevřenou – můžete ale pracovat s jinými aplikacemi nebo prohlížet v jiných
panelech jiné stránky, prohlížeč by se měl sám „ozvat“ při zobrazení vyskakujícího okna. Pokud však panel zavřete, bude dotazování aktivováno
až při dalším otevření této stránky (již bez nutnosti klikat na aktivaci dotazování). Dále je třeba mít povolen JavaScript.
The File Depository (or Depository) is an application designed to pass files to other users. Firstly, to users who log in to is.vstecb.cz, but also to users anywhere in the world. The depository is also intended for storing your own files for a limited period of time (30 days).
Examples of use:
Pracuji v počítačové učebně, rozdělanou práci si uložím jako soubor do ISu. Doma nebo v jiné učebně si jej opět vyzvednu.
I need to receive large files (the email system only delivers messages of limited size).
Another person(s) needs to take a large file from me, I want to easily publish it to them on the Internet.
Use of File Depository
The File Depository may be used solely for study and research purposes and in accordance with the Rules Governing the Use of IS MU and other university’s directives. If administrators find that the rules have been violated, they will block access to the File Depository for at least one semester.
Temporary file storage
The File Depository is not intended for permanent storage of files; files in it must be retrieved because after the 30-day time limit expires, the files are moved to the Waste Container. They are stored there for another 30 days. After this time, the files are deleted and cannot be retrieved!
File Depository is not a Homework Vault
Do not use it to submit files (homework, essays, etc.) to the teacher, use the Study Materials application. It is also not advisable to issue learning aids through it. If you are a student, use the "File Vault" folder in the Study Materials application.
Accepting files from unauthenticated users
If you want to receive files from unauthenticated users (who do not have access to the IS), you need to give permission using
The Information system Files File Depository Enable/disable file upload into Depository by unauthenticated users
The File Depository is available to persons who have an active relationship with the school and to graduates who have successfully completed their studies by passing the state final examination. Immediately upon interruption or failure of studies or termination of employment, the File Depository will cease to be available and all files stored in the File Depository will become unavailable.
The Information system File Depository Upload to another user’s File Depository
I want to temporarily publish a file for download by persons from the VŠTE:
I put it in my File Depository and tell the person(s) its address - the internal WWW link, e.g. „https://is.vstecb.cz/auth/de/2660/rozpracovany_spolecny_projekt.doc”. I check the file's access rights so that people can get to the file.
I want to temporarily publish a file for download by persons outside the VŠTE, from the Internet:
I upload a file to my File Depository, tell people the unauthenticated link, e.g. „https://is.vstecb.cz/de/2660/rozpracovany_spolecny_projekt.doc”. I check the access rights so that anyone on the Internet can read the file.
Someone is going to put a file in my File Depository:
I will receive an email informing me of this, including the date when the file will be automatically deleted. I need to enable the option for receiving files from the Internet:
The Information system File Depository Enable/disable file upload into Depository by unauthenticated users
1 Set to enable/disable upload into the File Depository from an unauthenticated site.
Every active user (active student, employee with a work contract, etc.) or successful university graduate who has completed his/her studies with a state final examination has his/her own File Depository. Its total capacity is limited by quota. The size of the quota, the currently occupied capacity and the remaining available capacity is displayed when you enter the Files application under the File Depository icon (including the percentage of the File Depository filled). It is not possible upload files into the File Depository that would cause the quota to be exceeded once uploaded.
Each file put into the File Depository is set to an expiration date, i.e. the day it will be automatically deleted. The expiration date is currently set to 30 days in the File Depository. After this time, the file will be moved to the Waste Container folder where it will be available for another 30 days (at this stage it can still be restored back to its original location) before it is permanently deleted. After that, the file cannot be restored in any way.
You can use the application to extend the expiration date of all files in the File Depository for another 30 days. You can also shorten and extend the expiration time individually for each file (but again, only for 30 days from now).
The Information system File Depository Change expiration date of all the files stored in Depository
Files in the File Depository are not backed up, so they cannot be restored after expiration in the Waste Container folder.
Administrators reserve the right to change the newly set expiration date (not the expiration date already assigned to files) according to the current operational status of the file manager.
If administrators find that the File Depository is being used in violation of the Rules Governing the Use of IS MU and other university policies, they will immediately block the user's access to the file Depository. Access shall be blocked for a limited period of time. Even the owner of the blocked File Depository will not be able to access it. Files in a blocked File Depository will expire as usual.
The File Depository itself can be entered after logging in to the Information System, e.g. from the front page of the IS VŠTE by clicking on the "Files" agenda and then on the "File Depository" application. Only the owner (and the owner of the explicit right "g_depository"; this right is granted only exceptionally to resolve possible excesses) is allowed to view the contents of the File Depository (i.e. to click through its folders). You can also access the File Depository itself by following the link:
https://is.vstecb.cz/auth/de/učo/
The abbreviation "de" stands for "depository(s)". This is followed by a username or nickname, if you have one set up in the system.
If you enter your own File Depository, you are allowed to manipulate the entire directory tree of your depository. You can create folders, add files, download/read files, delete files and folders, change access rights, etc. Only the owner of the File Depository (and the owner of the explicit right g_depository) has the right to do these operations. By setting the access rights appropriately, you can allow other people to read files (either the is.vstecb.cz user or anyone on the Internet). However, people other than the owner are not allowed to view the contents of the File Depository, but if you want to provide a file to someone without an IS VŠTE account, you must send them an internal link to the file (and give them the right to read it), see below.
A view of the File Depository itself:
1 link to the File Depository from the menu in the Files section,
2 files that you upload here yourself,
3 files that are uploaded by another user (they are sorted into folders according to the user's učo and name),
4 File Depository settings.
Only the owner can view his/her File Depository. An internal link to the file can be provided to others:
1 check the file for which you need to get an internal link (details will be displayed),
2 Share option to get the www address for sharing (right-click on the line to bring up the menu, or select the Share option in the right sidebar with the file details).
A feature of the File Depository is that no one, except the owner of the File Depository, can see what items (files, subfolders) are in the folder.
If the user wants to navigate anyone to his/her File Depository, he/she must give the complete link to the file.
Tip: Tip for accessing large numbers of files via the File Depository
If a user needs to access a large number of files
in his/her File Depository (e.g. to a non-member of the VŠTE), it may be advisable to create a single ZIP file
from these files and then send the complete link to this single file.
The internal link points to the is.vstecb.cz File Depository. The internal link is either authenticated or unauthenticated.
Use the authenticated internal link if you want to make the file available to an iis.vstecb.cz user who has the ability to log in to the is.vstecb.cz system with a password. The authenticated link is of the form:
You can find the exact shape of the internal link in your File Depository for each file
An unauthenticated internal link differs from an authenticated one by omitting the "auth/" that causes authentication. The unauthenticated internal link to the same file is then of the form:
If you have a nickname in the system, you can use your nickname again instead of your učo (university identification number).
You can find links to the selected file by checking the selected folder/file and then clicking the Share link in the toolbar.
1 Authenticated link for users logged in to the IS VŠTE,
You can upload a file or files to someone else’s File Depository using a special application either from an authenticated website, if you are an is.vstecb.cz user; or from a non-authenticated website, if you are not an is.vstecb.cz user.
From an authenticated site, you can upload file or files using an application:
The Information system File Depository Upload to another user's File Depository
1 Link to upload a file into someone else's File Depository on the People page.
From an unauthenticated site then
https://is.vstecb.cz/ (People) File Depository
In both applications, you first need to search for the person you want to transfer the file or files to. The person must have an active relationship with the university, or be a successful alumnus, and their File Depository must not be blocked or have a full quota. Once you have located the person, upload the files. You can give optional names and descriptions to the files (or you can add a message to the recipient in the description).
From an unauthenticated website, files can only be uploaded to the File Depository to people that have enabled themselves to receive such files! The owner of the File Depository can allow files to be received from an unauthenticated website by using the application
The Information system File Depository Enable/disable file upload into Depository by unauthenticated users
Users logged in to the system can upload to the file Depository for anyone without restriction.
The owner of the File Depository is informed of the receipt of the files by an e-mail sent automatically by the Information System. The email indicates who or from where has uploaded what files and when the files expire. The email also indicates the current quota usage.
The email contains:
1 description of the uploaded file,
2 information on expiration,
3 informace o expiraci,
4 link to My File Depository.
The files uploaded by this application are collected in the File Depository in a separate folder, which is named with the uploadng user's identification. If the uploader tries to upload a file with the same name as a file already in the folder, the new file is renamed with a random file name extension. File upload is limited by a quota. The size of the quota is not communicated to the uploading person.
If you intend to provide someone with a file from your File Depository for download, set your file and all folders above it (including the topmost folder in your File Depository) to have read access so that the person can read the file. By default, the File Depository and the folders you create have read access rights for "anyone on the Internet", so you can just email the person an unauthenticated internal link to the file, for example. Anyone who knows the link can download the file. They cannot view the structure of the File Depository (folder system), only the files they know the link to.
You can create a web page in your File Depository (like a web server) from which links will lead back to the File Depository. Note, however, that files in the File Depository are limited by an expiration date (30 days). You can create your own web space without file expiration in
The Information system Files My Web
and instructions to get the site up and running can be found in
Aplikace umožňuje uvnitř IS VŠTE vyhlašovat volby, hlasovat a zveřejňovat výsledky.
Jedná se o nástroj vhodný v těch případech, kdy je elektronické (vzdálené) hlasování či volba žádoucí.
Lze použít jak pro vzdálené hlasování např. v rámci pracovní komise či kolegia, tak i pro volbu např. do studentské komory Akademického senátu.
Vyhlašovatel e-volby však musí zajistit dostatečnou propagaci volby, aby účast hlasujících byla dostatečná.
Tento systém je koncipován tak, aby byl pro hlasujícího co nejjednodušší a důvěryhodný.
1 Aplikace „E-volby“ umožňuje hlasovat například o kandidátech do akademického senátu.
Elektronickou volbu vyhlašuje fyzická osoba (vyhlašovatel). Kterýkoli uživatel Informačního systému VŠTE, který
je v aktivním vztahu ke škole (aktivní student nebo zaměstnanec). Navíc vyhlašovatel, má-li přiděleno explicitní právo y_vyhlasit_volbu,
smí vyhlásit volbu, která se považuje za „důležitou“. Ostatní vyhlašují volby „běžné“. Výsledky se zveřejňují až po ukončení hlasování.
Do té doby nejsou výsledky dostupné ani vyhlašovateli.
E-volby se vyhlašují v aplikaci:
Informační systém E-volby Vyhlásit nové volby
1 Možnost vyhlásit novou elektronickou volbu má každý aktivní student nebo zaměstnanec.
Po vyplnění jednotlivých údajů, specifikaci skupiny hlasujících a zadání možností volby je třeba poslat na
adresu vsteis@fi.muni.cz žádost o přidělení „důležitosti“ (volba se pak hlasujícím objeví jako důležitá).
Note
Při každé úpravě e-volby se příznak důležitosti zruší, takže bude třeba psát na vsteis@fi.muni.cz znovu.
Je proto velmi důležité e-volbu nejprve připravit a zkontrolovat.
1 Důležitá volba se zobrazí vždy nahoře.
2 Běžné volby se zobrazí až pod důležitými.
Důležité volby se zobrazí vždy nahoře. Lze si vyfiltrovat pouze důležité volby a nebo pouze běžné.
Elektronické volby se pořádají typicky tajné. U tajných voleb se nikomu, ani vyhlašovateli nesděluje, jak kdo hlasoval.
Ovšem vyhlašovatel při vyhlašování volby může zapnout veřejnou volbu. Hlasující je o volbě přepnuté do tohoto režimu informován.
Je-li volba veřejná, zveřejňuje se po ukončení hlasování informace o tom, jak kdo hlasoval (tedy vč. jmen hlasujících a jejich
hlasů). Pokud není volba označena jako veřejná, nezveřejňuje se seznam hlasujících ani jejich hlasy. A to ani osobě, která volbu vyhlašuje.
Informační systém zajišťuje, že jedna fyzická osoba má tolik hlasů, kolik stanovil vyhlašovatel volby, ověřuje identitu hlasujících, příslušnost k vybrané kategorii
hlasujících a zajišťuje a garantuje anonymitu tajné volby. Anonymita tajné volby je mj. zajištěna jednoznačným pokynem provozovatelům
Informačního systému, kteří nesmí identitu odpovídajících zveřejnit podobně jako u aplikací Studentské ankety.
1 Místo jména a příjmení osoby, která možnost volila, je vidět pouze osobní identifikátor pro tuto tajnou volbu.
Tip
Pro ověření správného započítání svého hlasu má uživatel k dispozici osobní identifikátor, kterým je jeho osoba identifikována
v této volbě (v jiné volbě bude mít osoba jiný identifikátor). Místo jména a příjmení osoby, která možnost volila, je vidět pouze osobní identifikátor
pro tuto tajnou volbu. Je možné si dohledat v seznamu svůj osobní identifikátor, či spolu se spolužákem/kolegou společně dohledat svoje osobní identifikátory
a získat tak důvěru v korektnost volby a jejího vyhodnocení.
Při vyhlašování volby je podstatná osoba vyhlašovatele. Tato osoba je uvedena u každé volby.
Vyhlašovatel odpovídá za to, že volba není v rozporu s pravidly používání IS VŠTE. Na osobu vyhlašovatele se mohou
hlasující obracet se svými výhradami k volbě. Vyhlašovatele nelze změnit. Vyhlášenou volbu smí upravovat nebo
zrušit jen vyhlašovatel nebo provozovatelé systému na adrese vsteis@fi.muni.cz. K volbě vyhlašovatel stanovuje
datum zahájení a datum ukončení volby. Datum zahájení musí ukazovat do budoucnosti. Nelze měnit nastavení volby,
pokud už datum zahájení uplynulo. Tento rys je podstatný pro zachování důvěry hlasujících v systém. Pokud např.
hlasující volí s vědomím, že je volba tajná, nelze volbu později změnit na veřejnou. Vyhlašovatel určuje, zda
jde o volbu tajnou nebo veřejnou. Tzn. zda se po skončení volby uveřejní jen počet hlasů ke každé možnosti
(tajná volba) nebo se zveřejní, jak kdo hlasoval. Vyhlašovatel rovněž určuje, zda výsledky volby dle předchozí
věty mají být dostupné jen těm, kteří mohli hlasovat, nebo mají být dostupné všem uživatelům Informačního systému.
Dále vyhlašovatel určuje, kolik možností musí hlasující vyznačit. Definuje minimální počet hlasů a maximální počet
hlasů. Pokud hlasující neoznačí počet hlasů v tomto intervalu, jeho volbu systém nepřijme. Tzn., že hlasující
nemůže vložit „neplatný hlas“. Hlasující se smí volby „zdržet“.
Vyhlašovatel elektronických voleb má možnost zadat pevné datum a čas spuštění volby nebo zvolit manuální spuštění voleb
pomocí nastavení „zahájit volby manuálně“. Takovou volbu může hlasujícím otevřít např. v průběhu jednání po prodiskutování příslušného bodu,
o kterém má být hlasováno. Volbu spustí ve „Správě voleb“ prostřednictvím odkazu „Zahájit hlasování“. Pro ukončení volby se objeví v
nastavení odkaz „Ukončit hlasování“, kterým hlasování uzavře.
1 E-volba s nastavením možnosti manuálního spuštění hlasování.
2 Když přijde na jednání řada na toto hlasování, vyhlašovatel ho manuálně zahájí.
Vyhlašovatel nemá po zahájení hlasování možnost měnit nastavení volby (nemůže tedy později změnit volbu z tajné na veřejnou atp.).
Vyhlašovatel však může volbu kdykoli zrušit. Zrušení volby vyhlašovatelem způsobí zrušení všech hlasů.
Ostatní údaje o volbě (název, možnosti, kdo volbu zrušil apod.) zůstávají v systému typicky ještě dva měsíce.
Úplně zrušit volbu mohou pouze provozovatelé na adrese vsteis@fi.muni.cz.
E-volbu zakládá vyhlašovatel, který může nastavit správce, kteří mají možnost volby spravovat. Kromě vybraných správců může volby spravovat také zakladatel voleb a osoba, která volby naposled editovala.
Při vyhlašování voleb se určují dva stupně důležitosti voleb:
Důležité
Volby stupně „důležité“ vyhlašují pouze majitelé práva y_vyhlasit_volbu. Právo se přiděluje na konkrétní fakultu,
pracoviště, či celou školu. Právo přidělují provozovatelé Informačního systému na adrese vsteis@fi.muni.cz.
Předpokládá se výjimečné přidělování tohoto práva. Vyhlašovatel volby stupně „důležité“ smí k volbě přiřadit hlasující
jen z fakult či pracovišť, na která má explicitní právo. Vyhlašovatel volby stupně „důležité“ má právo hromadně obesílat
hlasující e-mailem, jak všechny, tak i dosud nehlasující a ty, kteří už hlasovali. Může si také stáhnout seznam
oprávněných voličů ve formátu PDF. Důležité volby se navíc zobrazují na titulní straně IS VŠTE.
Běžné
Běžnou volbu smí vyhlašovat kterýkoli student či zaměstnanec školy. Vyhlašovatel běžné volby smí k volbě přiřadit
hlasující ze kterékoli fakulty či pracoviště školy. Vyhlašovatel běžné volby dále určuje, pro kterou fakultu je volba
vyhlášena primárně. Vyhlašovatel smí vybírat jen z fakult, na kterých má aktivní zaměstnanecký poměr, nebo na kterých
je aktivním studentem. Vyhlašovatel běžné volby nemá právo obesílat hlasující e-mailem.
Hlasující hlasuje, tzn. vybírá jednu nebo více možností podle nastavení volby. Hlasovat má právo jenom ten, komu je hlasování
povoleno při vyhlášení volby.
Informační systém E-volby Aktuální [vybrané e-volby či hlasování] Hlasovat
Volby, ve kterých uživatel může hlasovat, se zobrazují v menu „Aktuální“. Volby, ve kterých uživatel mohl hlasovat nebo
bude moci hlasovat v budoucnosti, se zobrazují v menu „Kterých se účastním“. Přehled ostatních voleb je pak dostupný v menu „Ostatní“.
Volby lze dále filtrovat podle důležitosti, hlasování ve volbách či roku vyhlášení volby.
Důležité volby se navíc zobrazují na titulní straně IS VŠTE. Hlasující má právo u každé volby volit možnost „zdržel se“.
Tuto možnost nabízí systém automaticky ke každé volbě. Každý hlasující, který zvolil libovolnou ze zadaných možností u volby
nebo možnost „zdržel se“, se započítává do počtu hlasujících a do procentuální účasti.
1 Hlasování v e-volbě.
U voleb se stupněm důležitosti „běžné“ se hlasujícímu nabízí automaticky ještě
další možnost, a to „nebudu hlasovat“ (ikona křížku u e-volby). Hlasující, který označí tuto možnost, se nezapočítává do počtu hlasujících a nadále
se mu tato volba ke hlasování nenabízí.
1 U běžné volby se hlasujícím zobrazí křížek jako možnost „Nebudu hlasovat. Tuto volbu nechci dále nabízet.“
Ve volbách do Akademického senátu jsou hlasujícím nabízeny pouze ty volební obvody, ve kterých mohou hlasovat.
Z nich si mohou vybrat pouze jeden a odevzdat v něm svůj hlas. Výjimkou jsou hlasující, kteří jsou zároveň kandidáty.
Ti musí svůj hlas odevzdat ve svém volebním obvodu (dle pravidel volebního řádu).
Hlasující smí hlasovat kdykoli v určené lhůtě. Během této lhůty smí svoji volbu měnit, resp. i stáhnout (odškrtnutím všech
zaškrtnutých možností). Hlas se započítá až po vypršení lhůty. Během lhůty se pouze zveřejňuje počet již hlasujících a procentuální účast.
Hlasující svůj hlas vidí i po ukončení volby až do okamžiku zrušení volby (smazání údajů o volbě). Volbu ruší vyhlašovatel
buď manuálně, nebo zadáním data, po kterém mají být údaje o volbě zrušeny automaticky (nejdéle po roce).
Správné započítání hlasu si uživatel může zkontrolovat v záložce „Jak kdo hlasoval“ u vybrané volby. Zde zjistí jeho osobní identifikátor, který
mu byl pro tuto volbu přidělen (v jiné volbě bude mít stejná osoba jiný identifikátor). Místo jmen voličů se zobrazují pouze osobní identifikátory pro tuto tajnou volbu.
V jejich seznamu si může uživatel dohledat svůj osobní identifikátor, či spolu se spolužákem/kolegou společně dohledat svoje osobní identifikátory a získat tak důvěru
v korektnost volby a jejího vyhodnocení.
1 Osobní identifikátor uživatele.
2 Uživatel si může dohledat řádek se svým osobním identifikátorem pro tuto tajnou volbu.
Celkový možný počet hlasujících (maximální možná účast) se vypočítává jednou denně, typicky po půlnoci. Do počtu možných
hlasujících se započítávají všechny fyzické osoby, které vyhovují kategoriím zadaným při vyhlašování volby. Jedna fyzická
osoba se započítává nejvýše jednou, byť vyhovuje více kategoriím současně. Možný počet hlasujících se přepočítává automaticky
každou noc a to až do dne, ve kterém se hlasování ukončuje. Vyhlašovatel může navíc přepočítání spustit kdykoli ručně.
Opět jen do doby než skončí hlasování. Po ukončení hlasování se již vykazovaný možný počet hlasujících nemění. Do počtu
osob, které skutečně hlasovaly, se započítávají všechny osoby, které mají zaškrtnutý vyhovující počet možností (hlasovaly)
nebo které zaškrtly „zdržuji se“. Do počtu osob, které skutečně hlasovaly, se nezapočítávají osoby, které u volby s důležitostí
„běžné“, zaškrtly „nebudu volit“. Počet osob, které skutečně volily, se vypočítává dynamicky vždy, když je tento počet potřeba.
Tzn. není předpočítán. Vždy odpovídá aktuálnímu stavu. Stejně tak výsledky se vždy vypočítávají dynamicky a nejsou předpočítány.
Předpočítán je jen celkový možný počet hlasujících.
Volbu smí zrušit buď vyhlašovatel, nebo provozovatelé Informačního systému VŠTE na adrese vsteis@fi.muni.cz. Vyhlašovatel při vyhlašování
volby může (ale nemusí) zadat datum, po jehož uplynutí systém automaticky zruší kompletně všechny informace o volbě vč. hlasů.
Toto datum je součástí zveřejňovaných informací o volbě. Datum musí být větší než datum konce voleb minimálně o jeden týden a maximálně
o 5 let. Vyhlašovatel smí navíc volbu zrušit manuálně kdykoli. Manuální zrušení volby vyhlašovatelem způsobí jen zrušení hlasů
(tzn. smaže se kdo a jak hlasoval). Ostatní informace však v systému zůstanou po dobu cca 2 měsíců. Pak je systém kompletně vymaže
automaticky. Ke zrušené volbě již nelze hlasovat. Uživatelé informace o zrušené volbě v systému vidí; vidí také údaj o tom, kdo a kdy
volbu zrušil. Dvouměsíční odklad rušení byl zaveden s cílem zamezit fámám o možných cenzurách provozovateli systému v případech, kdy
volbu zrušil vyhlašovatel sám. Systém po uplynutí 5 let od konce hlasování automaticky kompletně smaže údaje o volbě, která
nemá vyplněno datum, po kterém by se volba jinak zrušila stejně. Kompletně zrušit všechny informace o volbě mohou provozovatelé systému.
Note
Pokud uživatel vyhlásí v systému volbu „jen tak na zkoušku“, bude uživatelům viditelná ještě aspoň dva měsíce po jejím zrušení.
Informační systém zajišťuje, že jedna fyzická osoba má tolik hlasů, kolik stanovil vyhlašovatel volby, ověřuje identitu hlasujících,
příslušnost k vybrané kategorii hlasujících a zajišťuje a garantuje anonymitu tajné volby. Anonymita tajné volby je mj. zajištěna
jednoznačným pokynem provozovatelům Informačního systému VŠTE, kteří nesmí identitu odpovídajících zveřejnit podobně jako u aplikací
Studentské ankety.
Vyhledávání vám umožňuje najít různé aplikace, dokumenty a informace uložené v ISu a v dalších webových zdrojích na škole. Vyhledávácí políčko, do kterého můžete
zadat váš dotaz, najdete na všech stránkách ISu.
[1] vyhledávací políčko v ISu
Vyhledávací políčko najdete také v některých agendách (Obchodní centrum, Vývěska, Diskusní fóra, ...), pomocí něj můžete
omezit vyhledávání pouze na agendu, ve které se právě nacházíte.
[1] vyhledávací políčko v agendě Vývěska
Některé agendy používají svoje vlastní vyhledávání (Lidé, Předměty, Publikace).
Způsob vyhledávání v těchto agendách je ale odlišný, návod najdete v této Nápovědě.
Zadáte-li výraz ve tvaru psychologické experimenty, bude vyhledáván bez ohledu na velikost písmen. Chybějící diakritika ve slovech se
doplní a vyhledávány budou i další ohýbané tvary slov. (Ohýbání je modifikace tvarů slov, kterými se vyjadřují mluvnické kategorie jako např. rod,
číslo, pád, čas, osoba atd. U ohebných slov používáme skloňování a časování.)
Příklad: k zadanému výrazu Jarni semestr se vyhledá i výraz V semestru jarním.
přesná fráze
Zadáte-li výraz v uvozovkách "psychologické experimenty", vyhledá se přesně zadaný výraz, ale již se nevyhledají dokumenty, ve kterých se
vyskytují tvary s použitím ohýbání slov a doplňování diakritiky.
Pozn.: I bez použití uvozovek se vyhledávají přednostně výsledky, kde jsou hledaná slova výrazu blízko u sebe.
fráze bez některého slova
Zadáte-li výraz s minusem např. ve tvaru experimenty -psychologické, pak se do výsledku vyhledávání nezahrnou dokumenty
obsahující slovo ihned za minusem.
Pozor! Minus uvnitř slova (e-learning, Frýdek-Místek) však funguje jako vyhledávání přesné fráze s tím rozdílem,
že se do výsledků doplňuje diakritika a zohledňuje se též ohýbání slov.
Vložíte-li před hledaný výraz plus tak, aby mezi ním a slovem nebyla žádná mezera, vyhledají se dokumenty obsahující jen přesný výraz bez ohýbání
slov a doplnění diakritiky.
Příklad: Hledáme-li výraz +ježka, vyhledají se dokumenty obsahující tvar "ježka", ale již ne např. "ježek",
"ježkem", "jezek" atd.
řetězec v uvozovkách
Zadáte-li hledaný řetězec do uvozovek, rozdělí se na jednotlivá slova, která budou hledána těsně za sebou bez ohýbání a doplnění diakritiky. Slova
v řetezci jsou obvykle oddělena mezerami.
Příklad: Hledáme-li řetězec "karel čapek", vyhledají se dokumenty obsahující přesně tento tvar, ale již ne např. tvar
"karla čapka". Uvozovky, které nejsou korektně uzavřené, se považují za interpunkci. Blíže viz otázka Jak vyhledávání zachází s interpunkcí?.
Pokud se v řetězci objeví výraz, který se skládá z písmen i číslic a je bez mezer, pak se za jednotlivá slova považuje každá skupina písmen a skupina
číslic zvlášť.
Příklad: Hledáme-li řetězec "icq2go", vyhledají se dokumenty obsahující slova "icq", "2" a "go" těsně za sebou, bez
ohýbání a doplnění diakritiky.
Z výsledku vyhledávání se vyřadí dokumenty, které obsahují slovo zadané do vyhledávání za prefixem '-'. Slovo za minusem se použije bez ohýbání a bez
doplňování diakritiky. Před minusem musí být mezera, nebo musí stát na začátku dotazu. Za minusem již žádná mezera být nesmí.
Příklad: Hledáme-li řetězec test -těsto, vyhledají se dokumenty obsahující tvary slova "test" a zároveň neobsahují přímo
tvar "těsto".
Interpunkční znaménko rozděluje hledaný výraz na jednotlivá slova. Zadáte-li ve hledaném řetězci výraz bez mezer, který zároveň obsahuje
interpunkci, ve výsledku vyhledávání budou zahrnuty dokumenty, které obsahují všechna slova řetězce ihned za sebou. Vyhledávány budou i tvary slov
upravené ohýbáním a doplněním diakritiky.
Příklad: Hledáme-li řetězec věda-výzkum, vyhledají se dokumenty obsahující tvary slova "věda", za kterými ihned
následují tvary slova "výzkum", tedy např. "oddělení pro vědu, výzkum a vnější vztahy".
Pokud jste na hledaný výraz obdrželi příliš mnoho výsledků, zkuste omezit vyhledávání
pouze na určitou agendu. Možnost omezení najdete pod vyhledávácím políčkem v rozbalovací
nabídce "Upřesnit agendu". Vybraná agenda se pak připíše do hledaného výrazu např. jako
agenda:help pro hledání v Nápovědě. Znáte-li zkratku agendy, můžete zadat hledaný výraz
už přímo s omezením na určitou agendu, např. stipendia agenda:apl.
Chcete-li vyhledávat v několika agendách zároveň, klikněte na možnost "Kombinovat agendy".
Vybrané agendy se v hledaném výrazu oddělí svislítkem, např. agenda:pub|th pro publikace a závěrečné práce.
Výsledky vyhledávání je možné omezit na konkrétní diskusní fórum či blog připsáním cesty k hledanému výrazu.
Např. strom:/blog/kapky/ omezí vyhledávání na blog IS po kapkách.
Vyhledávání s použítím procenta najdete v agendách, které mají svoje vlastní vyhledávání (Lidé, Předměty, Publikace).
[1] vyhledávání v aplikaci Lidé
Pro urychlení přístupu k aplikacím, dokumentům a informacím uloženým v ISu a v dalších webových zdrojích na škole můžete použít aplikaci Vyhledávání (políčko najdete na každé stránce ISu).
Některé agendy (Obchodní centrum, Vývěska, Diskusní fóra, ...) mají vlastní vyhledávací políčko, které omezuje vyhledávání na danou agendu.
[1] vyhledávací políčko na všech stránkách ISu
Formulace dotazů ve Vyhledávání je však odlišná, návod najdete v této Nápovědě.
V některých aplikacích jsou dostupné oba typy vyhledávání.
Na diakritiku a velikost písmen se nebere ohled. Nahrazovací znaky: '%' (procento) nahrazuje libovolnou skupinu znaků, '_' (podtržítko) nahrazuje jeden znak:
Více slov za sebou: vyhledává jako celou frázi.
Dotaz
tedy vyhledá pouze dokumenty obsahující řetězec "grafika kresba malba".
ACCUM , (čárka): dokumenty, které obsahují některé ze zadaných slov. Setříděno podle součtu výskytů hledaných slov.
Toto je nejlepší způsob dotazu, nejste-li si např. přesně jisti tvarem názvu hledané publikace v databázi.
AND & (ampersand): dokumenty, které obsahují všechna zadaná slova. Setříděno podle množství výskytů hledaných slov.
NEAR ; (středník): dokumenty, které obsahují všechna zadaná slova. Setříděno podle blízkosti výskytů hledaných slov.
OR | (svislítko): dokumenty, které obsahují alespoň jedno zadané slovo. Setříděno podle množství výskytů nalezeného slova.
NOT ~ (vlnovka): dokumenty, kde se dané slovo nevyskytuje
( ) (závorky): závorky použijte pro složené výrazy:
MINUS - (pomlčka) : výskyt tohoto slova zmenší přednost, s jakou je dokument nabízen.
Např. zadáním 'sci-fi' vyhledáte všechny záznamy, ve kterých se vyskytuje slovo 'sci' a zároveň se v nich nevyskytuje slovo 'fi'.
Zadávejte proto 'sci fi'. Podobně při hledání osob, jejichž jméno obsahuje pomlčku, např. při hledání osoby se jménem 'Al-Gaf', zadejte 'Al Gaf'.
Například, chceme-li najít vše o TeXu, je dobré zadat
čímž vyfiltrujeme množství titulů, zabývajících se TEXTEM, ale nikoliv TEXEM. (Systém nebere ohled na velikost písmen.) Pozor: je-li součástí hledaného výrazu pomlčka, nepíšeme ji: např. místo Čapek-Chod napíšeme Čapek Chod Brno-Kohoutovice napíšeme Brno Kohoutovice
K dispozici jsou také operátory $slovo, ?slovo a !slovo, které zadaný dotaz transformují na podobná slova a ta hledají.
Využitelné zejména při hledání anglických objektů.
? (otazník) : slova, která mají podobný spelling
! (vykřičník) : slova, která podobně zní
$ (string) : slova s podobným základem či kořenem
Obdobný dotaz je vhodné zpřesnit přidáním dalších podmínek, jinak je vráceno příliš mnoho výskytů.
Následující znaky a slova mají vlastní význam.
Pokud je váš dotaz obsahuje, je vhodné ho uzavřít do závorek nebo znakem '\' zrušit význam následujícího speciálního znaku.
& | , - ; $ ! ? > * # : % _ ( ) [ ] { } \ @
AND OR ACCUM MINUS EXECUTE EXEC SQE SYN PT RT TT BT NT BTG NTG BTP NTP
The IS users are expected to read the messages of high importance, i.e. those that are
marked with
(red). They are notified
of these via their main IS page. The other messages posted on the Noticeboard are of lower
importance and their reading is optional.
Here are a few tips for the effective use of Noticeboard:
Scan the headlines of messages, read those you are interested in, and click on
mark all the messages of medium importance as well as all the 'other' ones on
the page as read - an operation which will empty the page.
Use
to contract the folders with the contents
in which you are not interested. These folders will remain contracted and you will no longer
be notified of the numbers of new messages posted in them via the main IS page.
Provided you want headlines of more messages to be displayed on the main IS page, click on
show also messages of medium importance on the main IS page.
[1] Click to display only the messages of high importance on the main page
A new message can be posted on the Information System by any authenticated IS user that is
either a student (who has not interrupted his/her studies) or staff member. This person
can also edit it, move it into another section, or delete it later on. The owners
of the n_manip or s_studium rights are allowed to administer
all the messages the Noticeboard hosts. All the messages can be read by all the users logged in the Information
System.
Before using the Noticeboard, please make sure you are are familiar with the rules governing the use of
VŠTE Information
System. If this is not the case, please read them through
now. You should refrain from posting the messages promoting racial, religious and political discrimination, making confidential
information (this concerns, for instance, students' grades) and illegally obtained material public (also applies
to that which you are not authorized to distribute), using vulgar expression and those violating basic
principles of decency. The users will be held fully liable for any damage caused by someone else using their
user name and password. Moreover, it is every IS user's duty to select the password that is hard to guess and do his/her
best to protect it from any possible misuse.
NB: All the operations performed by all the IS users are recorded. The violation of any of the rules
may consequently lead to penalties and a serious violation even to being expelled from the University.
The Noticeboard is used for posting messages intended for academic community. For the purpose of posting
advertisements and private messages, please use the advertisements sections.
Please ensure that you specify a reasonable expiration date for your message since the messages that are not up-to-date
prove to be a nuisance. When selecting the group of users to whom your message should be displayed as 'blue', please proceed with
prudence since the messages the users find irrelevant are annoying.
The IS administrators reserve the right to move the messages the users have posted in wrong sections into the right
ones, correct the messages containing mistakes, and remove the messages violating the rules governing the IS use.
If any of the aforementioned changes is made, the users are always informed about it by e-mail.
Important: The messages posted on the Noticeboard expire after some time. The texts that you want to keep
displayed for a long time should be placed in the Documents section.
The Noticeboard users are not allowed to post their messages in unrelated sections
making them irrelevant to the visitors to these. It is also forbidden to
post the same message in more than one section (cross-posting).
Users should refrain from posting on the Noticeboard the messages that
are intended for students of a certain course - something they should do using the discussion
group of the course instead.
Users should refrain from posting on the Noticeboard the messages that
are intended for students of a certain course. It is the discussion group of the course
that should be used instead.
To post a message on the Noticeboard, please click on post a new message. Please ensure that you do so in the appropriate section. Posting the same message in more than one section is forbidden.
Text fields and options:
Name of message:
Use this field to enter a name (headline) for your message that will be displayed on the main page of the Information System to those who have not read it yet. Please make sure that the name is meaningful and indicates what the message is about. Please do not use any HTML tags in the text.
Message:
Use this field for entering your message. The lines containing more than 72 characters are broken into shorter ones automatically. Provided the text contains an Internet address, it is displayed as a hypertext reference. After posting the message, please check it to ensure that it is displayed correctly. If this is not the case, make the necessary changes by editing it. You can also remove it and enter it again.
HTML text:
Provided you are familiar with HTML, you can also use its tags in the text of your message (including the ones utilized for formatting it). When using HTML, the Internet addresses that you want to be displayed as hypertext references should also be enclosed in appropriate tags since otherwise these, as opposed to the previously mentioned text-only mode, are not displayed as references automatically.
Expiration date:
This is the date on which the message expires, i.e. becomes inaccessible to everyone including the person who has posted it. The date must be later than the current one and its provision is required.
Who will see the message as blue:
This section offers menus listing the groups of users to whom the message is to be displayed as 'blue' (i.e. as the one of medium importance) and in the upper part of message list. All the messages posted on the Noticeboard are accessible to all the users logged in the System. Provided you consider your message equally important to everyone, ignore this section.
The message is intended mainly for the students/doctoral students/staff of a certain faculty:
Please specify the groups of users you intend your message for by using the drop-down menus. It will be displayed to these as 'blue' (preceded by
)
and its headline will be placed in the upper part of message list.
The message is highly important and I want it to be displayed to a certain group of users on the main page of the Information System:
Please ask an owner of the n_manip right to mark your message as that of high importance, i.e. the one which is 'red' (preceded by
).
The reference to the list of users who have the n_manip right can be found behind the text of your saved message.
Importance of messages posted on the Noticeboard:
A message can have one of the three degrees of importance. The degree of importance is set for every individual user and depends on whether he/she belongs to the group specified for this degree.
The message is displayed to you as the one of high importance (red) provided you belong to the group of users for whom it is marked as highly important.
The message is displayed to you as the one of medium importance (blue) provided you belong to the group of users for whom it is not marked as highly important.
If you do not belong to any of the groups selected for marking, the message is displayed to you as white (one of the 'others').
Messages displayed to all the IS users:
If you want your message to be displayed to all the users of the Information System as 'blue' (i.e. that of medium importance) or 'red' (that of high importance), post it and contact the System administrators at
giving them a reason why you think the message should be visible to all the 20.000 users. Provided they find the reason well-founded, they will change the priority of your message within the next couple of days. Editing your message in the future will cause it to lose its original setting (i.e. it will cease to be displayed to all the users). In such a situation, please contact the System administrators again asking them to renew the setting.
The tree structure of the folder has been contracted. You can expand
it by clicking on
.
expanded folder
The expanded tree structure can be contracted by clicking on
. The folder will remain contracted until you expand
it, i.e. even the next time you access the Noticeboard. It is therefore advisable that you
contract the folders containing the messages you are not interested in.
message of high importance
Please always read the messages of this kind.
message of medium importance
Provided a message is marked blue, its author has selected you as one of the users
the message is primarily intended for.
other messages
The messages marked white are those that are not primarily intended for you. You can read them, though.
message already read
The message marked with a pair of glasses is the one you have already read or marked as 'read'.
expires
The date on which the message will disappear from the Noticeboard. Provided
you consider the message valuable, save it on your computer since it will not
be available once it has expired.
All the operations performed by all the IS users are recorded and thus those attempting to misuse the Noticeboard are easy to track down. Any attempt of this kind detected will be subject to disciplinary proceedings and might even lead to the culprit being expelled from the University. Minor offenses will be penalized by the offender being deprived of the right to post his/her messages on the Noticeboard.
This option allows you to mark the messages you do not want to read and see displayed on the page as read. To mark a message(s) as read, check it (them) using the check box(es) situated to the left of it (them) and click on mark selected messages as read.
If you are interested in none of the messages a certain section contains, instead of using the check boxes, click on mark the rest of this section as read.
This will mark the messages as read and, provided you have selected the only new mode (see the top of the page), they will no longer be displayed. If you select all, the System will keep displaying all the messages regardless of whether you have read them (marked them as read) or not until they expire.
There is also the option of mark the message as unread placed at the end of every message. Clicking on the option causes the message to appear and act as unread in the future.
The headlines of messages you have already read are no longer displayed on the main IS page and they are not listed among other messages either. To access them, please select all at the top of the page.
It is also possible to put them back on the list of those not hitherto read.
A message posted on the Noticeboard can be removed by the one who posted it there any
time before its expiration date and the owner of the n_manip right.
To locate the message you want to remove, please use the following reference:
Noticeboard and News
To remove the message, click on its name and then on remove the message.
Provided you want the headline of your message to be displayed on the main page of Information System, please contact one of the n_manip right owners. A reference to the page listing these can be found at the end of your message. The messages of high importance are marked red.
The picture for each message is mandatory on the Noticeboard. If the user does not choose from the IS Gallery, he can upload his own image from his device.
1You can upload an image from your device or choose from the IS Gallery.
The ideal parameters of your own image are:
minimum size 1200x450 px, but for best results 1600x620 px, larger is not recommended;
the ideal format is JPG;
the ideal file size is 200 KB, then it will load quickly, the maximum file size is 1 MB.
This page has been written to assist you in adding functionality to
your Web pages stored in the IS environment and to explain the
fundamental differences between administering them on a regular Web
server and IS.
Its aim, however, is not to teach you to create Web pages.
Therefore, it is not intended for the users with no knowledge of Web
design. That is also the reason why no technical support is
provided in this area on the part of IS developers (since it is beyond
their capacity) and why the IS users are requested to contact their
more experienced colleagues provided they encounter any problems during
the designing process.
First of all, go to the my Web section using the following path:
Personal Administration My Web
Then, proceed as follows:
Upload your main page (index.html or index.htm)
from your computer into the root folder (the one you have been taken
to) using Operations → Upload file, or select 'Enter
text and save it as a file' and save the newly entered text as a
file named index.html or index.htm (only one of these).
After uploading (or creating) the file, set its access rights by
selecting (using the appropriate checkbox) index.htm or
index.html (depending on the name of your file) and clicking
on Operations → Change rights and attributes of each item
separately (you can also use the padlock icon
for this
purpose). Then set the right to read to anyone on the
Internet (provided you want your pages to be accessible to
everyone, of course) and click on Save.
Now the address of your Web site is
https://is.vstecb.cz/www/your_personal_identification_number/index.html
or, provided you have a user name,
https://is.vstecb.cz/www/your_user_name/index.html).
For the instructions on how to work with the HTML editor, click
here.
Provided you use the plain text editor in combination with the HTML
one, you may encounter the situation where the latter does not display
your image while your browser loaded with the page does so (this
problem also occurs when relative addresses are used). Therefore, it
proves helpful to load one browser window with your page and another
with the editor. Thus you can easily view the changes you have made in
your page by reloading the contents of the former (using the
Refresh/Reload button of your browser) each time you save them
in the editor.
When inserting an image located in another folder into your HTML
code, you should use its abbreviation (not its name!). The
HTML editor inserts this automatically. Therefore, if you are
entering the path manually using the plain text editor, the image
tags should have the following format:
<img alt="your_description" src="/www/your_personal_identification_number/folder_abbreviation/your_image.gif"/>.
If you want your page to be accessible to people outside the
Information System as well, you should delete the /auth part
from the tag that has been generated by the HTML editor. Hence, the
URL part of the tag should finally have the following format:
/www/your_personal_identification_number/folder_abbreviation/your_image.gif.
NB: The plain text editor is case-sensitive!
Hypertext References
When inserting hypertext references using the plain text editor,
proceed the same way you would if you were writing the code in
Notepad, Wordpad, or any other similar program. The hypertext
references should therefore have the format of, for instance,
<a href="https://www.seznam.cz">odkaz</a>. When working with the HTML editor, you can use the icon for
inserting references.
The Information System allows its users to set a wide range of access
rights for their folders and files. Provided you want your folder or
file to be accessible to anyone, set its right to read to anyone on
the Internet. You can also make the folder or file accessible to
only a limited number of people such as IS users, teachers, a concrete
person, etc.
The access rights can be specified for each folder or file separately.
Provided you have created a folder where you plan to store the material
that no one else should be allowed to access, do not set any right to
read for it.
If you want to allocate some space to the material a team of IS users
will be working on, create a new folder and limit its right to
read and right to upload to the individual members of the
team using their personal identification numbers (učos). This will
enable all the members of the team to upload files into the folder and
read the ones uploaded by the others.
The address of your Web site stored in the my Web section is
https://is.vstecb.cz/www/your_personal_identification_number/index.html, or, provided you have a user name,
https://is.vstecb.cz/www/your_user_name/index.html). To
create/select a user name, please use the following path:
Personal Administration select user name
File addresses:
To find out what address a page on your Web site has (not just that of
index.html), please click on its
, which will
display the information about the file.
To change the properties of the file (e.g. its name, type, and encoding
system), click on
.
To change its contents in the HTML editor, use
.
Provided your Web site consists of multiple files, it is advisable to
organize these into folders. When creating a new folder (e.g. using
Operations → Create folder), remember to enter its name as
well as its abbreviation. The latter is consequently inserted in the
address of the file so that it has the format of
https://is.vstecb.cz/www/2660/Images/Plants blossoming in spring/plant.jpg
containing full names.
Address within Manager:
The address in the format of
https://is.vstecb.cz/auth/www/my_personal_identification_number/index.html?info takes you to the authenticated part of File Manager
allowing you to work only with this file. The section enables you
to access the information about the file as well as the tools you
can use to edit it the way described above.
Address within Manager for the users outside IS:
The address in the format of https://is.vstecb.cz/www/my_personal_identification_number/index.html?info takes you the
unauthenticated part of File Manager displaying the information
about the file. However, you can access neither the tools used
for its editing nor its access statistics. The file can only be
opened (its contents displayed).
Address within IS:
The Address within IS is the one of your Web site that
can only be utilized by the visitors logged in the Information
System. The visitors outside the System cannot browse it at this
address.
Address for the users outside IS:
This address can also be used by the visitors outside the
Information System.
If the System does not find the requested file at the address that the
visitor entered into his/her browser (e.g. www.is.vstecb.cz/www/2660/folder/file.gif),
it looks for the file in its parent folders, i.e. first at the address
www.is.vstecb.cz/www/2660/objekt.gif and then, if it fails to find
the file again, it moves up one level again and starts another search.
Unless the file is found, this operation is performed for up to ten
times.
Using this section, you can keep track of how frequently visited
your Web site is. The feature only works for files, not folders. To view
the access statistics, please use the following path:
Personal Administration My Web the
Tools icon of the file whose access statistics you want to browse
access statistics
Every IS user (a member of MU staff or student who has not completed or
interrupted his/her studies) has his/her own Web section with a
certain amount of free space allocated to it. The information about the
currently available free space (as well as the space occupied) is
displayed to him/her after he/she enters the application. Provided
he/she attempts to upload into his/her Web section a
file that causes its space limit to be exceeded, the Information System
does not let him/her do so.
The System administrators reserve the right to change the free space
limit if the need to do so arises.
For more information, go to:
https://www.jakpsatweb.cz/ - available in Czech
Instructions on how to create the first Web site with lots of examples
and a list of HTML tags (good for beginners and those who know little
about HTML) can be found at:
https://polopate.jakpsatweb.cz/ - in Czech
Books on Web design:
Návrh a tvorba webů - written in Czech
Subtitle: Vytváříme zákaznicky orientovaný web
The book focuses on all the areas of Web design ranging from the Web
page layout, to navigation, administration, e-commerce, and debugging.
The book has been translated into Czech from its English original
titled The Design of Sites.
Webdesign pro úplné začátečníky
This book (only available in Czech) provides fundamentals of Web design
and instructs the reader in how to build a Web site from scratch
focusing on making its first draft, creating graphics and incorporating
these in the site, making the site functional and interactive. All the
instructions are presented clearly and they do not require the reader
to have any previous experience in the area.
Web design - written in Czech
This book full of useful tidbits, which is a Czech translation of
Web Design Complete Reference, has been published as
a complete guide intended mainly (but not only) for advanced Web
designers.
Ovládněte kaskádové styly! - written in Czech
This book targets the effective use of cascading style sheets (CSS). It
has been translated from its English original titled
Eric Meyer on CSS: Mastering the Language of Web Design.
Other books - mostly in Czech
This page contains a list of other books on Web design.
mám záložky (odkazy do internetu, „Oblíbené“, Bookmarks) na jednom bezpečném místě v IS VŠTE,
pokud mne něco zaujme, založím veřejnou záložku i pro ostatní,
vidím, jaké záložky založili ostatní.
Zde jsou záložky, které si v poslední době uložilo nejvíce lidí (tzv. žhavé záložky):
https://is.vstecb.cz/auth/ln/hot.
Zobrazit žhavé záložky.
Veřejné záložky jsou k nahlédnutí i uživatelům nepřihlášeným do IS VŠTE, např.
https://is.vstecb.cz/ln/hot.
Štítky (anglicky tag) si k záložkám vepisuji jako nehierarchická
klíčová slova - o čem
záložka je, proč jsem si ji uložil, co si o ní myslím, k čemu ji chci
později použít. Pro představu zkuste
https://is.vstecb.cz/auth/ln/tag/radioZobrazit.https://is.vstecb.cz/auth/ln/tag/brno+cajovnaZobrazit.
Názvy štítků lze vepsat do adresy, jak je zde naznačeno, nebo v agendě
použijte vyhledávací pole.
Co znamenaji údaje u zobrazené mé záložky?
1 Zadám-li štítek „favorit“ nebo „favourite“, je záložka dostupná v pohledu „oblíbené“.
2 Štítek s kódem předmětu zakončený vykřičníkem zadal učitel předmětu.
3 Cizí štítky: tuto záložku mají uloženou i jiní lidé, s těmito štítky.
4 Možnost záložku upravit.
5 Počet osob, které mají tuto záložku: odkaz vede na seznam osob a podrobnosti.
6 Kdo záložku jako první vložil do IS VŠTE a kdy.
7 Odkaz na veřejné záložky osoby, která záložku první vložila do IS VŠTE.
Nechcete-li sdílet záložky, je možné si položky ukládat výhradně jako soukromé. Pokud pracujete
z mnoha počítačů (různé počítačové učebny, studovny, domov, kolej, ...), je pro vás
stále dostupná báze vašich odkazů přínosem - nemusíte
synchronizovat mezi jednotlivými počítači a prohlížeči; je k dispozici
všude, kde se
dostanete k IS VŠTE
Kdykoli vás zaujmou materiály, které takto poskytují
kolegové, můžete se také do sdílení (do informování o tom, co jste kde na webu
zajímavého četl) zapojit.
Při vkládání nové záložky vyplňte Název, Adresu, ev. Popis. Pokud systém tuší, jaké štítky se k záložce hodí či jste již používali, nabídne vám je:
1 Náhled výběru štítků.
Kliknutím štítky vkládáte a opětovným kliknutím odstraňujete, do políčka můžete připsat další. Štítek „favorit“ se nabízí vždy, můžete jím záložku označit jako oblíbenou.
Veřejné štítky: o čem záložka je, jaká je. Informace využitelné ostatními uživateli. Soukromé štítky: k čemu vám záložka je, značky pro další použití (ukol_precist,
darek_koupit), kterými nechcete „rušit“ veřejnou znalostní bázi.
Soukromá poznámka: text poznámky nevidí další uživatelé. Příznak „soukromá záložka“: celou tuto záložku nevidí další uživatelé.
Štítky pro předmět a pro obor: používejte je, upozorňujte svoje spolužáky
na zajímavé zdroje.
Odkaz „rychle“ v libovolném seznamu záložek
zobrazí formulářové políčko, ve kterém můžete upravit štítky k
záložce. Ostatní údaje budou okopírovány ze vzorové záložky beze
změn.
Pokud chcete touto metodou přidat soukromý štítek, uveďte před
něj znak dolar „$“, např. $proklikat.
Práce do školy, výzkum – označte si podklady k psaní eseje či
článku společným štítkem, budou se vám lépe dělat citace.
Studijní obory – máte zajímavé zdroje k oblasti, kterou
studujete? Označte je např. obor_sociologie či
obor_fyzika. Lze očekávat, že ostatní přidají zase svoje.
Co jste si přečetli a zaujalo – články na libovolné téma,
které stojí za přečtení, ev. je chcete doporučit ostatním.
Cestování – chystáte se někam? Najděte a uložte si možnosti
ubytování, stravování, zajímavé destinace. Při hledání štítky kombinujte,
např. znojmo+vino
Vaření – ukládejte si recepty štítkované např. dle surovin,
ceny, způsobu přípravy, ...
Hodnocení – vyjádřete počtem hvězdiček váš názor na
odkazovanou restauraci, knihu, článek ...
Odborník doporučuje – zajímá vás, které odkazy k určitému
tématu si založil známý expert? Mají adresu
https://is.vstecb.cz/auth/ln/UCO.
Pohled na záložky je dostupný i uživatelům nepřihlášeným do IS VŠTE na adrese is.vstecb.cz/ln/ (nemohou do agendy
přispívat). To vám dovoluje používat agendu např. pro vaše veřejné seznamy
Co jsem poslední dobou četl zajímavého – evidujte si v systému a odkaz na seznam dejte na svůj web, svůj blog
Nahoře v navigační liště si můžete přepnout pohled na záložky dle různých kritérií.
Pro přístup ke svým záložkám volte:
moje: oblíbené – co mám označeno štítkem favorit nebo favourite,
moje: všechny – vše, co mám uložno jako záložku.
Pro orientaci co nového v agendě přibylo, co uživatelé na internetu
čtou a zakládají:
ostatní: žhavé – co si nedávno uložilo více lidí,
ostatní: populární – co má uloženo nejvíce lidí,
ostatní: nejnovější – poslední uložené záložky,
štítky – všechny používané štítky.
Zajímají-li vás záložky označené konkrétním štítkem nebo založené
konkrétní osobou, použijte vyhledávací pole a v menu zvolte „ve štítcích“.
1 Možnosti přístupu k záložkám.
2 Pole pro vyhledávání ve štítcích.
Slova ve vyhledávání lze kombinovat pomocí znamének plus a minus:
kas+linux
Záložky uživatele s přezdívkou „kas“, které označil štítkem „linux“ (nebo záložky označené štítky „kas“ a „linux“ zároveň).
linux+1885
Záložky uživatele s učo 1885 označené štítkem „linux“.
recept-cukr
Záložky označené „recept“, ale neoznačené „cukr“.
Do vyhledávacího pole můžete zadat také url - adresu záložky
(musí přesně odpovídat).
Lze také plnotextově vyhledávat v názvech, popisech a poznámkách
(přepněte v menu na „v textech“). Toto vyhledávání je realizováno jiným mechanismem, než hledání
mezi štítky, a proto se v něm používají jiné operátory pro případné
kombinování:
víno MINUS Znojmo
Záložky, jejichž texty obsahují víno, ale neobsahují Znojmo.
víno AND Znojmo
Záložky, jejichž texty obsahují víno i Znojmo.
Pokud si nejste jisti přesným tvarem hledaného slova, lze jej doplnit
znakem procento, tj.
vín%
vyhledá výskyty slov víno, vína, vínový ap.
Lze také vyhledat záložky neoznačené žádnými štítky - odkaz „moje záložky bez štítků“ ke konci
pravého sloupce s vašimi štítky. Jsou dostupné také na adrese /ln/učo/>/bez či
/ln/učo/>/without. Cizí veřejné záložky bez štítku najdete pod volbou „štítky“
v horní liště (pod mrakem štítků), nebo na adrese /ln/tag/bez, /ln/tag/without.
Tip
Do agregačních mechanismů nejsou zahrnuty záložky, v jejichž URL
se objevuje „is.vstecb.cz/“ Takové záložky se nevypisují v pohledech žhavé
záložky, populární a nejnovější.
Mrak štítků zobrazuje štítky, které byly nejčastěji použity k označení záložek. Pomáhá tak nejen k lepší orientaci na stránce, ale i k vyhledávání. Častěji používané štítky jsou zvýrazněny větším písmem. V mraku štítků tak vidíte, které štítky jsou ve vybrané kategorii použity a můžete podle nich dále vyhledávat. Mrak štítků se mění podle toho, v jaké kategorii štítků se právě nacházíte. Pokud si nějaký štítek rozkliknete, bude mrak na nové stránce odkazovat na související štítky. Štítky mohou být seřazeny podle abecedy nebo podle četnosti výskytu.
1 Ukázka mraku štítků.
Pokud vám pro zobrazení štítků nevyhovuje mrak, můžete si nejpoužívanější štítky zobrazit v seznamu. V závorce se pak zobrazuje četnost výskytu štítku.
(tj. s vykřičníkem na konci)
jsou záložky k předmětu, které uložili bývalí i současní vyučující
tohoto předmětu. Můžete tedy zvolit, zda vás zajímají výhradně
odkazy doporučované učiteli, nebo cokoliv co k předmětu kdokoliv
zařadil (bude typicky obsáhlejší, ale možná může být méně kvalitní).
Jak lze Záložky využít v e-learningu? Odkazy na zajímavé zdroje v internetu
má mnoho učitelů zájem studentům poskytovat - nejčastěji formou souboru
se seznamem odkazů zavěšeným do Studijních materiálů předmětu. Agenda
Záložky přináší nové možnosti: odkazy lze snadno editovat, štítkovat, třídit
a zejména do nich mohou snadno přispívat studenti. Zapojení studentů
do spoluvytváření informačních zdrojů je v e-learningu trendem. Jako
učitel můžete například:
vystavit záložky k určitému tématu,
označit je štítkem a např. v textu
studijního materiálu na ně upozornit - jsou na adrese
https://is.vstecb.cz/auth/ln/tag/zkratka_fakulty:kod_predmetu+jmeno_stitku
tj. např.
https://is.vstecb.cz/auth/ln/tag/FI:PV005!+web
Variantu bez vykřičníku použijete, pokud chcete vyhledat i ty
záložky, které k předmětu nevložili učitelé, ale lib. uživatelé:
https://is.vstecb.cz/auth/ln/tag/FI:PV005+web
vystavit seznam doporučené literatury, jejíž položky jsou dostupné
on-line (články, volně šířené publikace). Pokud zadáváte studentům
např. každý týden čtení, lze toto snadno vyznačit štítky, např.
Snadnou editací štítků můžete seznamy pohodlně měnit, doplňovat. Může
to být pohodlnější, než udržovat seznamy odkazů např. v souborech ve Wordu.
Studentům jen sdělíte zvolenou konvenci (např. že mají hledat
„cteni+prvni_tyden“) nebo jim v Interaktivní osnově či jinde připravíte
odkaz se seznamem pro daný týden;
zadat studentům vyhledat/aktualizovat záložky k určitému
tématu a strukturovaně je oštítkovat a popsat (vyjádřit, co obsahují,
proč by na ně čtenář měl klikat, jak jim připadají kvalitní, ...).
Pokud vaši studenti zpracovávají např. referáty k danému tématu, může
být součástí úkolu průzkum a doplnění „Dalšího čtení k tématu“
prostřednictvím této agendy;
vyzvat studenty, aby si zkopírovali a okomentovali záložku -
vložte odkaz např. na určitý článek. Pomocí „přidat k mým“ si student
snadno odkaz zkopíruje a může u něj vyplnit štítky a popis. Pod odkazem
např. „14 osob“ se pak zobrazuje souborná stránka, kde lze popisy
zhlédnout.
Někdy se v těchto systémech kromě sběru komentářů sbírá také „agregovaný
názor“ studentů: v popisu k vloženému článku formulujte dotaz, např.
„Myslíte si, že autor Platónovo východisko správně pochopil? Vyjádřete
svůj názor štítkem ano / ne“ a přidejte k záložce štítky „ano“ a „ne“.
Student pak může použít volbu „rychle“, umazat štítek, pro který „nehlasuje“
a záložku si uložit. Cizí štítky jsou u záložky vypsány v pořadí
dle četnosti použití, tj. je vidět, zda studenti hlasují spíše „ano“
nebo „ne“. Můžete samozřejmě nechat „hlasovat“ i z více možností, např.
pomocí počtů hvězdiček ap.
Jsou to ty vaše Záložky, které mají štítek favorit nebo favourite.
Máte je přehledně pod odkazem „oblíbené“ a lze u nich nastavit pořadí.
Typicky pro:
odkazy jinam, které používáte hodně často: vaše e-mailová schránka
na cizím serveru, vaše oblíbené rádio, předpověď počasí, slovník,
encyklopedie wikipedia a podobně;
odkazy do ISu, které např. aktuálně používáte více, ale nejsou
dostupné „na jeden klik“ z titulní strany - např. přehled poznámkových
bloků, poskytovna předmětu, který nemáte zapsaný, diskusní vlákno, kde
čekáte na odpověď.
Note
Některé stránky IS VŠTE - zejména výsledky
vyhledávání v různých agendách - nemusí být možné do Záložek zařadit,
resp. po otevření takové Záložky se vám zobrazí jen nabídka vyhledávání
a nikoliv dříve vyhledaný výsledek. Musíte v konkrétním případě
vyzkoušet, zda umožňuje.
Pro export záložek si nejprve vyberte záložky, se kterými chcete pracovat, v navigační liště nahoře na stránce (volba „moje oblíbené/všechny“).
Následně zvolte v pravém sloupci v sekci Správa záložek možnost „export“. V aplikaci pro export můžete upřesnit rozsah exportu či typ výstupu.
Pokud chcete do IS VŠTE nahrát svoje záložky z jiné služby pro ukládání záložek, vyberte v sekci Správa záložek možnost „import“ a následně dohledejte
soubor ve vašem počítači.
Štítek je jedno slovo (bez mezery), které je vepsáno ke konkrétní
záložce a podle kterého pak můžete vyhledat skupinu záložek.
Ve štítku lze používat pouze písmena (i s diakritikou, malá i velká),
číslice, znak podtržení (_) a hvězdičku.
Záložky označené štítkem nebo kombinací štítků jsou na adrese:
https://is.vstecb.cz/auth/ln/tag/stitek1+stitek2
Záložky označené štítkem1 a současně neoznačené štítkem2 jsou na adrese:
https://is.vstecb.cz/auth/ln/tag/stitek1-stitek2
Tipy:
Štítek formulujte v 1. pádu jednotného čísla, tj. např. „internet“
nikoliv „internetový“, „internetové“ nebo „hra“ nikoliv „hry“. Štítky se tak
méně množí.
Slova v nutně víceslovných štítcích oddělujte podtržítkem, např. dvur_kralove.
Rozhodněte se, zda budete používat štítky česky, anglicky, s diakritikou, bez
a dodržujte to - budou se vám méně množit. Většina prohlížečů umí
zobrazovat adresy s diakritikou s URL. Pokud vyhledáte štítek
s diakritikou a nic se vám nenajde, např. is.vstecb.cz/ln/tag/víno,
zkuste ještě bez diakritiky: is.vstecb.cz/ln/tag/vino - chyba může být
ve vašem prohlížeči. V seznamech/mracích štítků se štítky slučují - nevidíte
vícekrát štítky lišící se pouze diakritikou nebo velkými/malými písmeny.
Nápadným formátováním (velká písmena, hvězdičky, více podtržítek, ...)
si lze opticky zvýraznit soukromé štítky, které třeba chcete mít v abecedním
seznamu svých štítků pohromadě (např. __ukol_tisk, __ukol_cist, __ukol_koupit)
Víte, že s dalšími uživateli sdílíte podobný speciální zájem (anime, web 2.0,
Carl Gustav Jung, ...). Domluvte se na systému štítkování – štítky se pak méně množí.
Jako štítky nelze používat slova „bez“ a „without“, protože takto systém označuje
záložky, které nemají žádný štítek.
Podobná služba je k dispozici např. na linkuj.cz, jagg.cz, del.icio.us,
digg.com. Jedná se o tzv. social bookmarking. Více o tomto fenoménu
najdete např. v záložkách na adrese
https://is.vstecb.cz/auth/ln/tag/social_bookmarkingZobrazit.
V čem může být přínos obdobné služby v univerzitním prostředí?
Do sdílení se zapojí i lidé, kteří podobné služby na internetu
nenavštěvují, ale IS VŠTE používají aktivně.
Služba není anonymní – vidím, kdo záložku přidal, kdo a jaký má na
záložku názor (podle veřejných štítků).
Univerzitní komunita je (oproti širému internetu) poměrně sourodá:
zajímají nás informace o našem městě, o studiu, o studentském trávení
volného času, nebo o učení, cestování, vědě, ... Lidé mají obvykle zájem
o dění v oboru, který studují nebo vyučují. Sdílení odkazů do internetu
tak může být velmi přínosné.
Služba agreguje záložky týkající se studijních předmětů – snadno
můžete se zajímavým materiálem seznámit své spolužáky či své studenty.
Platí pravidla pro používání Informačního systému VŠTE.
Je povoleno vkládat záložky odkazující na komerční subjekty či nabídky služeb.
Je zakázáno spamovat opakovaným vkládáním stejných nebo podobných položek
s cílem dosáhnout efektu inzerce. Není povoleno duplikovat funkci Vývěsky
ISu.
Štítkujte záložky s rozmyslem. Neoznačujte např. oborovými štítky relaxační
(vtipný ap.) materiál – ctěte omezený čas jiných uživatelů, kteří v agendě
hledají např. užitečné zdroje ke svému studiu.
The service allows students to make contact with other students in a
particular programme or location. Active students can use the service to get in touch with classmates from certain
courses/seminars they are attending or examination dates they are enrolled in.
The contacts that are made public can be used practically, e.g. for living together, carpooling,
exchange of study materials, etc.
Students can make themselves public in a course/seminar or examination date in application:
The Information System Student During studies Make yourself public in a course
Making myself public will facilitate contact between classmates, those who made
themself public will see others who did so. Clicking on the name of the
course/seminar group will bring up the option to "Make me public" and then list
other classmates who made themself public.
1 Make yourself public in a course.
Students can make themself public to other students in their
programmes and district:
The Information System Meet People (Mine) Zveřejnit se Zveřejnění mých oborů a okresu
By clicking on the „Zveřejnit se“ link, the user can view a list of students by each of their programmes, and a list of other colleagues made
public is listed directly to the right of the page.
By enabling the feature, the user publishes his/her district of residence and the courses or
seminars/examination dates he/she is enrolled in. At the same time, he/she will have access to
a list of other students with whom he/she has the same published data.
This option allows current students to make themself public globally in all past, present and
future registered or enrolled courses, registered seminar groups and/or registered examination
dates.
The Information System Meet People (Mine) Zveřejnit se
Under the „Zveřejnění v mých předmětech a seminářích“ tab, select any or all of the options in
the „Globálně se zveřejnit ve všech minulých, současných i budoucích“ section and confirm
your selection with the „Změnit“ button.
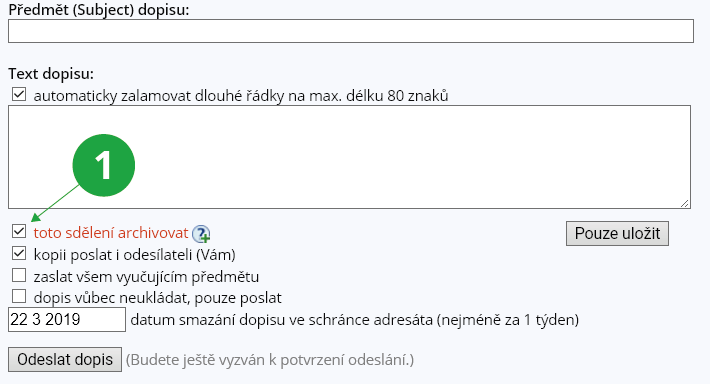
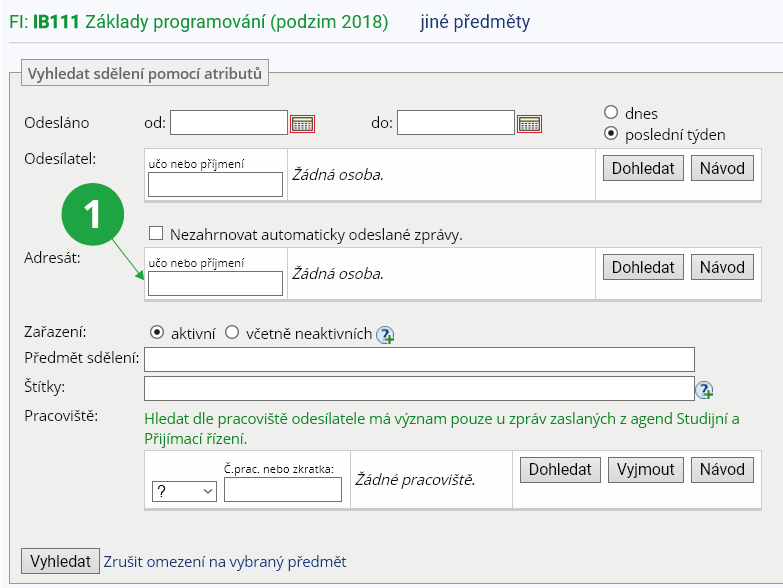
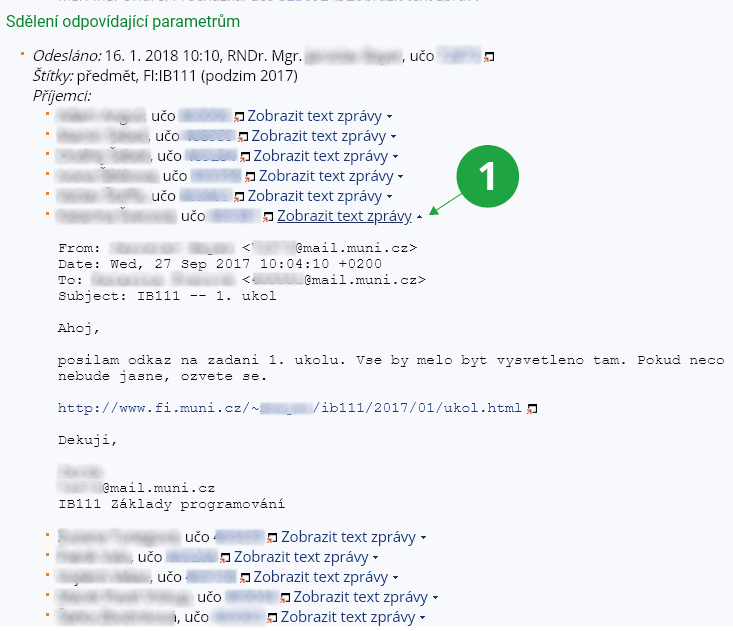
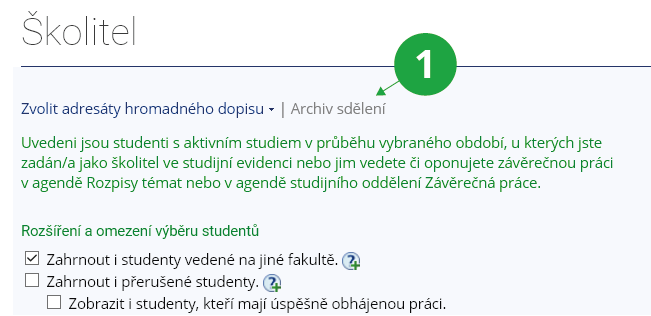
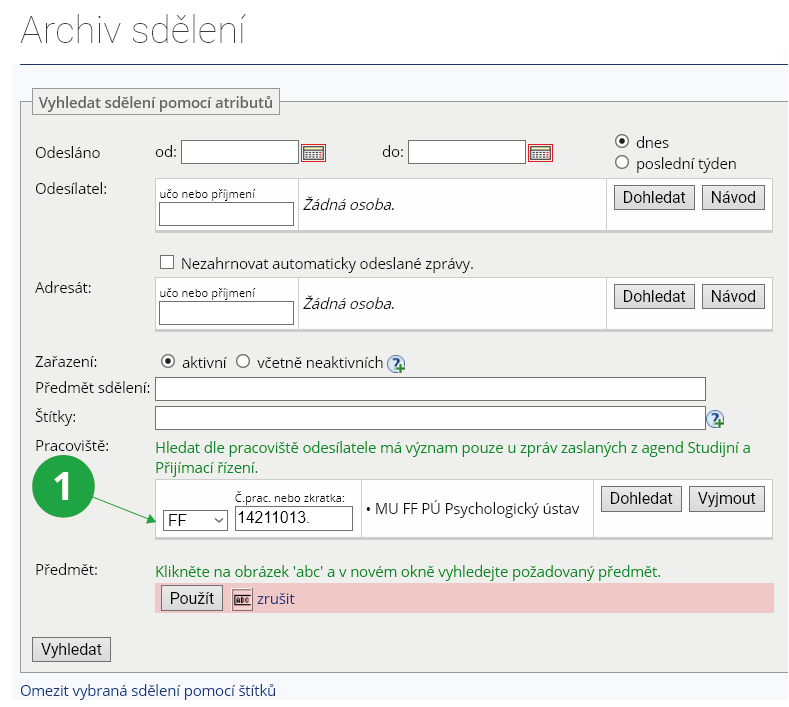
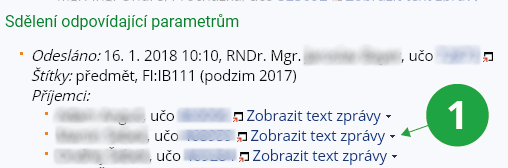

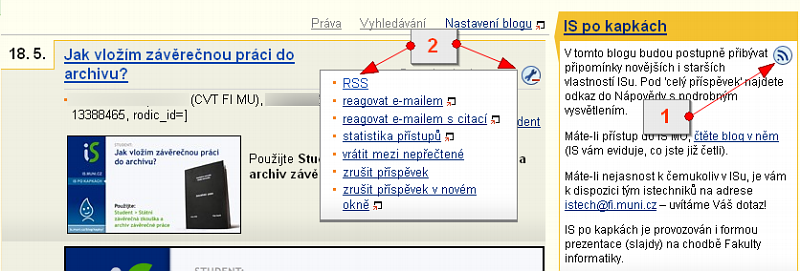
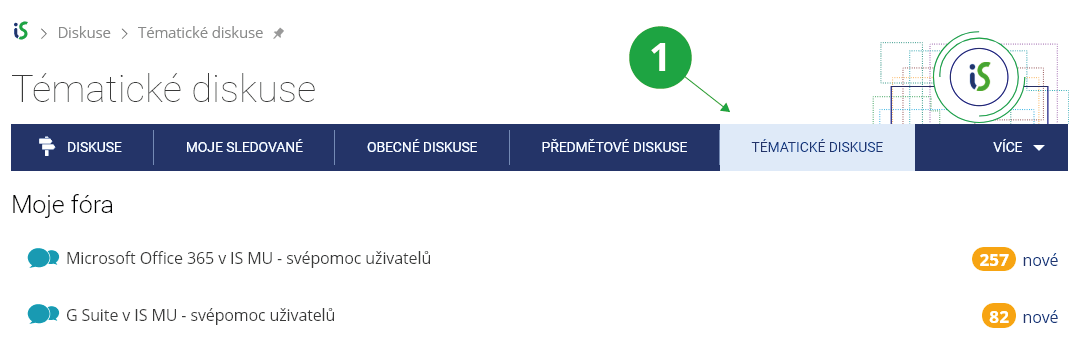
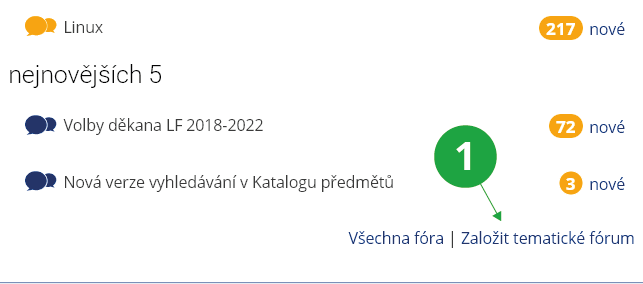
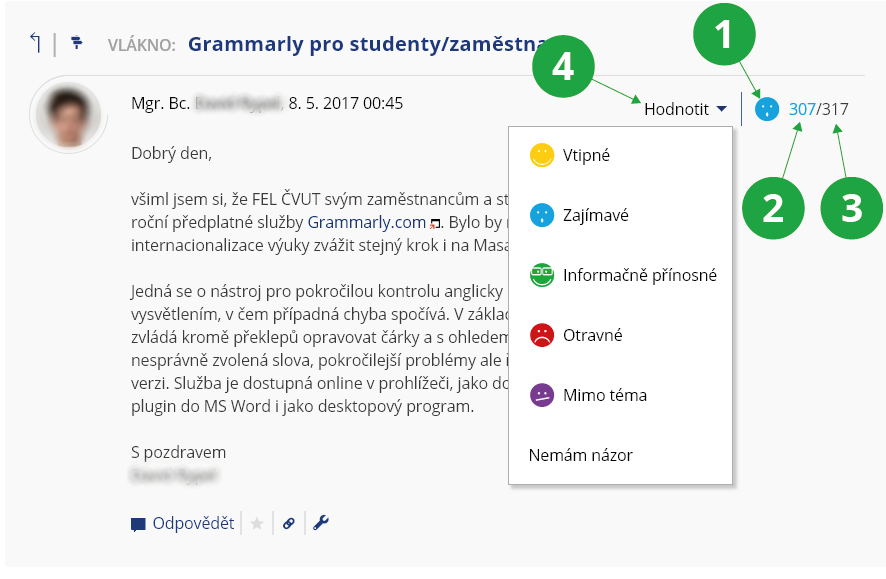
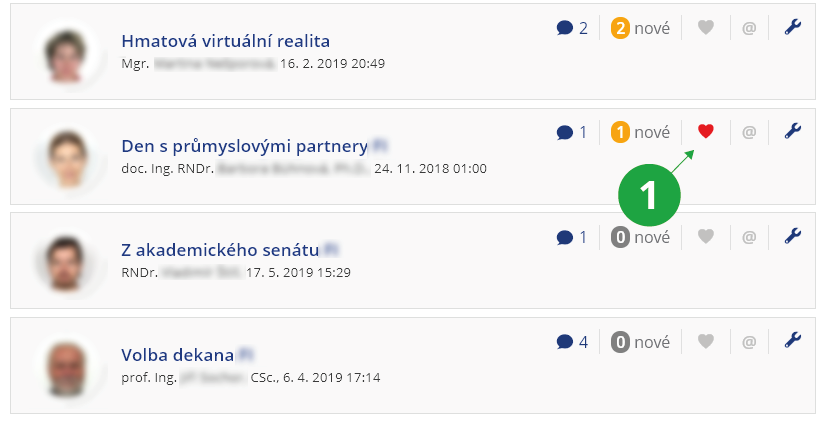
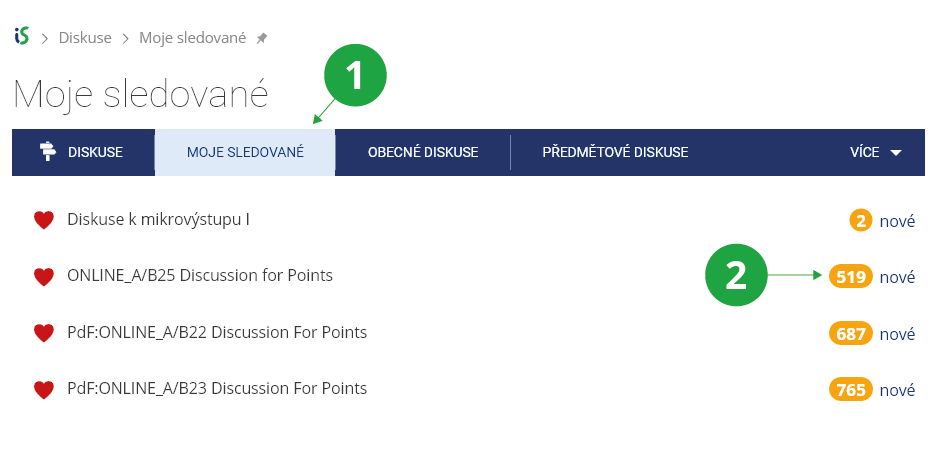
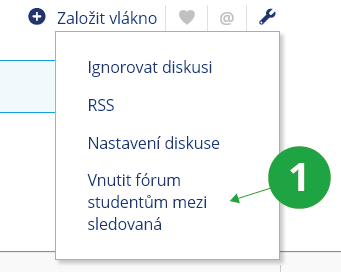
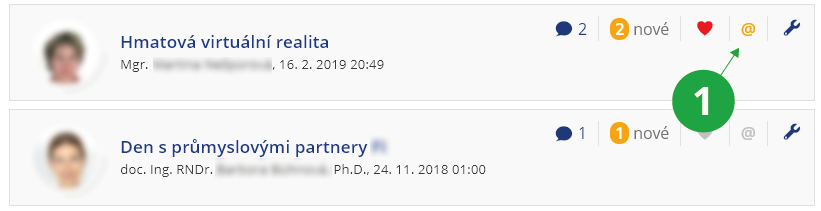
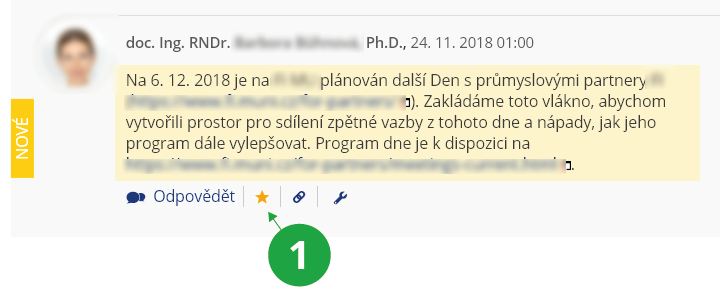
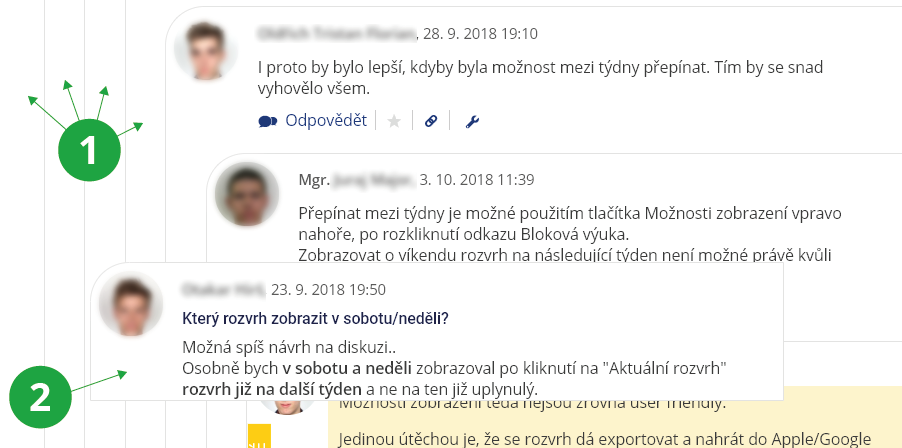
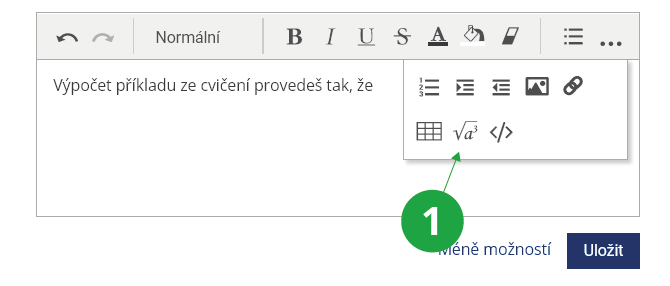
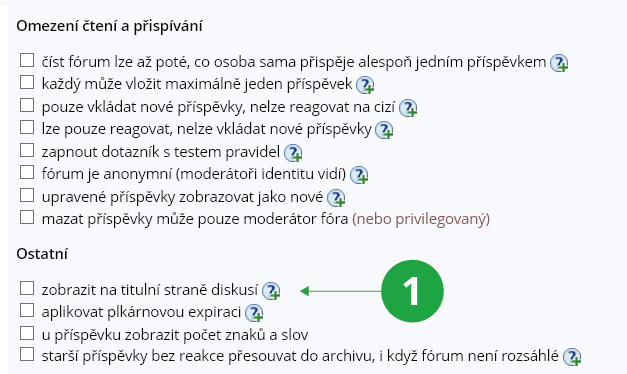
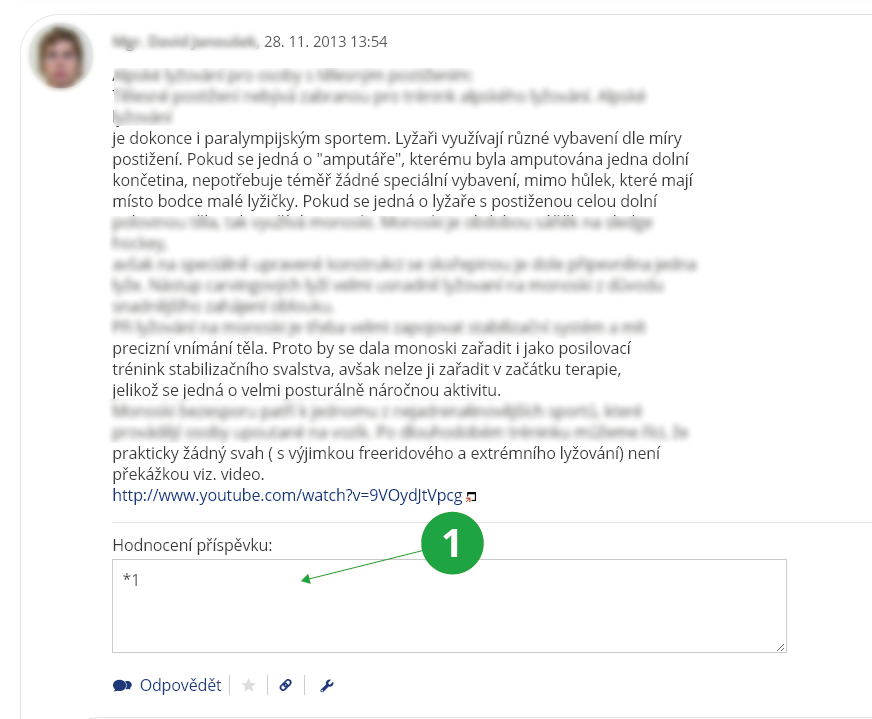
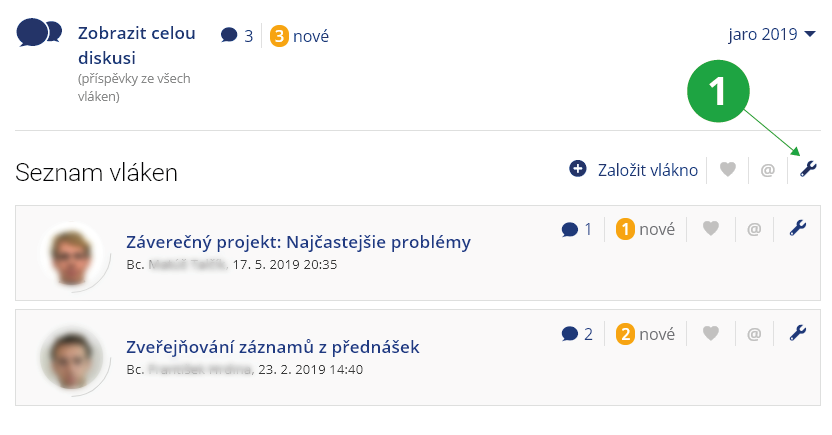
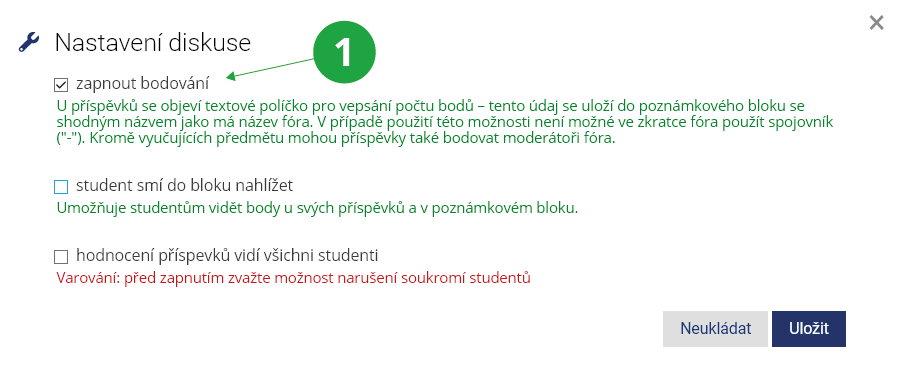
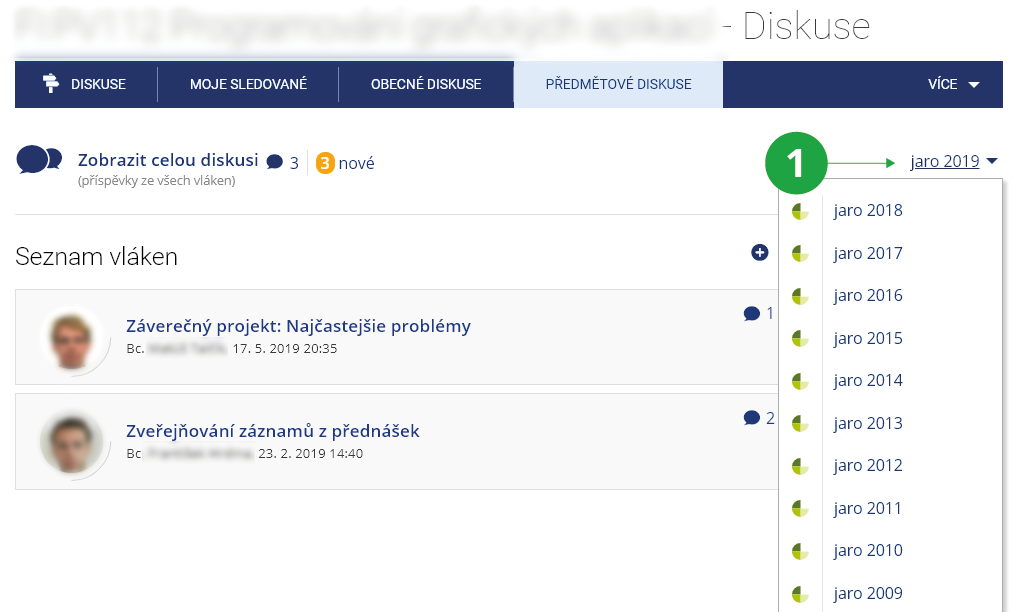
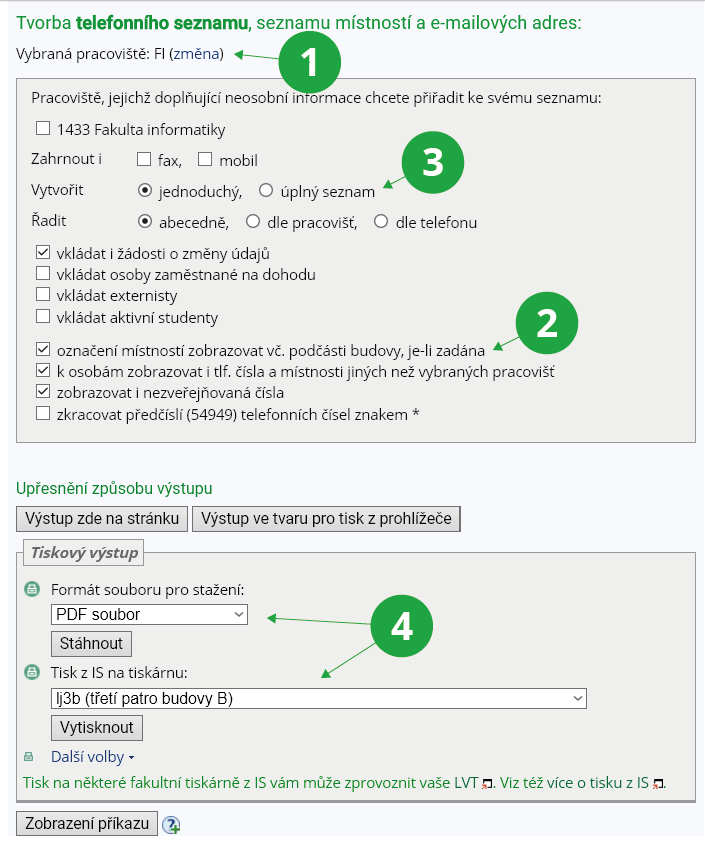
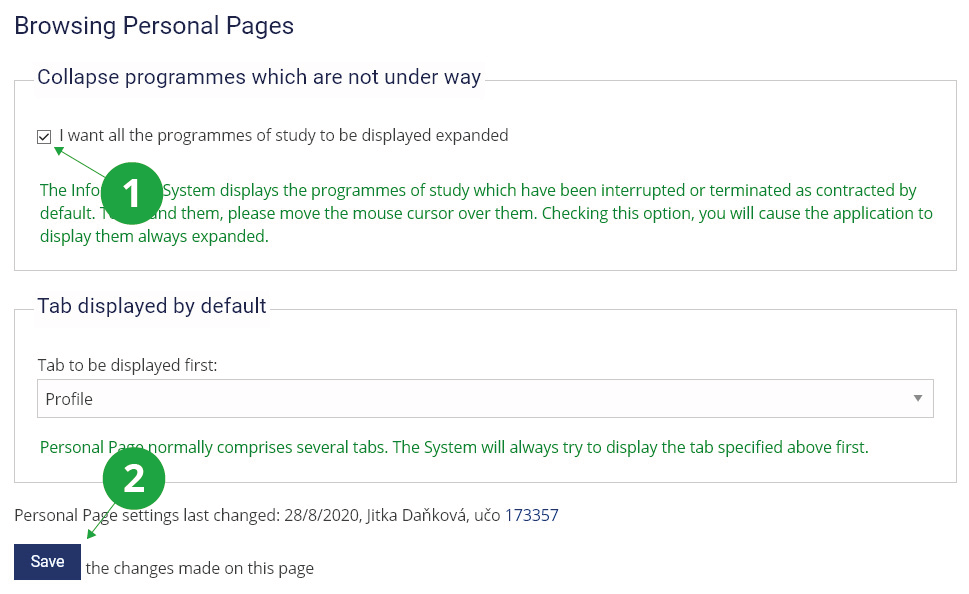
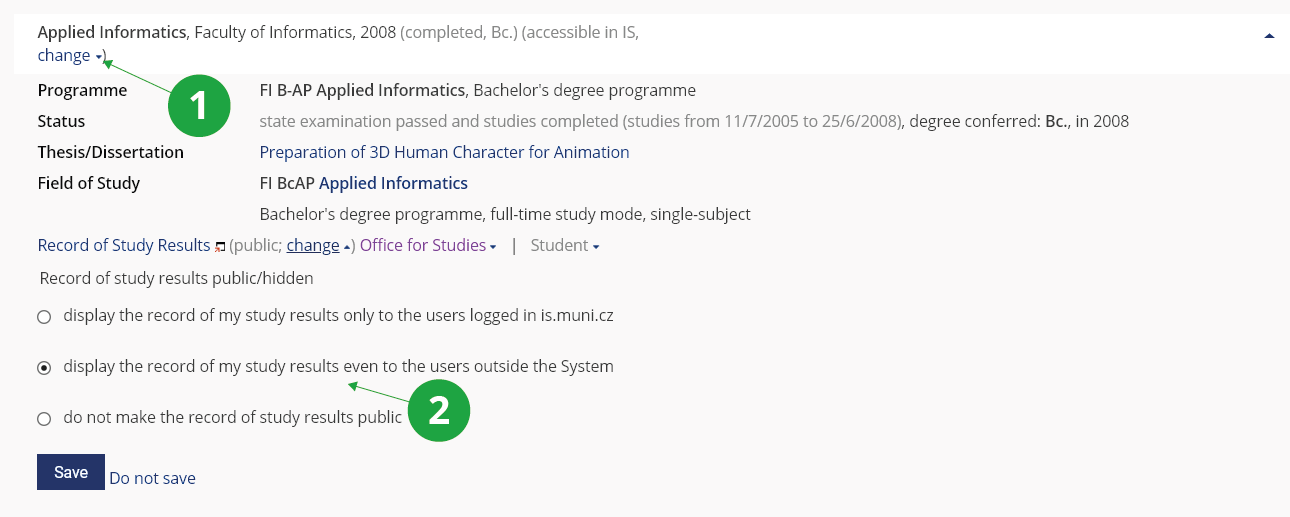

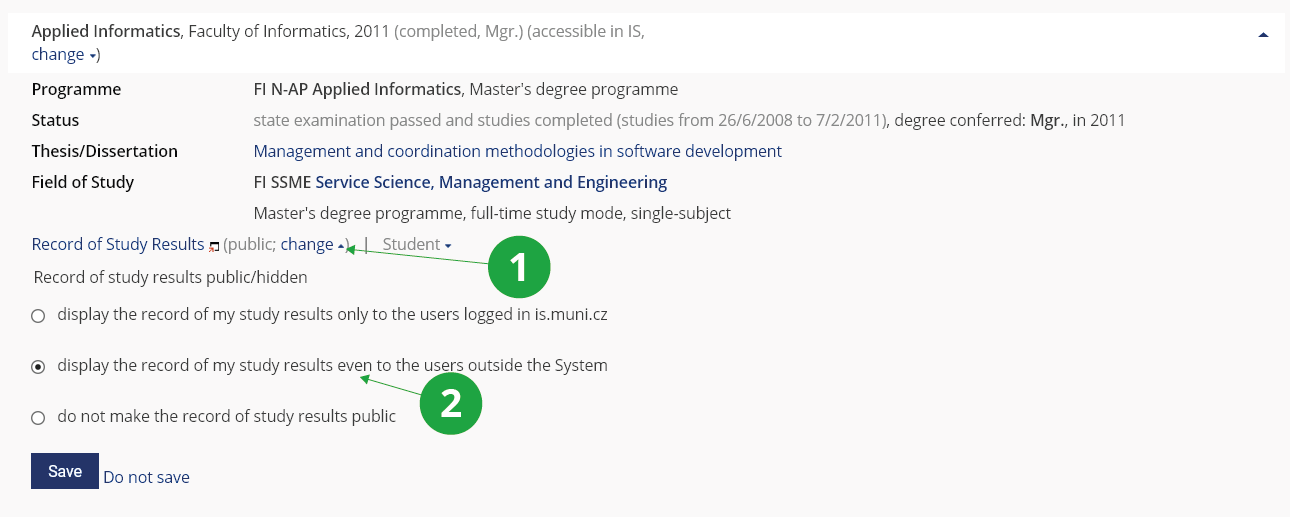

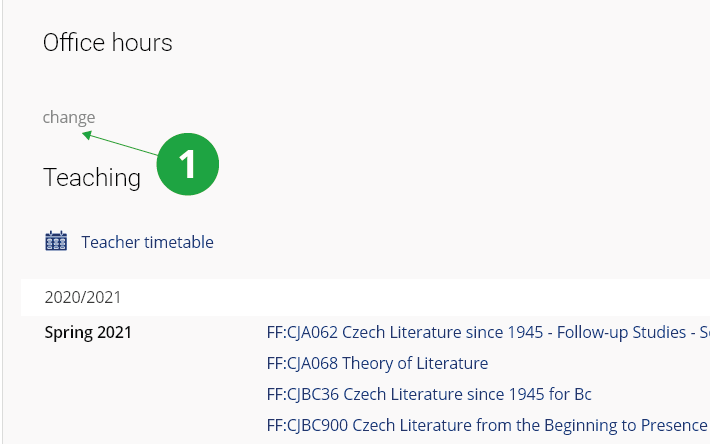
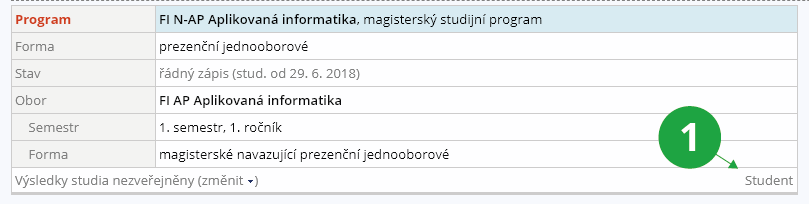
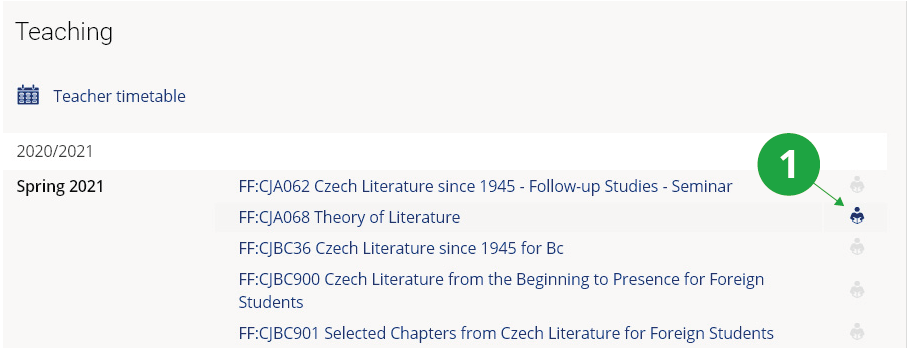
 fi
fi muni
muni